Sunday, October 21, 2012

Muu Muu Magic

I've been waiting for a long time to do this one! As soon as I bought this muu muu at The Salvation Army in Fulton, I was intrigued by it's sheer awfulness. As are most muu muu's, it was eerily similar to a parachute with a head-hole. (If you don't believe me, see these.) Given, I had not the slightest idea on what to do with it all this time, up to and including this morning when I hunkered down to tear it apart, but I was bound and determined to turn this into anything something.

Here's the beauty, with nothing yet sewn or torn apart. I didn't even untie the God awful bow at the top. If that's not blogger dedication, I don't know what is.
My "holy crap I spent money on this" look.


Speaking of price - this monstrosity was purchased at $2.99, so I figured even if it turned into a scarf I'd be making out. However, I really did fall in love with the bright pinks and oranges, and something about the brown in the swirls screamed "I need to remain a dress and you need new brown boots". Look close - I'm sure you'll see it too.
 
So it was decided: the muu muu will be a dress. This actually worked out well because that means it was a matter of taking it in instead of ripping it out and, after my last project, my seam ripper definitely could have used the rest. So the first thing I did was turn it inside out to start my pinning.

And I found a pocket (yup, just one)!! Who saw that coming. Sadly, I had to chop it off. First of all, pockets add volume to the hips. Not ideal. Secondly, I would have had to take all the inches from the dress from the opposite side, as I am completely clueless on how to bring a garment in while keeping pockets intact, and that would have been completely lopsided.

Before my pocket killing, I decided to chop off the bottom. Although I was keeping it as a dress, it fell in that awkward spot just below my knees that is severly unflattering on a 5' frame. So I chopped off the bottom. It was here that I realized my "trusty" scissors happened to be worth nothing when it came to cutting straight lines in fabric. It took a whole lot of swear words before I remembered that I own a rotary cutter. Way. Easier. So I put the dress on, found a good spot for it to hit on my leg and chopped it off.

And here, my friends, is probably where everyone who has actually sewed anything in their lives sucks in their breath and says "uh oh". Which is precisely what I did when I realized I should have added a few quarter inches on that to make a seam. Therefore, my "perfect length" would be shorter than I had anticipated. Whoops! At this point, the deed was done, so whatever length it ended up being was what I was going to have to work with. This is now known as "Compromise #1".

Then I measured out the sides, and used a copious amount of pins because I know I can't "guess" at a straight line to save my life, bringing in the muu muu about 5 inches altogether. Then I sewed my line and cut off the excess. I tried it on and it worked out perfectly. Who would have thought bringing in clothes was so easy?! This is where I should have stopped. It was done, it was fine. But no; I just had to get all footloose and fancy free on Google.

I don't own a serger which, from my elementary understanding, is an attachment for a sewing machine that creates a seam and cuts off excess fabric at the same time, and the seam is done in a way that makes it all tied into one little nice package that prevents fraying. So my Google search consisted of "mimicing serger results" and "creating seams that don't fray" and I found a tutorial by some random chick that does this type of seam on just a plain old sewing machine like mine. I watched her tutorial and got my confidence up by her ease of completing this task and her very convincing words of "this is so simple!". Well... tragedy ensued.
Random chick was very, very wrong. Much to my dismay,  my seam ripper had to come back early from it's vacation, and my seams are open and have possibility of fraying. That being said - it looks way better than that mess pictured above. This is Compromise #2.

Then I got to the arms. When I took a few inches from the sides, I took a few inches from the armpit as well, so already they weren't looking like the armflaps of the original muu muu, but they were still a bit longer than a typical arm of a dress should be. Again I got out my measuring tape and my massive amount of pins and measured a seam into it. It looked all fine and well while pinned up, but then it got to the sewing machine and all hell broke loose. I can't even describe to you what was going wrong or how I was messing up, I just know I went through an enttire bobbin of thread and tore out more stitches than I had on all my projects put together. Finally, I flew my white flag and tore it all out. Hence, Compromise #3.

At this point I was done so I turned it right side out and threw it on. I looked in the mirror - and holy moly it was short. My wannabe dress was now bound to be a tunic over leggings. (You guessed it, Compromise #4.) It doesn't look all that short while standing in one spot, but all it would take for an "R" rating was a bad posture, a large step or a small gust of wind. Leggings are more comfortable, anyway. All it took was a brown belt to break up the mono-pattern and a matching boot and I have an outfit.


It's certainly not a total win, but now looking at the pictures I think a brown legging will tone down ground the pattern and color a bit. And I certainly need new boots - I'm not even sure why I bought these things that I have on in the picture, considering they can't even zip up all the way over my dancer calves. Boot fail.

Few notes on my mental checklist: 1) It's okay not to have a detailed idea of what I want to do, because most of the time rolling with my mistakes is what becomes necessary. So far *fingers crossed* my lack of detailed planning is working out well. 2) Learn and price out what the heck an actual serger is because it is obviously not a "fake it 'till you make it" situation. 3) Start looking at these clothes more - I've already had a surprise zipper and surprise pocket in my last 2 projects. Probably a good idea to not depend on the "hey this is a pretty color" inspection alone anymore.

Up next: I think another trip to Salvation Army is due. The only thing I have left from my last trip is a very dressy dress, and I am enjoying me some casual weekender looks. I'm also trying to think ahead for the holiday season - holiday shopping, Thanksgiving, Christmas, my birthday. (Yes, it is a holiday.) Can I make it through an entire season full of parties in thrift store clothes?

Tuesday, October 16, 2012

Excitement on the Blue Dress Front!

After a fantastic weekend spent in Boston, the husband and I decided to stop in and meander at the Lee Outlets (Lee, MA) on the way home. When we stopped in, one of the first places that we went to was Van Heusen, a store that I often relish in the fact that I can find cute (and often lacy... not sure why that's a pattern lately) pieces that I can actually afford.

AND WHAT DID I FIND???!!!

(Sorry that it is sideways... the picture itself is right side up but apparently Google Blogger wanted to rotate it. I don't complain because it's letting me blog for free, so do your thing Google.)

Does that look familiar though? It SHOULD! Because that is pretty much the exact skirt that I made the blue dress into!  (And if you missed it you can find it here.) It had a bit bigger dots, and I'm sure the hemline was much straighter, but the fabric, style and general fashion idea was the same. I was so psyched, so I had to take a picture. And what was the price on it, you ask? The Van Heusen price was $69.00 and the Outlet price was around $22.00. What was the price of my skirt? $2.50. Eat it, Van Heusen.

I'd also like to note that my husband was pretty excited for me as well. His first response when I showed him was "You should take a picture for your blog!". Sarcastic or not - I was pretty psyched to do so :) He certainly may not read this thing - he gets enough of my quips and sarcasm each day in real life to fill that quota - but he's certainly happy to enable support it.

Friday, October 12, 2012

Update: The Retro Dress

So I apologize for making you wait so long after the wine tour for pictures, as I had a rough week being sick. But... back now and ready to show you the results!

I didn't quite take a detailed picture of the entire outfit, but here is a pretty good one for both laughs and proof that I got this thing to fit (and ready for the public to view!)

It was pretty chilly that day, so I wore a sweater over it most of the time, so unfortunately you can't really see the side lace all that well. The good news is that it was a pretty fantastically comfortable outfit for running around in, and stayed together with no embarrassing rips/tears, so this one WILL debut again (once I test out the washing portion of it...) and hopefully I'll be able to remember to take a good picture of the whole outfit next time :)

But onto more important things - seriously, how awesome do all the masks look?! Our Queen of the Day very much rocked.

Wednesday, October 3, 2012

Retro Dress

I thought I'd start this post with an update with the blue dress - it was a success! I didn't have to break out the back-up skirt at all, and no one believed me that I made the skirt out of a dress. I guess I could probably take that as no one thought I was that creative or skilled... but I'm choosing to take it as a compliment that it looked like it was a skirt on purpose. Therefore - success.

So as you know from the end of the last post, I was excited to start on the next project for Sunday's wine tour. It was so hard not starting right away, but I really needed to think about what I was going to do and which dress to use. I finally decided on this one:
Gotta be honest - I chose this at the Salvation Army because I'm pretty sure I saw it (or something like it) at New York and Company for somewhere around 45 dollars, and the thrift store had a 5.99 tag on it, and yellow tags were 50% off. Take your 45 dollars and stuff it, New York and Company, I just got this for $3. Boom.

So then I got it home and tried it on - just to find out it was a good 2 sizes too small. This was Damn #1. So once I decided it was THIS dress I was going to do, I wasn't going to waste my $3. I was going to wear this thing, my size or not. So I brainstormed and came to the decision that if I were to put it on while it's too small, I would have blown out stretched out the seams; so why not roll with it? I decided to rip out the seams (yay seam ripper!) and put some pretty black lace down the sides. I then took my idea to my far-more-fashionable secretary and, I'm not proud to say, the conversation started with my asking "Hey Latoya, would this look too hoochie?" followed with my describing my idea. She now dreads my brainstorming, but by the end of the conversation we came to the conclusion that it's not hoochie because I'm never caught without wearing some sort of tank-top undershirt. Therefore, any see-through lace sides would be negated by my undershirt. Hoochie conundrum: solved.

So then I went to Joanne's with the intention to just look around. I promised myself that I would NOT buy anything fabric-wise until I have a set plan and time to put it to work (also known as Friday).

... so when I got home with my purchases on Wednesday - I'm a sucker who is really bad at "looking around" - I decided to get on it a full 2 days before my intended goal. First thing I did was rip out one of the side seams. The second thing I did was notice this:
An extremely well hidden zipper that was quite possibly the sole reason the dress did not fit. This was my second "damn" of this project. But, I already had half the dress ripped apart so I went with it - plus I do like that seam ripper - so I ripped out that dang zipper and ripped out the other side too.

This is when the seam ripper started to lean towards my bad side. I sewed the lace on the dress. The first time I did this, it bunched up like crazy, so I had to seam rip everything I did and start over. The second time I did this... this is what happened.
Probably not the best picture, but that is my created seam. On the wrong side of the freakin' fabric. So, I had to seam rip it again. Finally, I got the seam right. Then, without thinking, I sewed the two front sides together (as opposed to the front side to the backside, as it should be) so I had to rip it apart again. For those counting, this is the 3rd time I've torn apart the dress, 4th if you're counting my initial rip-apart of the factory seams. Finally, I got it right - front flap to back flap on BOTH sides. Although it wasn't exactly even - it didn't look half bad. When I put it on, it was still dress length and my intention was tunic, so I chopped off the bottom. It killed me to chop off the pretty flowers on the bottom, but I tossed it into the deep dark corner that I threw the blue dress balero in - you never know when someone may ask you for random flowered dress bottom!

Now, when I say I "cut" off the bottom.... something about this fabric was so hard to cut that by the time I was done it was so jagged any random person who didn't witness me cut it with scissors would have truly thought I chewed through the thing, but I guess that's neither here nor there. At first, I thought I could cheat and put a string of lace on the bottom and not have to finish off the bottom seam. That was my "lazy brain" thinking and reality was having none of it. I attempted to cheat and it came back to bite me because I AGAIN managed to get the seam on the wrong side of the fabric (insert 3rd "damn" of this project here). So I ripped out the seam of the dress for the 4th time  (or 5th, depending on your type of tally). I gave up on the lace on the bottom for 2 reasons: 1) I wanted to stop before any more dumb mistakes could ensue and 2) it added enough length that it made the tunic right back into a dress, thereby nixing all of my intentions. Another thing I probably should have thought through.

So finally I stopped fussing with it and decided to finally let it rest. It certainly is not perfect, and I don't think that I can call this a straight out success, but I hope think it'll be okay to make it's public debut on Sunday. I'm not going to give a finished project picture quite yet... I'm going to rope the girls into doing it with me on Sunday, so stay tuned for that.

Few notes on my mental checklist: 1) Get some sort of full length mirror for craft room. Although I do appreciate the exercise from running from the basement to the bedroom each time to check how I'm doing, it tends to hinder the process. 2) Craft room needs cable. 3) Right sides of fabric go together to create a seam on the intended side 4) Seam ripper is only enjoyable when you're ripping out initial seams, not your own mistakes. 5) Find out if buying dirt-cheap clothes justifies buying new shoes and accessories. I'm pretty sure I can find a rule somewhere that screams "yes"

Next up: I have a fantastically obnoxious muumuu that I can't WAIT to play with.

Saturday, September 29, 2012

Blue Dress

At some point, I promise to come up with better names! For now, generalities will have to do.

When I decided to do this project a few days ago, it was all I could do to wait for the weekend to go shopping and have the time to work on my first project. Finally, Friday came around and I spent a few hours after work combing the racks of Fulton's Salvation Army and Baldwinsville's Thrifty Shopper. I made sure to keep within my mental checklist for the first few projects: look for nice colors, simple designs, fantastic buttons, etc. Every single item I chose was a dress - I thought I'd start "easy" with items with lots of fabric attached. Safe to say, I found plenty for my first few projects (and a few things I regret not buying like a fantastically designed sweater and an accent chair for 6 bucks!)

First up: blue dress. I've been very into blues and whites lately, especially together. Stripes or dots, you name it and I've looked at it with all intention of purchasing it. I found this dress and knew I had to bring it home (for $2.50!)
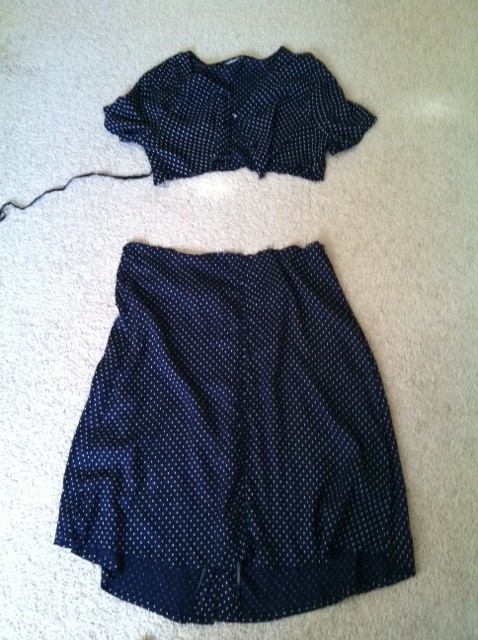
This was a tea lenth, blue and white dotted, button-up-the-front shirt dress that a few of my grade school teachers were extremely partial to. I chose it strictly for the cute buttons, the dots, and the fact that it was such a soft fabric. After trying it on at home and noticing that the A-line skirt was way better than the awkward arms, I knew it had to be a skirt. Before I came to this decision though - I knew that the shoulder pads had. to. go.
Sad shoulder pads! I feel like a lot of the items I'll find at thrift stores will have shoulder pads - maybe I should start a collection of some sorts?  I also cut off the belt; I did this for no particular reason other than I was rather enjoying my new seam ripper.
 
Next, I noticed that there was a natural seam around the waist and thought that was rather convenient! So I cut it in half, using the existing seam as a guide.
At this point, I was thinking the top could be made into a cute balero and I could use BOTH parts of my dress. Then I tried it on. Blegh - definitely not for busty girls. I did sock it away in some dark corner of the craft room, though. You'll never know when someone will ask "do you have an old fashioned balero that is blue with white dots?" and I would totally have that covered.

It was also at this point that I realized the original dress was longer in the front than it was in back - this seemed pretty backwards to me, but I'm not gonna judge. My original hope was to have the buttons (originally in the front of the dress) on the side so it'd be easier to hook when it was finished. As doing this created a certain assymetrical look - and not a flattering one - I had to flip it around and make the original front of the dress the back, thus making it longer in the back than it was the front. You know... like typical skirts. I then proceeded to sew a seam from the bottom of the skirt, keeping a small slit so it remained a-line, up to the first button, with hopes of the first button being my skirt closure. This actually took me two attempts. The first time I sewed the seam, I forgot about the buttonholes, so when I put it on the first time the buttonholes created quite the "peek a boo" every 2 inches or so. The second time was a charm!

All that was left at this point was just to make a top seam. I folded over the top about a half inch and sewed that down, then folded it over again and sewed it down again. Why did I do this? Not sure. My brain was thinking "if I did this twice, maybe it'll take longer to fall apart". As you can see, my confidence was stellar at this point. After doing this, I realized there was quite a gap from my closure top button to the top of the skirt, so I took one of the buttons that I removed from the dress when I sewed it up and sewed the button to the top of the skirt. It was at this point that I realized I had no idea how to make buttonholes. Whoops.

This is where I'm not proud. I knew I should have googled it, or at the very least looked it up in that book that came along with the sewing machine. But, I followed my "the book is all the way downstairs!" mentality and just cut a hole. That's right! I got out my handy scissors and I just stuck it there, somewhere around the opposite side of the new button. I then hand-sewed around the edges of the hole a few times so it wouldn't fray or rip when I buttoned it up. For now, the hole seems to be doing okay, and luckily the button fits inside of it (another thing I should have thought about before I sewed all around it. Thank you, fate, for making me lucky this time.) So I donned the skirt and it fit. And it stayed. And it isn't half bad!
 Yes, I had to put on an ENTIRE outfit to see what it would look like, up to and including the shoes. It didn't look half bad, so I think this will be my Monday morning work outfit! *With a backup skirt in my bag... just in case*

Few notes on my mental checklist: 1) Learn how to do buttonholes. 2) Learn how to take a decent picture of myself that isn't a typical Facebook photo through a mirror. I may have to rope the husband into helping me on this one. 3) Get comfortable with being in pictures - I seriously hate being the subject.

Next up: I have a fantastic pair of grey boots that have not been debuted quite yet and I'm desperate anxious to wear them soon. I have a wine tour coming up next Sunday, so I'm hoping to make one of my other thrift store finds from yesterday into a comfy tunic to wear with black leggings and my new boots.

What are your thoughts? Was I "sew" thrifty, or was it something to be desired?

Whew! I need to google this...

My first post and project. How... overwhelming! So here's the reason for this whole ordeal: I need practice. Pretty simple, right? I've had a bit of practice with the big bad sewing machine so far. I've bought kits - they're interesting but I feel like I'm cheating. It's all pre-cut fabric, pin it together, sew it up and ta da! end result is a table runner or quilt; not too much creativity or brain power used. I've taken the measurements of these pre-cut fabrics and have chosen my own fabric and used the pattern and ta da! end result is a table runner or quilt. In all honesty, a girl can only have so many quilts and table runners.

So I took on re-vamping my craft room. Home projects always get the brain flowing! So I re-painted and re-organized and it was tons of fun. That is always going to be a work in project, finding more storage and such, but now I found myself craving to actually USE my brand spanking new craft room for, well, crafts! I went back to the drawing board - what to practice on now?

I thought about the fact that I'm a new homeowner on a small budget. Also a new wife with a small budget. And a girl with a "sale" brain for a cheap budget. It didn't take a genius to see the pattern: small budget. I googled something along the lines of "crafts on a small budget" and saw a random blog post of a girl that turned around a $5 dollar thrift store dress into a night out dress and no one knew the difference and she looked amazing.

Eureka! (I've always wanted to say that!) This was it - I could get crafty with thrift store finds. I googled thrift stores and found myself getting even more excited. Not only do they have clothes, but they have housewares and furniture. The brain started flowing - any mess ups I have I can chuck it up to practice, and any successes I had was a new item for our home or my closet. It was truly a win-win. Therefore... off I went.

The posts that follow should be documenting my works of "creativity" - whether it is a fail or success you will see it, as well as hear all the details throughout the project. My goal is to take pictures of most of the steps taken so you can see the whole process. As for HOW to do all this stuff...

I need to google this.