Sunday, April 20, 2014

Easter Easy

Happy Easter, all! I have a quick and easy project for you today. I had anticipated this being a long one, but it was super quick. That fact was very welcome after a full (full!) day of spring cleaning.
 
I started with this gorgeousness.
All in all, this wasn't so bad. What grabbed my eye was the pattern - the blues and purples are very pretty together. Also, it is silk, lightweight and super comfortable for summer. It didn't button (most of them were gone even if it could), so I definitely had to work around that as well. The final sell was the fact that it had pockets. That's pretty much always a sure thing.
 
First, I got rid of the ridiculously large shoulder pads.
Then I cut off the collar, and tucked down the ends and sewed them down.
The next thing I did (and failed to take a picture of) was cut off the bottom of the too long skirt. As this was silk, I did not finish the bottom. I made sure to make even cuts so it didn't look like I hacked away at it... although that is exactly what I did. Doesn't get any easier than a "cut and go".
 
Lastly, I didn't know what to do with the sleeves. I didn't want to cut them off, but I also didn't want to leave them long. For now, I compromised by rolling them up to a short-sleeve length. I've always been a fan of the roll-sleeve. It's the definition of lazy-girl fashion sans sloppiness.
 
Then it was just a matter of removing the few remaining buttons, and voila! The most comfortable silk, light summer dress that I'm sure I will get tons of use out of. When it is no longer 40 degrees.


Sunday, April 13, 2014

It's Been a Bumpy Weekend

So I think I may be a disappointment this week, friends. All I have is story time today.
 
I went home this weekend to see my family and spend time with my parents. Also, I've been having a few car troubles - such as my anti-lock brake system not working - so I wanted my dad to take a look at it as he owns a manual to my car. This, I would soon learn, was the beginning of my car problems.
 
Now, I live in the mountains where this winter really took a toll. The roads back home aren't fantastic to begin with, but throw in tons of snow and vicious plows, and the roads are just screwed. Safe to say, there are potholes. During my ride home, I hit one of these potholes. Hard. And my hubcap came flying off and rolled across the road. I stopped the car and my husband and I went searching for it. We found it, figured ourselves lucky, and continued our trip home.... where my "maintenance required" light on my dashboard promptly turned on. Grand total of lights on my dashboard: 3.
 
We get home, put the hubcap back on and soon realize... it's not mine. We found a hubcap that wasn't mine, but nonetheless fit. It would look funny, but it would work for now and we figured we'd stop on the way back the next day and find mine.
 
The rest of the trip was great and we enjoyed the time spent with family. Today, we headed out and stopped on the way back in the area where I lost my hubcap. Did I find it? Yes. And four of its friends.
Come to find out, that pothole was a real bitch for a lot of people.
 
So Mike and I get home and go about our business. Then, we start to smell gas. Apparently, we have a gas leak somewhere in our basement. What's also in our basement? My craft room. This is the reason you are not seeing a project right now.
 
So instead, you are getting my "over it" selfie.
Although this post is not entirely lacking of thrift store items. Today was a gorgeous weather day (79 degrees!) so I broke out a summer dress. In the above picture is my new thrift score: an adorable A-line dress, that needed no work, that cost $3. Score!

So on with the week we go - it'll be a week full of service men: furnace men, car care men... all sorts of repair shit. My apologies for the language. All I can say is thank God for family and the comic relief that just being around them can bring.

And speaking of family, please send your thoughts and prayers to my aunt, who is a strong and resilient woman recovering from a stroke that she had yesterday. She is one of my biggest cheerleaders for this blog, as well as a loving and caring family member.

In the meantime, enjoy your week and I promise as soon as this gas thing is under control, I will be back at the sewing machine with just as little skill as before.

Fixing for Family - Part 2

Hey friends! I'm still working on the project mentioned last week - life and work got in the way a bit. This weekend I finished up Mandy's other dress. As a reminder, it looks like this. 
Mandy wasn't a huge fan of the hi-lo hem. As you may remember - I was a bit nervous last time to cut into someone else's clothes. This time, I came prepared. 

Just kidding, I wouldn't drink while cutting into other peoples clothes. That's for after. Since the front was a fine length for Mandy, I concentrated more on the back. Chop chop!
Next, I made a hem on the back, ironed it down and sewed it up. Short and sweet. As the back was rounded into the front (hence the hi-lo hem) the two sides ended up being slightly longer than the front and the back. I almost went at it again with the scissors, but stopped when I put it on and noticed this illusion disappeared. Glad I stopped! I'm sure Mandy did not want herself a hoe dress if I kept cutting!
Final look :) sorry Mandy - purse isn't included! (Unless I totally ruined your dresses; then it's all yours!)

Have fun friends - hope you enjoyed your weekend and I wish you a most restful Sunday night! See ya next week!

Sunday, March 30, 2014

Almost Done

Hey friends!

I am working on a project, but unfortunately it is not quite finished. Feeling a bit slow-moving today. It's possibly because the weather finally cracked over 40 and it feels amazing, so I've been a bit distracted...

Anyway, please check back soon - it'll be up, just maybe not today. 

Sunday, March 23, 2014

Fixing for Family - Part One

This week was a bit different than others - because I am not in these pictures! This week, I was asked to fix two dresses for my gorgeous sister-in-law, Mandy. As we spent all weekend away in a vacation rental with the family watching March Madness mayhem, I happily obliged. A weekend of vacation and then a Sunday blog post where I didn't have to think of a project? Sold.
 
Here she is with the first dress. Certainly taking a better "Before" picture than I take...
So the problems she had with this dress was that it was a good foot taller than she was, and she was not partial to the strapless idea. I went to work as soon as I got home. After shopping. And a nap. And a beer. (It was a vacation - don't judge.)
 
While at the vacation house, Mandy put on the dress and I pinned the bottom to a length where she wouldn't fall over herself. Keeping the pins in, Mandy then turned over the dress to me and wished it the best of luck.
 
When I got home, I measured from the pins how much I had to take off - it was 8 inches. I don't know who this dress was made for, but "giant" must have been in the description. I'm not going to lie... cutting into someone else's dress is a bit nerve-racking. This was the face I had pretty much the entire time.
I cut off the appropriate length and then folded up the hem. Then, because I don't want Mandy to think I do shoddy work (because that only happens on my own clothing) I folded it again to make a proper hem and ironed it down. Once it was nice and flat, I sewed it down.
 
Next, I dealt with the strap(less) issue. The scraps I had from the bottom was plenty enough to make some straps. I had two strips from the bottom - one from the front and one from the back of the dress. I took one of the bottom scraps and cut the original hem off so I would have a flat surface, then folded it in half, wrong side out and pinned it down. Next, I sewed down the opening, trimmed the excess close to my stitches and pushed the tube right side out. (In the picture below, to the left is the finished tube, and the right is the scrap I made it from)
 

In the end, I had a brand new dress that was long enough for a normal person and had straps to ensure it was comfortable any and all the time. I only tacked on the straps for now; because the top is super stretchy I want to ensure I have proper placement so they are long enough and in the right spot when Mandy is actually wearing the dress. For now, only Sophie can do the dress justice but I will post an "After" once Mandy tries it on.
As you can plainly see, this is only one dress and Mandy gave me two. Therefore, the second dress (Part 2) will be coming up this week when I get it done. It'll be a bit more complicated, so I want to be able to dedicate a night to it. Here's a sneak peek:

Happy St. Patrick's Day!!

This weekend was St. Patrick's Day weekend, so as you may have noticed - there was no post on Sunday. My apologies. By the time I got motivation to move, I used it to clean the house and then had a quiet night at home reading my books. So instead, I thought I'd offer up a question : what did everyone do for the holiday? What did you wear?

My holiday started here...

Then it continued to here...

Then this happened...

So, you know. There's that. 

It was a blast, and I couldn't have asked for a better night than hanging out with friends and family at a house party. Beats out waiting at a bar for an hour for one drink any day. 

So that's what I did! And what did I wear? Check out this blog post from the past - I wore the jacket. And an obnoxious hat. 
http://thriftysew.blogspot.com/2013/10/pretty-plaid.html?m=1

So leave a comment below or send me an email (pictures are loved and appreciated). What did you do? What did you wear?


Sunday, March 9, 2014

I Accept Challenges

Happy Sunday, all! Hope everyone is enjoying their weekend. I had a great weekend of cleaning out my closet, wandering around Target and just generally enjoying the nice weather. It's been mid-30's here lately, which I will take any day over the negative degree weather we've been having the past few weeks.
I get sent quite a bit of pictures from you guys with a random "can you do this?!" or "check this out!". I recently received one from my sister-in-law that got my gears grinding. It was cute, and something that I was pretty sure I could handle. This is what she sent me:
Seems easy enough. Take a few shirts, spin 'em into awesomeness. Got it.

Off I went to Salvation Army. After I donated 4 large bags of giveaway items from my and my husbands' closets, I popped into the store part to see if I could find any shirts that would look ombre-esque. As I wasn't a huge fan of the above colors - I improvised.
Close enough. 

Each shirt was $2 or under (the light purple was $1) so altogether this dress cost me $7. That's comparable to some scores that I've found on Target 75% clearance rack, so I will take it.

Now, I'm short, but I was skeptical about this project. I wasn't entirely sure if these shirts would hit the ground. Especially since I, unlike the inspiration picture, am more partial to empire waists than drop waists. So, I got out my pins and before doing any sewing, I thought it out. 
As you can tell from my ecstatis thumbs up - this plan will work. I think.

First, I cut all of the purple shirts off at the armpits. Then, since all of them were quite obviously different sizes, I cut them all to the same size.
Learning from my many past mistakes, I did make the bigger shirts a tad larger than my goal, to leave room for seam allowance. How's that for thinkin' ahead? There may have been a happy dance involved at my noticing that I remembered this. Post-dance, I sewed up the seams so I had three equal sized tubes.

Next - a lot of sewing ensued. I sewed each tube to each other, making sure that all right sides were where they were supposed to be. I also made sure to made the darkest shirt, the bottom, so that the bottom of the t-shirt was the bottom of the dress. This was for no other reason than I hate hemming. Hate it.
Go fancy sewing machine go!

Once I had all the purple sewed together, I cut the black shirt a bit lower than my natural waist, and sewed my large purple ombre to it on the light purple section.

When all is said and done... I can't walk in it and will be sewing a slit in it VERY soon. It's super pencil skirty.

With that said though - it didn't come out all that shabby! Challenge accepted and sort of mastered.
Hope you all enjoyed this weeks project. It was a pretty easy going one. Like I told my husband - I'm not sure if this was a super easy project or if I'm getting better, but the whole project took me an hour. And that does not subtract the time I spent watching random YouTube video's (there were a few). 

Have a challenge? See something on Pinterest that you want me to mess up? Send it my way to thriftysew@blogspot.com. I'll see what I can do with it. As always, whether I mess it up or master it, you know I will show you.


Sunday, March 2, 2014

See Ya Skirt

Finally got to play around with my sewing machine and it is all sorts of awesome. It's like I don't even need to know how to sew - I just put things under the needle and it happens. Here's a little insight into my random practicing. It includes a button hole and a bunch of lines of different stitches.
I mean - how cool is that?!
So here's what I had to work with this week:
This is a Talbots skirt that I scored for $1. When I got it home, I realized why it was only a dollar - the under skirt was a mess and the closure to the dress was nonexistent. I wasn't sure if someone ripped off the zipper or what, but nothing was there - including a button hole for any would-be button closures. I was lost.

So I did what any self respecting sewer would do when faced with something completely confusing - I made stuff up.

I started with making a 10 inch slit on the inside of the skirt on the side seam. I then cut the outer skirt in the same slit and then sewed it all down. See where this is going? I only had a vague idea too.
This would be an arm hole - surprise!
 
I then put on my new garment, sewed out a neckline and chopped off a few inches on the bottom of the underskirt. What was the result? A somewhat unflattering tunic that was perfect with leggings.
I only had made one armhole because I was super uncomfortable making it and was unsure what I was doing. Now that I see the result of it, I should have made two - I enjoyed the look of the shoulder and it wasn't all that hard to create. Next skirt, I suppose. 
 
Hope you all are enjoying your Sunday - the hubster and I are enjoying a quiet night at home doing homework (him) and watching Netflix and Pinterest-ing (me). Big night for us.


Sunday, February 23, 2014

I Got It!!

Happy Sunday!! I had a weekend in my hometown celebrating my moms birthday. Upon arrival home, I got to crack open this little box of awesomeness.

You knew it happened... But did you know it was purple? And that it came with a lot of crap I didn't recognize?!
Four feet, four bobbins, two spool holders, five needles, a button putter onner (technical term, obviously), spool caps (and some felt spool washer looking things), a seam ripper (all too familiar with that!), a brush to clean it with (apparently it comes with chores), a button holer (I'm surprised myself to learn that is the technical term - that's my kind of English), a dust cover and a screw driver to get the plate off. Singer could have saved money on their design because a quarter works just as well. Anyway - it's a lot of stuff. Not to mention this machine takes up a lot more space. My desk never looked so small. 

So, a project did not happen today as I familiarized myself with all the new buttons and moving parts. Beside that fact, I'm one of those people that have to read the user manual and watch the instructional video before I do anything. I got to reading all of it today, and will get through the video tomorrow. 

Until that time, I'm going to occupy myself by watching my nails. My sister and I took my mom to the salon and they got pedicures while I decided to try my hand (get it?!) at a gel manicure. I chose orange. And brown. How did I do that?! It changes with my moods (or temperature if you don't give in to your inner teenager). I think it tells my mood pretty accurately actually. Here's an example - can you tell my mood here?


Honestly though - this cracks me up. 

Enjoy the weekend friends, and expect something fun next Sunday once I know how to use my new machine. 

Sunday, February 16, 2014

Ready for Spring Shorts

Happy Sunday all! I took to my craft room and attacked my stacks of fabric again. Not sure what got into me, but I got it into my head to make some shorts. It was probably while I was staring out my window, looking at my three inches of snow. I just want spring to come. I'm done with winter. Thanks, Mother Nature, it's been fun, but please haul out any day now.

The only problem with my whole idea was that I have no idea how to make shorts. After a few quick google searches and youtube video watching, I decided to just get on with it.

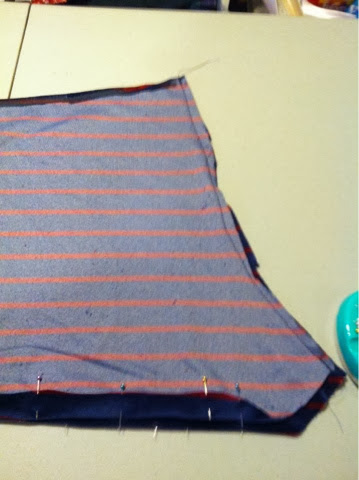
I grabbed a pair of shorts from my drawer - a pair of Old Navy shorts that I was quite partial to this summer. I folded the shorts in half and also folded the fabric in half. I put the straight edge of the shorts on the folded part of the fabric and traced around it.
Then I did that same thing a second time to end up with two pieces of fabric in the same shape. Then I put one piece on top of the other, right sides together. Keep in mind, although I left room for seam allowances, I did not measure (true to form, I suppose). Should I repeat this process, I would certainly measure and make a deaper curve.
Next, I sewed the two curved sides together. Only the curved sides. This is important. Believe me... I learned that.
Next, I hemmed the bottom so the legs would be properly hemmed. I wasn't going to do this (lazy), but the edges kept rolling anyway, so the thread in the hem weighed it down just enough to stop rolling
Once the hem was sewn, I folded the entire shorts from the middle  to put the two side seams together. I know that comes out confusing so maybe these pictures would help.

Find middle:
Put the seams together. See what's happening here?
The next step is to sew up the crotch. You should see it form at the bottom so you'll know exactly where to sew. This was my second mistake - the crotch was rather flat, when it should hae been a distinctive V. Although I knew this, I didn't want to cut into it and totally ruin it, so I let it be. Next time, I'm cutting that crotch into a V. (P.S. Read in the wrong context, this post may become PG-13, My late apologies.)
Next, I worked on the waist. For this, I needed an old friend... non roll elastic.
I sewed the elastic onto the inside of the shorts (keep the shorts inside out and sew the elastic around the band). I then folded down the elastic to completely cover the elastic in fabric, and sewed it down again. Once finished..
And voila. Girl's got herself a pair of shorts. They are certainly not perfect - the crotch area, for most of the reasons listed above, turned out not quite right. It had a bit more fabric bunching than a girl needs, but they are certainly comfortable. I've got myself a new pair of pj shorts. The fact that I made them out of a fancy beach-towel material also played to the fact that they would never see public. Next shorts I make will be an attempt at beach shorts, but maybe I'll wait for better weather to go about doing that. For right now, I'm back in my sweatpants and sweatshirt, cuddled under a blanket and sitting in front of a space heater. 

In other news....

I bought myself a sewing machine.

Yes, it was the one that I was eyeing and I ended up getting it for a pretty great deal. Thank you everyone for your thoughts and opinions on the subject - especially all of the super helpful e-mails. In the end, I made the decision on the reputation of the Singer brand and, most importantly, my budget. The fact that I had gift cards to Joann's certainly played a good role as well. 

Enjoy your Sunday, friends. I hope it is as relaxed as mine has been. Hopefully next week will be a nice shiny new project on a nice shiny new machine.