Showing posts with label skirt. Show all posts

Sunday, May 11, 2014

My New Favorite Skirt

I am super excited about this project, guys. Not only am I excited because it turned out well... but it was pretty easy too! I'm not lying when I said it turned out well. I can't wait to wear this and I think if it was something I saw in the store I would purchase it. I'd shell out a solid 10-15 dollars for this, I think. I am a thrifter, after all.
 
First thing I got together were the raw materials. This is happening from scratch. 
Next, I cut off the ends with the Joann fabric logo. I'm all for Joann's, but I'm not going to wear the logo unless I'm getting the check. So chop chop goes the ends!
Next, I measured the fabric to my waist and cut off the excess. I sewed up the ends to create a tube. I did this with the "right side" of the fabric out and, because it was such a stretchy fabric, used a zig-zag stitch to keep the stretch. I promise I haven't gone crazy and forgot how to make seams - I have a plan.
Next, I flipped the tube inside out, and sewed down the seam once more.
This enclosed the raw edge so it wasn't against my skin and made it itchy. As the skirt only has one seam, my plan was to put it in the back so the skirt didn't look lopsided. Sitting on a raw edged seam just didn't sound appealing to me. BONUS: I almost nailed matching up the pattern. Almost.
 
Fine. I was only close on one square.
Next, I measured a 2inch wide black elastic around my waist. One thing I always do wrong with this elastic is that I never stretch it enough when measuring around my waist. I do this every time and this time was no exception. If you do this - don't be afraid to stretch it quite a bit when you measure. I always get nervous that it looks too small so I don't stretch it as much and it always ends up too big. Once I had it cut, I sewed up the edges.
Once the edges were all sewn up, I attached the skirt to the elastic and voila - I had a skirt! I threw on a white tank to ensure the skirt was well seen in my pictures, but for work I'd tone it down with a simple black shirt.
My apologies on the blurry picture. My camera took everything super blurry because I was on a weird function and didn't notice it.
 
As for the bottom, since it was a fabric that is not going to fray, I left the edges raw. I made clean cuts on it so it is not uneven and unless you look close you don't even notice that there is no hem. If I don't just leave it like this (which I probably will) I would do a blind hem, so the stitches don't ruin the fantastic pattern.
 
Don't think this was all sorts of easy peasy and that I'm getting skilled here, folks. I still have my serious faults. Such as my ability to match up seams...
You win some, you lose some.

Happy Mother's Day to all the wonderful mothers out there that bust their butts to ensure their family gets everything their hearts desire - mine especially. There wasn't a day that went by (or still goes by) that my mom didn't wear about 20 hats within the house. Enjoy your day, Moms!

Sunday, April 13, 2014

Fixing for Family - Part 2

Hey friends! I'm still working on the project mentioned last week - life and work got in the way a bit. This weekend I finished up Mandy's other dress. As a reminder, it looks like this. 
Mandy wasn't a huge fan of the hi-lo hem. As you may remember - I was a bit nervous last time to cut into someone else's clothes. This time, I came prepared. 

Just kidding, I wouldn't drink while cutting into other peoples clothes. That's for after. Since the front was a fine length for Mandy, I concentrated more on the back. Chop chop!
Next, I made a hem on the back, ironed it down and sewed it up. Short and sweet. As the back was rounded into the front (hence the hi-lo hem) the two sides ended up being slightly longer than the front and the back. I almost went at it again with the scissors, but stopped when I put it on and noticed this illusion disappeared. Glad I stopped! I'm sure Mandy did not want herself a hoe dress if I kept cutting!
Final look :) sorry Mandy - purse isn't included! (Unless I totally ruined your dresses; then it's all yours!)

Have fun friends - hope you enjoyed your weekend and I wish you a most restful Sunday night! See ya next week!

Sunday, August 18, 2013

Beach Baby

This week I was feeling a bit like I needed a vacation. My husband and I have decided to take a few days off of work just to do our own thing. I plan to spend my "mental health" days working on my tan and finally getting my hair cut. With vacation on the brain, I decided to remake a popular beach cover up that's been hanging around Pintrest - see this. The problem? That wrap costs 39.50. On sale. Hell with that! I bought this skirt for $1.50.
Alright yeah, I did a ghetto kind of picture. I risked my life for this, guys - I stood on a chair because I couldn't find a place to put my camera to get a better shot. Basically, it's a wrap skirt a la:
I had no idea what to do with this when I bought it. It's been sitting on my refashion rack for a good 6 or 7 months. Until I saw this idea and knew I had a gem.

First thing I did was cut off the ties for the wrap dress, like this.
Next, I took the corners and folded them down a bit. This is the point where I should of ironed but... "ain't nobody got time for that".

I pinned down the corners on either side and pinned about 1 inch in and sewed them down. This created my casing that I could use a safety pin to thread the ties that I had cut off through the casings on either side.

After the ties were threaded through the casings, it was just a matter of sewing the ends together to create the loops, and then rotating it so the seam was on the inside of the casing.

And just like that, I had myself a beach wrap for a buck fifty. Boom.
I do admit, with a better fabric it would drape a bit better and have a bit more "give" than the skirt, but it turned out to be a bit more modest than the Victoria Secret one (which, all in all, is not that hard to do.)
 
And the best part? I can class it up. Scenario: I'm at the beach, got me my cover up on and all of the sudden my husband offers to take me out for a nice dinner. I certainly don't say no to a nice dinner, so what do I do to make myself presentable? Slap a belt on it.
As always - comment away or throw an e-mail to thriftysew@gmail.com. Until next week!
 

Thursday, May 2, 2013

Pants Off, Dance Off!

Hey, hey, hey! It's Thursday!

I have finally hit the point where my four week notice at work is OVER. I was finished with work on Tuesday, as my notice went to the end of the month. I start the new job on Monday, so I had a whole three days to myself. I know this doesn't sound like much but, save for my wedding/honeymoon, this is the most amount of days that I've taken off since college (a good 5 years ago). I'm just not good at vacations and taking time off.

So for my mini-vacation, I really wanted to be able to kick back and relax. I'm pretty well known for wearing the crap out of my lounge pants - and never really buying new. Therefore, pretty much every single one of my lounge pants have holes in them. Not cute. So I went through my stash of refashion-to-do's and found this beauty:

It was a maxi skirt made out of sweatshirt material - what more could a girl ask for? Now, I don't do maxi skirts; they just don't work on my body. Additionally, I'm super clumsy so any extra fabric around my ankles is generally frowned upon. I took the opportunity to try to make my first pant. I wasn't entirely sure how to go about doing it until I looked down. I was wearing my favorite skinny jeans that were amazingly comfortable so I said to myself "why not?". So here's where we get all PG rated and such: I took my pants off, turned the skirt inside out and slapped my pants on top of them to use as a pattern.

It was also at this point I realized I was apparently pretty partial to plum. Go figure.

I pinned, using my usual copious amount of pins, all around the legs and the crotch area. I made sure to go in a bit more than the pattern pants because my favorite pants are about a size too big (probably where the pure comfort comes from).


The crotch area was by far the hardest. I knew that the butt part had to be bigger to hold la ba-dunk-a-dunk, but I didn't want to make it too small and end up going PG-13 in this joint. I figured I'd play it safe, do a general apex in the middle, and deal with it later. You also may notice I didn't really use any of the original seams. I knew I should have, but the skirt has a slit on the side that put a bit of a damper on my seams. I knew the random seams (and darts) would make the pants look odd, but as I was just going to wear these at home, I wasn't all too concerned.

After sewing around the legs (only at Thrifty Sew will you hear "alright, let's get my pants back on and sew this) I chopped out the middle.


As anticipated, when I put the lounge pants on, the ba-dunk-a-dunk fit great, but the front looked like I was wearing a man's cup. At first, I wasn't sure how to go about fixing it, so after playing with a few different techniques, finally I chose the least classy way. I put them on inside out, grabbed a handful of crotch and pinned the amount of fabric I wanted to take in. I then took them back off, and pinned a better sew line.

 
In hindsight, I could have brought them in a bit more, as there is still quite the gap in the crotch, but all in all they didn't turn out too bad. They are certainly a very good in-home lounge pant, but I wouldn't go out and prance (or dance!) around town in them by any means. Once the crotch was sewn and I cut off the excess, I donned my new lounge pants and prepared for 3 more days of no worries and no work!
 
I hope you all enjoy the rest of the week and the weekend as well! Also, my wedding anniversary is this Sunday, so I may have to make a special outfit of some sort for that! Stay tuned!

Thursday, April 18, 2013

Dying Dresses

Happy Thursday, ya'll! Let's jump right into this one...

 
If you've followed me for longer than a few posts, you've known that I've been pretty obsessed with lace and nauticals lately. This one, although lacking the nauticals, certainly is lace. As much as I was in love with the lace, I was not loving the white. Folks, I am an extremely clumsy person who often spills coffee on my clothing and has a slight knack for drawing on my shirt without noticing. I took the opportunity to do my first dying!

 
I'm not lying when I say that the name had everything to do with my choosing this one. Also, WalMart had a whole 4 colors to choose from so the pickins' were already slim anyway.

Since the shirt was all cotton, I knew it would take to the dye pretty well. I got my bucket, filled it with steamin' hot water, a half a bottle of dye (this was probably excessive for one shirt) and a bit of salt. The salt ingredient isn't in the directions, but the many other blogs I've read that talk about dying often mention salt is important for... something to do with bright, rich colors. I then stuck the shirt in and let it soak, stirring pretty often, for about an hour.

 
I didn't want to ruin any of my spoons, so to stir this whole get-out I used the wooden/ribbon wands that I made for my wedding. Considering I had about 60 wands left after the reception, I had no problems parting with this particular wedding souvenir. 59 more dye jobs to go!

After I dyed the shirt and took it out after an hour, I spent about 30 minutes rinsing it under water to get the excess dye out. Once the water was turning semi-clear, I threw it in the washing machine with an old towel. At this point, I was anxious to see how my first dye job went. Because of this anxiety, I did something stupid. When this cotton shirt was finished washing I put this cotton shirt in the dryer... on high. I didn't think this one through at all, and in hindsight, I certainly should have because as I took my cotton shirt out of the dryer I slowly realized that it was much, much smaller. Fail. I put on the shirt and knew for a fact that I would never wear this midriff-bearing shirt. Brainstorming ensued.

Finally, I thought of something! Plan: buy some fabric, make a dress. Boom. So I bought some fabric made of cotton/spandex blend that would complement my newly dyed shirt. When I got it home, I realized this fabric was different than all the other fabrics I've bought. How is it different, you may ask. Well...
Ignore the crazy eye - I haven't quite gotten the hang of the red eye remover.
 
I had apparently managed to buy a yard and a half tube of fabric. Not sure how this happened, but it totally saved me from sewing a seam or two. My confusion turned to relief pretty quickly.

I had a piece of elastic in my craft room, so I measured it around my waist and sewed the ends together. As I wanted the elastic on the outside of the dress, I did a fancy-ish seam. My gut tells me it's called a "french seam" but I am unsure on this fact (google it). Basically, you sew it together, and fold it over the seam so the outside looks as such:

 
This makes it just a bit cleaner on the outside than just the cut end of the elastic. I then sewed my cotton/jersey fabric to the elastic. I read on a few blogs that when you're sewing dresses with elastic you should stretch out the elastic while sewing in order to keep a "ruffled" look and keep the stretch in it. This was - well - it was a mess. I kept stretching it, which then pulled the elastic faster through the needle and made the stitches uneven. I then tried to not pull it too hard, and ended up not stretching it at all. I kept going back and forth between great stitches and drunken sailor stitches. Again, no one will climb up my dress and inspect the inside seams, so I let it go.

Then, I cut my shrunken shirt shorter - to my natural waist - leaving a bit of a seam allowance. You'll notice on this picture as well that I'm in need of a longer ruler.

 
Once I had the top and the bottoms on the elastic, it all came together from there! I have a nice new dress with lace shoulders that is very, very comfortable. Check it!


Thursday, April 11, 2013

Darted to Death

Happy Thursday! I hope your week went by well. My weeks since my resignation have seemed to go very, very slowly. They're pretty painful, but I see the light at the end of the tunnel and can't wait for May 6th (which is my start date at the other job). Apparently I love changing my entire life around at the beginning of May. Last May, I married my best friend. This May, I'm changing careers. Wonder what next May shall bring?!

So friends, I gave you a teaser in the last post about the upcoming project. Alas, it is finished and it is a huge, huge fail. It's so destroyed that it is actually sitting in the garbage right now. I may take it out later and try to harvest some fabric, but right now it's in a fabric time-out to think about what it's done.

I had pretty high hopes for this one.
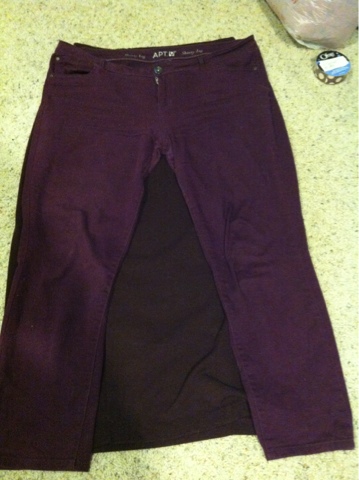
It was a long skirt that I absolutely loved the pattern on! It reminded me of summer and I couldn't wait to make it a cute sundress. The idea was easy - as ideas always are - take it up around my shoulders, cinch the middle, hike the hem up a bit and call it a day. Oh, and there was the little matter of the hooch-tastic slit up the side.

So when I hiked up the skirt to my armpits, it was quite billowy. As I saw it, I had two ways to go on this one. I could throw a belt on it to cinch it or I could actually learn something and do some darts to cinch and fit it a bit more to my body. I decided on the latter - I was going to learn something.

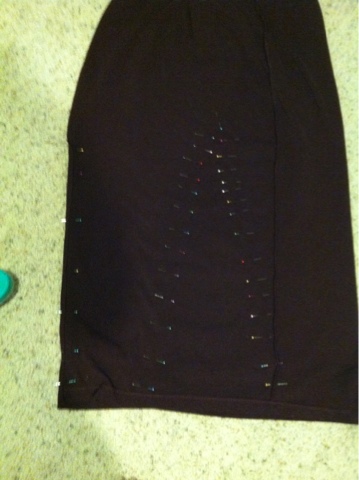
First thing I did was put the dress on Sophie (as you saw in the last post) and put some darts in starting at the bottom of the chest and going down a few inches. Now, I'm obviously no "how to guru" on darts because you know this project turns out to be a huge fail, but basically a dart is put in to fit garments to the curves of your body. They're often found at the bodice, back and chest but could be other places as well (for example on skirts you often see four of them - two in front, two in back). If you look at most of the clothes in your closet, they have darts somewhere or another. Essentially, it's where the tailor pinched the fabric together in the back and sewed a little triangle, chopped off the excess triangle piece and ironed down the fabric. Turn something inside out, you'll see it.

Back to what I did - I pinned on Sophie where the bottom of her chest was and then a few inches down for my starting and stopping point. I did two of these on the front. After I sewed, this is how the wrong part of the fabric looked.

Luckily, I was a smart cookie and tried it on before cutting off the excess. After I tried it on it was absolutely hideous. We'll call this Fail #1. I donned the skirt dress and it was a) uneven, apparently Sophie isn't as symmetrical as we thought b) puckered at the back, I had a full-on back belly and c) puckered at the sides. The sides I was actually okay with - if it puckered there, I could always sew up the side seams that were already there and bring in the puckers that way. The other two problems I couldn't live with, so the handy seam ripper came out in style and I ripped it all out.

It was at this point that I gave up and wrote you a post about all the random things I had done throughout the week. Meanwhile, I scanned YouTube and other tutorials on how to do what I wanted. Let me tell you guys, I. Found. Nothing. Nothing. I found a lot of tutorials on how to do the darts following a pattern and making a dress from scratch. I found a lot of tutorials on how to do a dart on a random piece of fabric. I did not find one tutorial on how to include darts into a refashion of a dress. No instructions whatsoever on where to start them, where to finish them, what type to do on what types of dresses, etc. I know people have done it, but apparently it's such an easy tactic that no one felt a tutorial was needed. I showed them.

Luckily, I was all "learned up" on how an appropriate dart was done. Basically, you start at the inside of the dress and go to the outside of the seam. You back stitch when you start, leave it be when you end and just tie a double knot in your thread. So - I did attempted that.

I mean, it basically did happen. A dart was made. I also made it longer to go all the way down the bodice. I had noticed on the last one that the fabric still folded over itself in a natural fall during the first time around, so I thought if I continued to bring the dart down into the bodice and waist it would really make it nice and fitted (and lengthening lines). Yeah - I was dreaming. I put this thing on and it still a) made me have a back belly and b) puckered at the sides, however we now have a new c) cinched the waist so tiny - I had accidentally taken the dress in about 2 sizes and I now couldn't breathe. Fantastic. So the seam ripper came out again. We're calling this Fail #2.

I found in my random Google travels that there is a different type of dart - the diamond dart. Since I was already on a roll, I figured "why not?" I knew at this point the dress couldn't go out into public anyway - there were major holes in the (what I now knew as) delicate fabric from my seam ripping that you could see tiny dots of my skin all over my waist.

In my mind (again, those easy idea things) this thing called diamond dart was the perfect solution. It would tailor the garment under my chest to bring it in, and the bottom of the diamond wouldn't bring in the waist as much so I could commence breathing. It was settled - I did the diamond dart.

You heard me. I did it. This is actually how it's supposed to look. You start at the seam and end at the seam, back stitching nowhere, and tying double knots from the excess thread to keep it.


Then I put the dress on, and threw a belt in there just to keep it a little more cinched at the waist, since I hadn't kept the dart going all the way down the waist.

Mind not the bra straps. I'm not fancy enough to go all the way up two flights of stairs to find a strapless. Deal with it.

So from the front it wasn't horrible. It's not what I would call the most flattering thing in the world, but it was a strapless dress, cinched at the waist with darts that made it more fitted. AND! There was no back stomach, and only a small amount of side billow-age. It still wasn't going out in public, but it was something I was happy about. I learned something.

Then I turned sideways.

Fail #3 can be summarized, again, via alphabet. a) Pancake boobs. Yes, pancake is an adjective in this sentence and you know exactly what it means in this context. b) Belly pooch - and folks, that's not mine. If it was mine, I would have edited that shit out and never drawn attention to it BUT! this one is not me. The pooch was even larger without the belt. It looked like I carried a baby and a six pack in this pooch, neither of which is accurate.

Although after the week I had at work, and looking forward to the next 2 weeks at work... the six pack doesn't sound half bad...

See you next Thursday, friends. And please don't follow or consider this blog post a "tutorial" or "how-to" post at all. I don't want to be responsible for the result.


Saturday, September 29, 2012

Blue Dress

At some point, I promise to come up with better names! For now, generalities will have to do.

When I decided to do this project a few days ago, it was all I could do to wait for the weekend to go shopping and have the time to work on my first project. Finally, Friday came around and I spent a few hours after work combing the racks of Fulton's Salvation Army and Baldwinsville's Thrifty Shopper. I made sure to keep within my mental checklist for the first few projects: look for nice colors, simple designs, fantastic buttons, etc. Every single item I chose was a dress - I thought I'd start "easy" with items with lots of fabric attached. Safe to say, I found plenty for my first few projects (and a few things I regret not buying like a fantastically designed sweater and an accent chair for 6 bucks!)

First up: blue dress. I've been very into blues and whites lately, especially together. Stripes or dots, you name it and I've looked at it with all intention of purchasing it. I found this dress and knew I had to bring it home (for $2.50!)
This was a tea lenth, blue and white dotted, button-up-the-front shirt dress that a few of my grade school teachers were extremely partial to. I chose it strictly for the cute buttons, the dots, and the fact that it was such a soft fabric. After trying it on at home and noticing that the A-line skirt was way better than the awkward arms, I knew it had to be a skirt. Before I came to this decision though - I knew that the shoulder pads had. to. go.
Sad shoulder pads! I feel like a lot of the items I'll find at thrift stores will have shoulder pads - maybe I should start a collection of some sorts?  I also cut off the belt; I did this for no particular reason other than I was rather enjoying my new seam ripper.
 
Next, I noticed that there was a natural seam around the waist and thought that was rather convenient! So I cut it in half, using the existing seam as a guide.
At this point, I was thinking the top could be made into a cute balero and I could use BOTH parts of my dress. Then I tried it on. Blegh - definitely not for busty girls. I did sock it away in some dark corner of the craft room, though. You'll never know when someone will ask "do you have an old fashioned balero that is blue with white dots?" and I would totally have that covered.

It was also at this point that I realized the original dress was longer in the front than it was in back - this seemed pretty backwards to me, but I'm not gonna judge. My original hope was to have the buttons (originally in the front of the dress) on the side so it'd be easier to hook when it was finished. As doing this created a certain assymetrical look - and not a flattering one - I had to flip it around and make the original front of the dress the back, thus making it longer in the back than it was the front. You know... like typical skirts. I then proceeded to sew a seam from the bottom of the skirt, keeping a small slit so it remained a-line, up to the first button, with hopes of the first button being my skirt closure. This actually took me two attempts. The first time I sewed the seam, I forgot about the buttonholes, so when I put it on the first time the buttonholes created quite the "peek a boo" every 2 inches or so. The second time was a charm!

All that was left at this point was just to make a top seam. I folded over the top about a half inch and sewed that down, then folded it over again and sewed it down again. Why did I do this? Not sure. My brain was thinking "if I did this twice, maybe it'll take longer to fall apart". As you can see, my confidence was stellar at this point. After doing this, I realized there was quite a gap from my closure top button to the top of the skirt, so I took one of the buttons that I removed from the dress when I sewed it up and sewed the button to the top of the skirt. It was at this point that I realized I had no idea how to make buttonholes. Whoops.

This is where I'm not proud. I knew I should have googled it, or at the very least looked it up in that book that came along with the sewing machine. But, I followed my "the book is all the way downstairs!" mentality and just cut a hole. That's right! I got out my handy scissors and I just stuck it there, somewhere around the opposite side of the new button. I then hand-sewed around the edges of the hole a few times so it wouldn't fray or rip when I buttoned it up. For now, the hole seems to be doing okay, and luckily the button fits inside of it (another thing I should have thought about before I sewed all around it. Thank you, fate, for making me lucky this time.) So I donned the skirt and it fit. And it stayed. And it isn't half bad!
 Yes, I had to put on an ENTIRE outfit to see what it would look like, up to and including the shoes. It didn't look half bad, so I think this will be my Monday morning work outfit! *With a backup skirt in my bag... just in case*

Few notes on my mental checklist: 1) Learn how to do buttonholes. 2) Learn how to take a decent picture of myself that isn't a typical Facebook photo through a mirror. I may have to rope the husband into helping me on this one. 3) Get comfortable with being in pictures - I seriously hate being the subject.

Next up: I have a fantastic pair of grey boots that have not been debuted quite yet and I'm desperate anxious to wear them soon. I have a wine tour coming up next Sunday, so I'm hoping to make one of my other thrift store finds from yesterday into a comfy tunic to wear with black leggings and my new boots.

What are your thoughts? Was I "sew" thrifty, or was it something to be desired?