Sunday, July 27, 2014

Dying to be Different

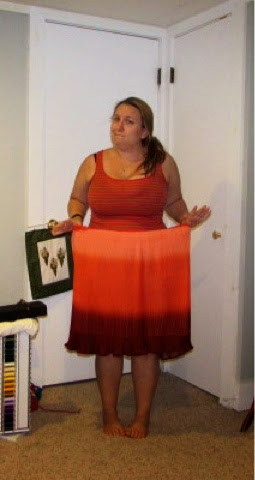
Happy Sunday! I just gotta start this by saying - I totally freaking love this dress! I was super excited how it came out. I also want to let you know beforehand that I totally failed at taking pictures of the process. So... you win, you lose, right?

I started out with this:
This dress may or may not have been homemade. There was a tag but it literally said nothing but a word that I couldn't read. I had no idea what the fabric was, how to wash, etc. It was also a very nasty color, stained in a few places, and just generally ugly. It's been hanging on my refashion "to do" rack for quite a while- until this weekend when I had an "AHA!" moment. What a perfect job for these guys:

I got a few of these on sale at Joann's, so I brought home some colors I thought may work for this dress. Once I got everything home I decided that red was the way to go.

Once I had the hot water and red dye in the bucket, I thought "well hey, let's get dye crazy" and added in a bit of the tangerine as well.

And this is where the pictures stop, friends. Here's the short checklist of items:
1) Dye in a bucket for a few hours, rinse and spin in the wash and toss in the dryer
2) This dress was way too small in the arms and a tad too small in the bust. To fix, I got rid of the arms altogether - they had holes anyway - and I made more a V-neck in the bust to let those babies breathe a bit more.
3) Chop chop! I cut off the bottom so it no longer stopped at my calves. Why is that a thing, anyway?

And that's it! Super simple changes to make a boring brown dress into something that totally stands out!

Hope you guys are having a great weekend. Stay tuned for Wednesday - we're testing Pinterest!


Sunday, July 20, 2014

Back with a... Fail

So, I always tell you guys that I will always let you know when I fail. Well... I wasn't lying, and I'm back to blogging and starting off with one. I've had this piece for quite a while now, but was totally stuck as to what to do with it. I am a huge fan of orange so this screamed my name this past spring as soon as I saw it.
The problem? I had no idea what to do with it. Every time I put it on, I hated how it looked but didn't know how to make it better. Finally - today -  I thought I would come back with a bang and conquer my personal challenge. I adored the orange ombre-look, but those horrible flowers on top of my rack needed to go. away. So, I got to chopping and (looking back, thankfully) chopped only the flower front from the plain arm strap of the back.

So then, as with all of my projects, I went ahead and played with different ways to change it up. I figured now that the first cut was made I would automatically find myself a solution.


But this didn't look right.


And this didn't quite work either...

Umm... nope. Not that either.

So this is where I got frustrated. When this happens, I try to start myself back at square one. So, I put the dress back up where it was supposed to be. Since I had already cut the straps, I just pinned the flower straps to my shirt to see if I could get an idea of what direction to go with this son of a bitchin' dress.


Suddenly, it dawned on me: the only thing I didn't like was that the flowers were on top of my chest. How did I never think "just move them down"? So I played around with pinning the straps and once I simply shifted everything down a bit, I liked it a lot more. Also, without the front connected to the back it created a gorgeous hi-low hem with the see through fabric that I immediately loved.


So the solution? It was actually super easy, but I couldn't complete it - here comes the fail! The solution is to cut and sew the back straps into an open back and add a ribbon to create a halter. The problem with this plan? I don't own orange ribbon and since we just resealed our driveway and were stuck at home not being able to drive on it, I couldn't go buy some.

Here's the look with just simple pins and a simple plan.

Happy Sunday, friends! Enjoy the rest of your weekend and, as always, sound off in the comments or my e-mail thriftysew@blogspot.com.

Look out this week (around Wednesday) for some new and exciting !

Testing the Food Network: Peanut Butter 'n' Banana Ice Cream

So I don't know about you guys, but I watch the Food Network quite religiously. I think the cooking shows are the most fun and could truthfully watch them all day long. Confession: Sometimes, on Saturdays, I do just that. I also share my day with the HSN and QVC shopping channels. Don't judge.


So anyway, on Saturdays, there is a new show on the Food Network called The Kitchen - and I am obsessed. I won't go into details, but you need to watch it.

Anyway, two weeks ago on The Kitchen, they made a quick and easy "healthy" ice cream with bananas. And I had banana's. So, during the next commercial break I got right up and threw my banana's in the freezer. And then I ran straight back to the couch to continue watching. A few hours days later, I remembered my intentions and got all the ingredients together, including: frozen banana's, plain Greek yogurt, peanut butter, Nutella (or the cheapskates version, as I have),


I didn't quite think about the banana's when I was tossing them into the freezer. It didn't dawn on me until I brought them out that I had no idea how to peel a rock solid, frozen banana. Youtubing commenced. Turns out, you let it thaw for 5 minutes, cut off the ends, cut it in half and the peel comes right off with a little help from a knife (or your finger nails when you get frustrated with the bits that remain.)

Once peeled, toss them into your food processor in chunks.
Next, add to the banana chunks your Greek yogurt. This recipe calls for full-fat, original flavored Greek yogurt. Naturally, this is what I purchased.

Honest, I swear the "low fat" was hidden in the store... it appeared while in my fridge...
Next, add a gob of peanut butter into the food processor along with your yogurt and banana chunks. A gob is obviously the technical term for "however the hell much you want". I put this much:
Next, you turn on your food processor and let it rip until it's creamy and chunk-less. I turned mine on and... nothing happened. I played with it for a good 20 minutes, but it just wouldn't lock. So, for the sake of the blog, I swore a lot about the multiple dishes, but I got out my blender and wished it luck.
But... I didn't care all that much because I had a trusty friend by my side that tends to keep my stress down.
Next, you put your mixture into a bowl and "fold" in a gob (refer to the peanut butter part for definition) of the Nutella. This makes it look... well.. not so edible and delicious.
I didn't let it phase me, although it tried because my Nutella never really did "fold" in nicely, but instead stayed in small chunks that resembled poop. (It's what we were all thinking - I just put it in writing)

After a few hours, I took it out of the freezer to see how it developed. The top of the bowl resembled ice cream, but the middle and right underneath the top was still pretty runny, so I put it back in the freezer and vowed to come back to it in a few hours.

3 days later, I remembered it was in the freezer when I went in for some real ice cream. I grudgingly surpassed the real ice cream and took out the bowl of, lets be honest, mashed bananas and gave it a go. It was hard as a rock and looked a little like this:
After a quick microwave and a sit on the counter for a bit, I finally had my taste of concoction.

Results: Yup. Tastes like frozen bananas. And if you do this, definitely eat it a few hours after freezing instead of a few days.

As a side note: I'm not completely believing this is a "healthy" alternative to regular ice cream. I made one small bowl out of two bananas (200 calories), a yogurt cup (100 calories), a scoop of peanut butter (probably 100 more) and a scoop of Nutella (about 50). Together, this small bowl is 450 calories. I'd rather just indulge in a bowl of regular ice cream of the chocolate variety for just about the same and know I will enjoy it much more.

Tuesday, July 15, 2014

I'm Alive!

Hello all! I know, I know - I've been pretty non-existent for the past few weeks. You know those times during summer when life just... HAPPENS? And you start to not remember what spare time was? That's been my last few months. Now, I'm not complaining, because I've been doing some pretty great stuff and have been having some very quality family time. The downside to that was that I had to put the blog on the back burner. BUT! I have been thinking of you all and have tried to keep a photo diary of the big stuff...
 
I think we left off here, at Niagara Falls.

Then, I took a very long run in 94 degree (F) weather with a sweet bib on. It was dumb and it was hot, but it happened and my time for 3.5 miles was a good 10 minutes shorter than it was last year. It's a "one and done" kind of activity, so I won't do that again for another year. Thank God. I'm okay with that.
Then we had storms. Lots and lots of storms. And our power went out. A lot. And our gutters were clogged. A lot. And we called gutter companies to come clean them who charged for that service. A lot. So, my husband bought this contraption that worked but was also hysterical and made me laugh. A lot.
 

Marry an engineer, friends.
 
I'm also not going to lie - I did a lot of shopping, and not at the cheap places I prefer frequent. I went big, and then I went home to hide my wallet. This was my last Sephora haul...

I also spent some time gardening. Some of it was super unsuccessful because of the storms. For example, this basil that I managed to drown within a day.

However, the garden that I had planted/showed you during my video is looking pretty good. And by "pretty good", I mean it is gorgeous and I'm fantastic.

Even my hydrangea bush has come back this year. It may or may not have been butchered last year by a overly-happy shearer named: my husband.

Although my goal was blue...
 
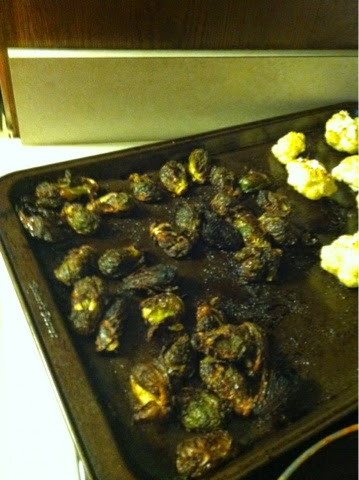
It hasn't all been great though. I did serve this dinner...
How 'bout them sprouts, eh?

So, long story short - it's been a great summer. Now, I'm back... I hope. I hope to pick up again with some exciting turns to keep ya'll readers interested. Here's a couple of the ideas that I have been known to be thrown around in my head:
  1. I've been pinning again on Pinterest and am playing with the idea of a mid-week Pinterest test.
  2. I'm also thinking of having you, my readers, send me challenges: see what I can re-make, re-do or, most likely, what I can mess up.
  3. Contests? Do y'all want to be winners of something?

So shout it from the rooftops, friends - what are your thoughts on these? Leave them down below in the comments or, as always, feel free to sounds off to me at my e-mail thriftysew@gmail.com. Help me make this blog something you can't wait to read :)

Sunday, June 8, 2014

It's a Gardening Kind of Day

Today I did a lot of gardening. I wasn't sure if I'd manage a project on top of my chores and errands today, so I thought I'd rock a new kind of post.

My aim was to do a "follow me around" video but I suck at taking my phone everywhere. So, it's basically only my gardening. And my last minute thought to show you my lunch. You are welcome.


Sunday, June 1, 2014

Home Stuffin;

This weekend was one filled with family. I had a great weekend. It started with a barbeque at my brother's new house and then finished with a day filled with my favorite things - chatting with the family, going to my favorite restaurant for my favorite sandwich, and ending things with my wedding cake. You heard me - my wedding cake. We have it every chance we can get.

So when I got home, it was only natural to make my home more... well... homey. I decided to finally cover those pillow forms that I bought. (You can see my mini-haul that these were mentioned in here.) I decided to make the easiest pillow covers ever. Bonus: they aren't permanent so I can switch them out to my liking or just take them off and wash them. (I drool. Don't judge me.)

First thing, measure your pillow. You measure the width first (left measurements in picture below) and then you measure what would be the "height" (obviously the opposite of whatever you just measured) all way around the pillow. I had a square 16"x16" pillow, so it was pretty easy. To figure out what to cut you add two 5/8 inch's for seams to the width, and then you add two 1 inches to the circumference. I'm not fantastic at math, so don't look too closely to my adding of fractions. After cutting, I didn't really pay much attention to how long my seam allowances were, so this step probably wasn't all too necessary.
My first cut didn't go well. I was watching Netflix and for some reason had 8" in my head. So, my first piece was cut completely wrong. Damn Netflix.
The top strip is my "whoops" cut. The bottom is what it is supposed to be. Quite the difference. Probably should have noticed that before cutting.
Next, on the shorter sides, I folded up the edge 1/2" and then again for another 1/2". I ironed that down (yes, I ironed, pick up your jaw) and sewed up the two edges.
Next, I laid the fabric down with right side up and folded up the sides to overlap each other, a la this:
Thus giving me something that looked like this:
Remember that 2.5" overlap that I factored in? (check my math above... but not too close and all judgemental-like) This is where that comes in. You make sure the two ends overlap each other by the 2.5". This is kind of important because it takes this from just a square of fabric into a square of fabric you can jam pillows into.
Then you sew up the two edges to close everything in and trim the corners so they aren't all bulky.
Last - turn it inside and out and stuff in your pillow.
And voila! You have a pillow cover that is removable, changeable and washable. In my video, you may remember I wasn't a huge fan of this red on my couch when I just placed the swatch of fabric on it. However now that it is in actual pillow form...
I love it!

I can't wait to make more of these. It is legit super easy (not that fake easy that people say and no one I can't get past step number one) and took a max of a half hour to make. A little bit more for me since I a) cut wrong b) stopped mid-sew for some grilled pizza. That stuff is delicious and you don't pass it up for anything.
Are you still thinking "what the heck are they doing eating wedding cake?" You shouldn't be - you should just be jealous you don't have this deliciousness in your life.
Have a great Sunday!


Monday, May 26, 2014

Memorial Day Awesomeness

Happy Memorial Day! Today is a day to remember those that fought for our freedom. I saw a perfect saying today "Home of the free, because of the brave". I think this encompasses the spirit of the day very well. Both of my brothers, numerous uncles and my grandfather are all included in that brave, and I am more than proud to say I am related to and support that kind of dedication to our country.

I had to find an awesome dress for this weekend, and this one fit the bill:
It had good bones and a fantastic pattern... but it was completely see-through. Not all that appropriate for any sort of public festivities - or just public in general.

With time not on my side (gorgeous weather! cookouts! family time! Ice Cream!) I made a quick three cuts. That was all it took to make this into a great top. I cut the bottom portion of the dress off (it's not like a see through dress was of any use to me), shortened the arms and made the neck less constricting.


With a quick sew on the arms and the bottom hem (I kept the boatneck with a cut edge) my shirt was ready for the holiday!
And because the holiday is one to celebrate the soldiers - I threw some red, white and blue together in the spirit of freedom.

Along with a National Holiday, today is also my husbands birthday. With the weather being absolutely gorgeous, it demanded us being outside. We went to a National Park near us and took a quick three mile hike around the lake. The views, however few and far between, were quite awesome.

Oh yeah - and I may or may not have dyed me hair pink. 

Answer - may not. I ain't crazy! Although, hair chalk on sale at TJMaxx saw me coming a mile away.

Enjoy your holiday all! Happy Memorial Day!

Monday, May 19, 2014

Quick and Easy

Sorry this post is a day late. Tends to happen when you forget to hit "Publish".

What happens when you've got somewhere to be real quick-like? Or when you've got an idea for a project but don't want to make it final by sewing it quite yet? Or when something is just not quite right?


Safety pins. (And shameless plugs of old wedding decor that I swore I'd use again)
Here's what I started with... When I bought it, I thought I was getting a sweet deal on a dress. I threw it in my cart when I saw the $3 price tag, and danced out of the thrift store. Then... I put it on..


What is this?! (The dress, not the slippers. The basement is chilly!)

I had to get rid of those flaps, but didn't want to just cut them off because I'd have to tear the entire dress in half. Eventually, that'll be where I go with it. For now - ain't nobody got time for that. I had a summery weekend to enjoy. So, I went with the following steps. 

1. Gather weird flaps. 

2. Stretch flaps and bring together. 

3. Tuck it in like you do your phone when you have no pockets. (Come on, I can't be the only one! Anyone? Anyone?!)

4. Pin until it doesn't look weird. 


With one simple fix in four easy steps, my dress is no longer a "what is that?" dress. 


Coming up: it's rummage sale season! I'm excited to try to pull my experiences whilst rummage saling into my posts - possibly with a "day in the life" or hauls. If you hate it, let me know. If it interests you and want to see more, let me know that too. As always - comment away or reach me at thriftysew@gmail.com!


Sunday, May 11, 2014

My New Favorite Skirt

I am super excited about this project, guys. Not only am I excited because it turned out well... but it was pretty easy too! I'm not lying when I said it turned out well. I can't wait to wear this and I think if it was something I saw in the store I would purchase it. I'd shell out a solid 10-15 dollars for this, I think. I am a thrifter, after all.
 
First thing I got together were the raw materials. This is happening from scratch. 
Next, I cut off the ends with the Joann fabric logo. I'm all for Joann's, but I'm not going to wear the logo unless I'm getting the check. So chop chop goes the ends!
Next, I measured the fabric to my waist and cut off the excess. I sewed up the ends to create a tube. I did this with the "right side" of the fabric out and, because it was such a stretchy fabric, used a zig-zag stitch to keep the stretch. I promise I haven't gone crazy and forgot how to make seams - I have a plan.
Next, I flipped the tube inside out, and sewed down the seam once more.
This enclosed the raw edge so it wasn't against my skin and made it itchy. As the skirt only has one seam, my plan was to put it in the back so the skirt didn't look lopsided. Sitting on a raw edged seam just didn't sound appealing to me. BONUS: I almost nailed matching up the pattern. Almost.
 
Fine. I was only close on one square.
Next, I measured a 2inch wide black elastic around my waist. One thing I always do wrong with this elastic is that I never stretch it enough when measuring around my waist. I do this every time and this time was no exception. If you do this - don't be afraid to stretch it quite a bit when you measure. I always get nervous that it looks too small so I don't stretch it as much and it always ends up too big. Once I had it cut, I sewed up the edges.
Once the edges were all sewn up, I attached the skirt to the elastic and voila - I had a skirt! I threw on a white tank to ensure the skirt was well seen in my pictures, but for work I'd tone it down with a simple black shirt.
My apologies on the blurry picture. My camera took everything super blurry because I was on a weird function and didn't notice it.
 
As for the bottom, since it was a fabric that is not going to fray, I left the edges raw. I made clean cuts on it so it is not uneven and unless you look close you don't even notice that there is no hem. If I don't just leave it like this (which I probably will) I would do a blind hem, so the stitches don't ruin the fantastic pattern.
 
Don't think this was all sorts of easy peasy and that I'm getting skilled here, folks. I still have my serious faults. Such as my ability to match up seams...
You win some, you lose some.

Happy Mother's Day to all the wonderful mothers out there that bust their butts to ensure their family gets everything their hearts desire - mine especially. There wasn't a day that went by (or still goes by) that my mom didn't wear about 20 hats within the house. Enjoy your day, Moms!