Sunday, May 26, 2013

Happy Updates!

It's fixed, it's fixed! To be honest, not even sure what happened to it in the first place, but the sewing machine is fixed!

My husband took my machine apart and basically gave everything a good cleaning, pulling out the goop, thread and grease that had made its way into my machine. Nothing was actually found to be wrong - apparently the banging and all the other weird stuff that was going on was only caused by a dirty machine. Which doesn't make me feel like a sewing scumbag at all (sarcasm.)

 
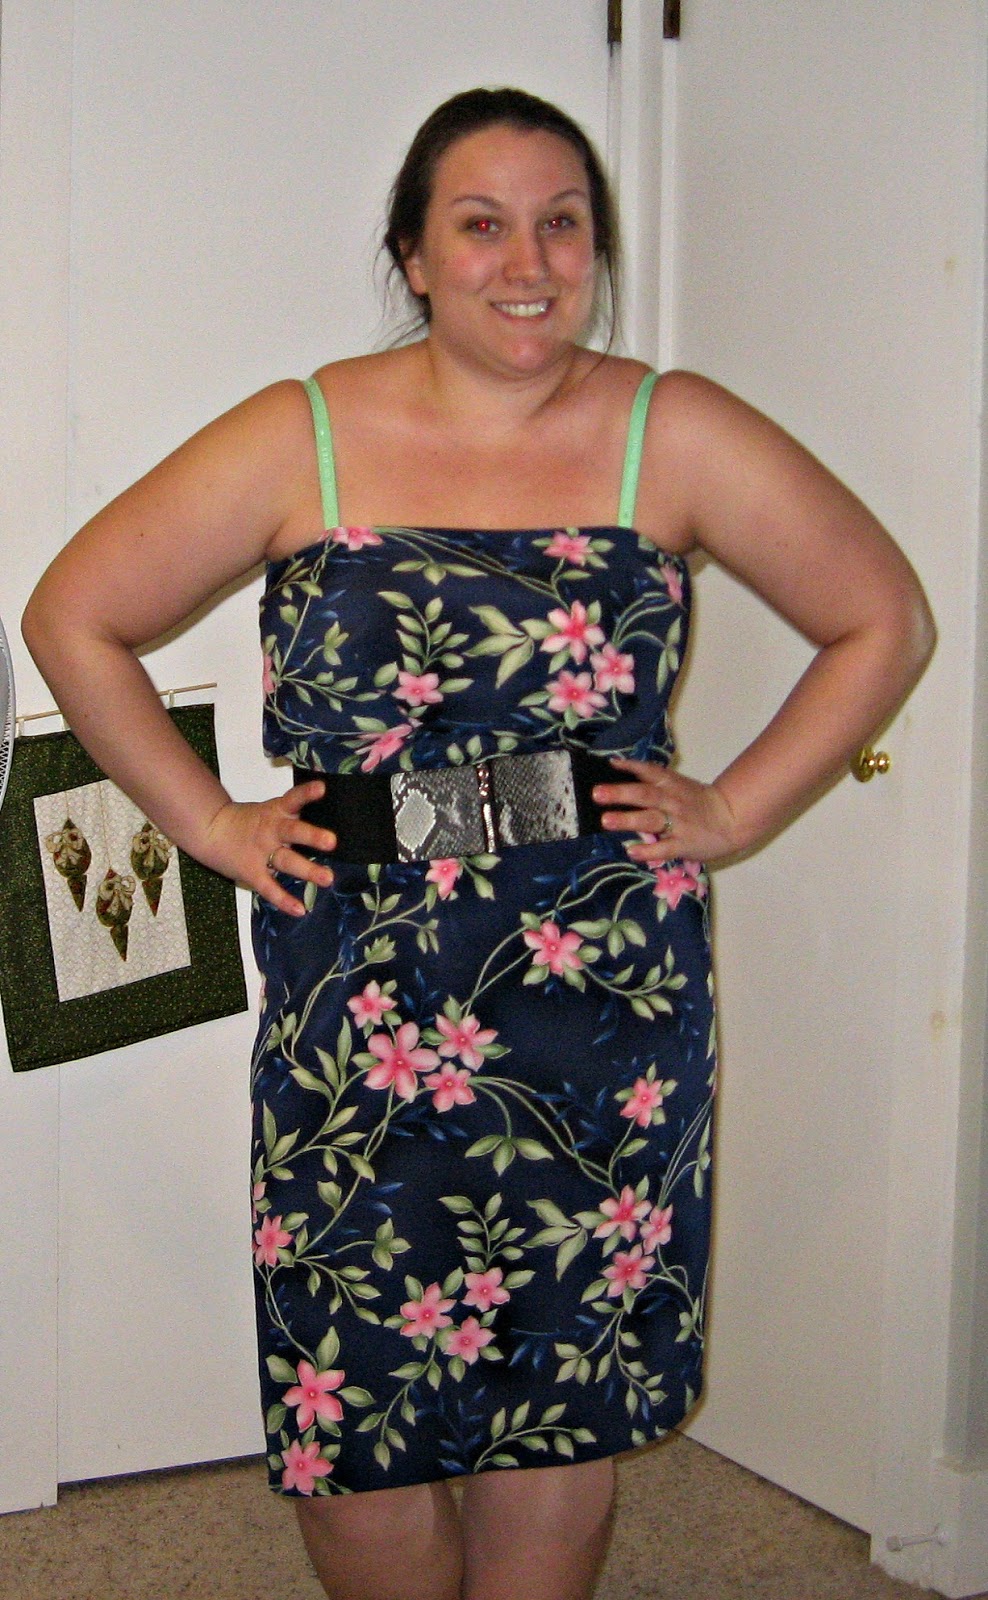
So now that that was taken care of, I could finish up some of the projects that I've left half finished. One of these projects was my school marm dress. (See a refresher here.) As you may remember, I left this dress on Sophie all pinned together but not sewed up because I was missing a piece of elastic for the back to hold it up. Well, when I was searching around for the feet that I bought from ebay mentioned in the last post, I pawed through the back of one of my craft drawers and found a piece of elastic about 4 inches long that was perfect! So I went ahead and sewed everything up.

I'm pretty ecstatic about how it came out - the arms ended up coming out a bit weird, but I'm a layerer (that's a word now, deal with it) so it's not often I'd wear a dress like this without a cardigan of some sort. Therefore - the arms shouldn't be too noticable when I actually wear this somewhere.

Here we are:
I will end up making the length shorter, but that is the end of this project :) So stoked that the project that had the most construction turned out to be one of my biggest (and best!) project.

Also, because my husband and I are pretty in love with it, I wanted to show you one of our anniversary gifts. Thomas, one of our groomsman, gave this to us last week for our 1st anniversary and we were so stoked to put it on our wall! It looks fantastic and is just  what we needed, not just to make our home feel like a home, but also a personal touch to really commemorate the best day in our lives. Not only is it a fantastic picture, but we also love it because it is a picture that was taken by Thomas himself on our wedding day when we were walking on the golf course. It's the personal touch and story that makes this so much more perfect. (I know - I got all sappy there. My apologies.) The artsists name is Brooke Elizabeth Ann - once I get contact info (website, etc) I will make sure to post it. From this picture, I can safely say that she. is. amazing.

For those celebrating - Happy Memorial Day! I have lots of family members and friends, past and present, that have served or are currently serving in one of our wonderful branches of the United States military. I love and respect you all, and there are no words that can express how much I truly appreciate you all fighting and putting your lives on the line for our personal freedom. A few honorable mentions: my grandfather, my uncles, both of my brothers and more than a handful of my high school friends, all have whom have served in some sort of war. Superman be damned - you are my heroes.

Thursday, May 23, 2013

Mayday! Mayday!

Sad day, guys, sad day. As I finished the below activities (read on after I get this tragedy out of the way) I went to change the color of my thread and I happened to notice a ball of something inside my machine.That's right - INSIDE. In a place that I could not get to. Upon closer inspection I figured out what it was.
 
A ball of thread. Mangled and tying together a few of the gears in my machine.
 
Panic ensued. I have no idea if this is normal, or if this is my machine doing something terribly wrong, but I decided to stop what I was doing right away and freak out. Afterwards, I did the only logical thing and complained like a 5 year old to my husband. If you've been a reader for a bit, you'll know my husband likes to tinker and tear things apart. Despite some recent trips to urgent care (2 visits in the same amount of weeks, actually) he is very handy and usually can take things apart and put it all back together like nothing happened. He offered numerous times to rip my machine apart and get out the ball of thread and un-mess it up. This idea made me panic again - what if he can't put it back together? What if it's messed up forever? What if he can't do it by the time I have to post next Thursday? I'm usually very confident in his engineering abilities, but this one was so close to home it scared me.
 
Grudgingly, I agreed - but not without a bit of a bet. He bet that he could fix it, I bet that he could not. If I "win", he will buy me a new machine. If he "wins"... well, we haven't decided on that quite yet. Either way though, I think I legitimately win. (Honestly, I think that's why there's no prize on his end. He's being "betting supportive" and just wants me to get back to doing the thing I enjoy.)
 
Plus, he kind of hates when I have my lady-panic fits.

In other news, I've been a shopping fiend lately! Now, don't get too excited - my "fiend" is equivalent of a hundred bucks or so, but I did go out and get myself some new fancy digs. This is where I break readers hearts though - it wasn't anything from a thrift store, and nothing is an intended project. Sad day. I know a few people get upset that I broke my trend - I was supposed to be buying everything second-hand! Here's what I have to say to those folks: I know the value of a dollar. I know I can buy really, really nice fabrics and items at a thrift store for a dollar so if I'm going to  spend 20 of those dollars on one shirt I know it better be a good. gosh. darn. shirt.

In high school, I admit, I used to buy brands, not clothes. It didn't quite matter the fabric or the quality. If it said "AE" or "Aero" it was meant to be in my closet. I noticed when I was shopping recently I totally surpassed brands and paid attention to the garment itself - were they well constructed? Was the fabric durable? Did it fit well? Long story short - I found a new way to appreciate thrift stores and making my own clothes. I know that I don't have to settle for odd fitting clothes or see-through, thin cottons. If I'm going to spend my hard earned money, it is going to be on quality and durability.

What else was included in my haul, you may ask? I finally broke down and bought myself a zipper foot and a hemmer foot. I know, I know - they aren't huge purchases, especially since they were ebay buys for less than 20 dollars and free shipping, but it's more an exciting purchase. I was ready to move on to all the fancy stuff that real sewists (again, not sewers, never sewers) do!

First thing I tried was the hemmer foot. I do admit - I bought the feet from a seller that was advertising that these feet fit Brothers, Singers, etc. A "one foot fits all", if you will. The first success was that it did, in fact, fit my Brother sewing machine.

Hot off this first success, I decided to try my hand at actually using it. I took a swatch of fabric from the last project and tried it out.

Nailed it.
 
So that didn't quite, what one would say, "work". Was it all my fault? Probably. What am I going to blame it on? Having the wrong bobbin. That's my story and I'm sticking to it.
 
So I couldn't get one flippin' hem to come out right. I had wanted to hem the dress from this post. I wasn't sure if the cotton/spandex blend was too thick or too stretchy, but it was not feeling like going through the hemmer foot. Eventually, I gave up and just did a hem with the good ol' fashioned straight stitch.
 
And I have to say... it's kind of the best I've ever done. I even rolled it twice all official and stuff! Check this win out!


I will be back next week. If I don't have a sewing machine, it may not be the most impressive project but I'll do some hand-sewing to get something done. Meanwhile, I'll keep you updated on the bet with my husband. It's pretty unusual to say - but I'm really hoping he wins this one.
 
P.S. The ring in the above picture is my new favorite! It's a handmade aluminum right (thank you, Etsy) that wraps around my thumb and says "Hakuna Matata" on it. I love love love it. Not only is it a fantastic saying and theory, the Lion King was by far one of the best Disney movies. Win.


Wednesday, May 15, 2013

School Marm

Hey y'all! Sorry about last week's hiatus - as I had mentioned in my last post I was mentally tapped. However, now I'm back and in action!

Here's what I was working with that has posed the biggest challenge for me thus far.

I'm not proud of this face, but unlike other weeks, I only took one before picture to choose from. Lesson learned.

So when I bought this, I decided that I was going to take off the vest part and just have a clean white button-up shirt with a teal skirt. Everything was a cool clean linen so it would have been a good summer dress. Then I started ripping it apart....

 
The first thing that I discovered was that the vest, shirt and skirt were all sewn together. Therefore, when I seam ripped the vest off the entire front and back of the dress disconnected from each other. As you can see above, the only way to keep them together was to pin the sides back together as I was seam-ripping, making sure the vest was out and the front and back were together.
 
Then, I discovered that the "vest" was actually just a fake panel in the front. The back of the dress was the teal color (not what I wanted the final result to be). So I did the only thing I could think to do - I took off the back panel. Since the waist was elasticized, I cut the panel about 2 inches above the elastic and folded it down over the elastic and pinned it. This made the edge cleaner instead of just the raw edge that I cut. I thought this would be a nice, backless number that is now pretty popular in Hollywood lately. What I had forgotten was... I have a chest. When I tried on the dress, I was showing a bit more on the sides than I had anticipated. As working the corner isn't my style, I needed to harvest extra fabric from somewhere. So I did what I do; I removed the arms. (Sorry, Mom!). I removed pretty much all of the fabric right up to the collar on the neck, essentially making the collar into a halter top.

Try not to judge the complete disaster that is my craft room. Ever since I brought in all that fabric (!) I have been having some spatial issues. Until I figure out storage... organized chaos is what it'll have to be.
 
I now had to figure out what to do with the back to cover up the side exposures. This is also when I decided I needed something on the back to cover up an eventual bra back. It just wasn't optional. I seam-ripped the arms so they were one flat piece of fabric (instead of an arm tube) I first put the arms on in a way that created a key hole back, as such:

I was actually very, very much in love with this look. I pinned everything up and prepared to sew it up.

Then came the realization: I can't get it off Sophie.

There was no way to pull it over the head, and there was no way to shove it down the hips. It was stuck. Therefore: not able to get it off of Sophie = never being able to put it on myself. I had to think of another option. Although zippers and such were an option, I really don't yet have the tools (read: zipper foot) to do that. I know I could sew it in by hand as well, but I'm just not there yet.

 
I turned it into a true halter top. I took both sleeves and sewed them together in a way that created an entire panel, then I pinned it to the sides of the halter top and to the top of the skirt. The only thing left to do now is to purchase some more elastic to make the top of the back snug to my back so it will stay up. I don't have any elastic left in my craft room and have yet to do my craft haul, so I can't sew it all up yet. Save for a bit more sewing - this dress is done, and I'm super happy with the result.
 
And you know I'll jack it up when it's all said and done. I even have my accessories picked out...

 
Thanks for being patient with me on my hiatus last week. For those that are interested, I ended up signing up for that 3.5 mile run. So, starting tomorrow I will be adding yet another task to my jam-packed days - going to the gym to train. At least it's got me motivated? As always - you will hear how it all goes!

Thursday, May 9, 2013

I Hate To Do This Again

Welcome to Thursday ya'll!

Unfortunately, I don't have a post for this week. I've started my job and it's honestly taken up pretty much 100% of my brain power. When I get home, I typically dive right into creating a dinner for me and the hubster and that's the end of my mental output for the day. I had no idea I would be this exhausted! A big part of it is that I am no longer completely confident in what I'm doing. Folks, there IS fear in the unknown, and that fear is exhausting. I can feel myself already getting comfortable with job tasks, so I soon see myself more confident and, in result, having more energy at the end of the day.

Just a few things that I am looking forward to to keep ya'lls interests piqued:

- Remember at the beginning of the year I made my resolutions? Two of those resolutions were to get healthier, and experience the city of Syracuse more. While I've certainly not managed the healthy part this week (I have yet to eat my lunch all the way through - too anxious to get things done!), my new place of employment has a 3.5 walk/run coming up mid-June that they have invited me to go on. I haven't yet given my answer, but I'm thinking about participating. This is definitely a "two birds with one stone" situation. I will have to complete some training of some sort to run this race, although knowing it's okay to walk and some people are walking the whole thing makes me feel a bit better about that. This makes me healthier. It is also a race that the entire city of Syracuse participates in. Thousands of people join together in the race and have dinner at the end, catered by a pretty popular restaurant here. This certainly makes me experience Syracuse. In summation - I'm thinking about signing up for it. It'll certainly be out of my comfort zone. I will be with my new coworkers, whom I know pretty little at this point, and will be showing them my unfortunate athletic skills. Therein lies the "maybe next year" thought. We'll see how it goes. 

- Even though I don't have a project to present to you this week, it doesn't mean I don't have something in the works! I've been working on a dress that is surprisingly hard. This is part of the reason why you're not seeing it - the additional brainpower it requires was just not there for me this week. I looked through my past few projects and felt a bit discouraged. Yes, I've been practicing and "tweaking" thrift items, but it's been some time since I've attempted to transform something. In result, I chose the worst looking garment on my "to be refashioned" rack and decided "this is being transformed into something great. That "something great" is in process and, as always, bad or good you will see the result!

I hope you all have a fantastic weekend! I will be spending time with my beautiful mother for Mother's Day and working a bit on my new dress, so I'm certainly excited for this weekend to come upon us! Happy Birthday to you hardworking mom's out there - I still don't know how you do it!  

Thursday, May 2, 2013

Pants Off, Dance Off!

Hey, hey, hey! It's Thursday!

I have finally hit the point where my four week notice at work is OVER. I was finished with work on Tuesday, as my notice went to the end of the month. I start the new job on Monday, so I had a whole three days to myself. I know this doesn't sound like much but, save for my wedding/honeymoon, this is the most amount of days that I've taken off since college (a good 5 years ago). I'm just not good at vacations and taking time off.

So for my mini-vacation, I really wanted to be able to kick back and relax. I'm pretty well known for wearing the crap out of my lounge pants - and never really buying new. Therefore, pretty much every single one of my lounge pants have holes in them. Not cute. So I went through my stash of refashion-to-do's and found this beauty:

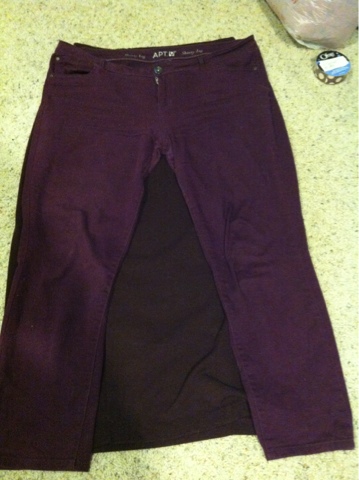
It was a maxi skirt made out of sweatshirt material - what more could a girl ask for? Now, I don't do maxi skirts; they just don't work on my body. Additionally, I'm super clumsy so any extra fabric around my ankles is generally frowned upon. I took the opportunity to try to make my first pant. I wasn't entirely sure how to go about doing it until I looked down. I was wearing my favorite skinny jeans that were amazingly comfortable so I said to myself "why not?". So here's where we get all PG rated and such: I took my pants off, turned the skirt inside out and slapped my pants on top of them to use as a pattern.

It was also at this point I realized I was apparently pretty partial to plum. Go figure.

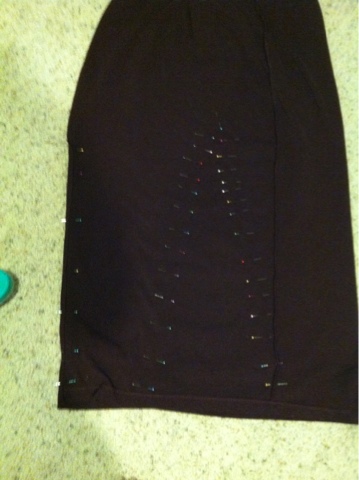
I pinned, using my usual copious amount of pins, all around the legs and the crotch area. I made sure to go in a bit more than the pattern pants because my favorite pants are about a size too big (probably where the pure comfort comes from).


The crotch area was by far the hardest. I knew that the butt part had to be bigger to hold la ba-dunk-a-dunk, but I didn't want to make it too small and end up going PG-13 in this joint. I figured I'd play it safe, do a general apex in the middle, and deal with it later. You also may notice I didn't really use any of the original seams. I knew I should have, but the skirt has a slit on the side that put a bit of a damper on my seams. I knew the random seams (and darts) would make the pants look odd, but as I was just going to wear these at home, I wasn't all too concerned.

After sewing around the legs (only at Thrifty Sew will you hear "alright, let's get my pants back on and sew this) I chopped out the middle.


As anticipated, when I put the lounge pants on, the ba-dunk-a-dunk fit great, but the front looked like I was wearing a man's cup. At first, I wasn't sure how to go about fixing it, so after playing with a few different techniques, finally I chose the least classy way. I put them on inside out, grabbed a handful of crotch and pinned the amount of fabric I wanted to take in. I then took them back off, and pinned a better sew line.

 
In hindsight, I could have brought them in a bit more, as there is still quite the gap in the crotch, but all in all they didn't turn out too bad. They are certainly a very good in-home lounge pant, but I wouldn't go out and prance (or dance!) around town in them by any means. Once the crotch was sewn and I cut off the excess, I donned my new lounge pants and prepared for 3 more days of no worries and no work!
 
I hope you all enjoy the rest of the week and the weekend as well! Also, my wedding anniversary is this Sunday, so I may have to make a special outfit of some sort for that! Stay tuned!

Thursday, April 25, 2013

Luck o' The Irish

Happy... Friday? Yup, it's Friday. Sorry about yesterday - I've been a bit under the weather lately so I wasn't in much mood to sew, so this one is going to be a bit of a throwback.

I started out with this green garment that I didn't know what to call it. Dress? Not really. Cover up? Not so much. I still am at a loss of adjectives for this one.

This was long, large and not very flattering, but a perfect green to ring in St. Patrick's Day. Plus, it had the most amazing back to it!


At first, I thought about just sewing up the button front and making an actual dress of it. However, I just couldn't see a seam up the middle of my stomach/chest being flattering, so I had to go another way of it. I decided to take away a lot of the fabric in order to put more emphasis on the crocheted back.

Unfortunately, I have absolutely no pictures of this process, so I'll have to go at this the Kindergarten way and "use my words". First thing I did was cut the bottom just above the fourth button and then hemmed the bottom. Because the fabric was a bit stretchy, I went around the bottom hem twice. I then cut the sleeves off to 3/4 sleeves. I realized at this point that the fabrci wasn't fraying, ripping or destroying itself in any other way without an actual hem, so I decided to leave the sleeves with raw edges. As I planned on scrunching them up anyway, no one would notice if they were slightly uneven. (Which they didn't. Or, at least, no one pointed and laughed.)

And that's it! It was pretty easy, peasy and a great cardigan for St Patrick's Day. I got a lot of compliments on the back now that it was more prominent without all the extraneous fabric. I have worn this pretty often since - it's becoming quite the staple to my wardrobe.


Wednesday, April 24, 2013

Fabric Invasion!

Hello All!

I know it's only Tuesday, but I just had to show everyone my recent haul! I've recently gotten into the habit of going onto Craigslist for arts and craft items. Mainly, I've been looking for cheap sergers, sewing supplies and random varieties of ribbons, thread, elastics, bias, etc. As I only started looking about a week ago, and have no committments to myself to purchase anything just yet, I couldn't help but answer one advertisement.
What was it you ask?! TWO (read it, TWO!) big bins fabric. And this isn't just remnant fabric; most of these cuts are full out yards of it. Some of the fabric, even though it had obviously been cut, still had at least a yard of it. With the exception of some very bright pink tulle, none of the "remant" fabrics were any less than a half of a yard. Some, such as the top dark fabric on the left pile in the picture, still had the price slip on it from Joann fabrics (3 yards priced at 18.00). The only downside is that there is so much fabric and none of it has explanations/details on it. Some are pretty obvious, such as velvet, corduroy, cotton, etc. but then there are others that are out of my fabric knowledge. Another thing I'll have to google, I guess! I'm so excited to have this fabric - not only can I make interesting additions to my thrift store finds now, but I may even be able to create something homegrown and all my own! (See what I did there?)


And oh! I forgot the very best part. All I paid for this fabric that the lady estimated at $600 (I found $120 worth of price slips still on the fabric):

$25.00

Gonna go ahead and call that my Steal of the Month!

Thursday, April 18, 2013

Dying Dresses

Happy Thursday, ya'll! Let's jump right into this one...

 
If you've followed me for longer than a few posts, you've known that I've been pretty obsessed with lace and nauticals lately. This one, although lacking the nauticals, certainly is lace. As much as I was in love with the lace, I was not loving the white. Folks, I am an extremely clumsy person who often spills coffee on my clothing and has a slight knack for drawing on my shirt without noticing. I took the opportunity to do my first dying!

 
I'm not lying when I say that the name had everything to do with my choosing this one. Also, WalMart had a whole 4 colors to choose from so the pickins' were already slim anyway.

Since the shirt was all cotton, I knew it would take to the dye pretty well. I got my bucket, filled it with steamin' hot water, a half a bottle of dye (this was probably excessive for one shirt) and a bit of salt. The salt ingredient isn't in the directions, but the many other blogs I've read that talk about dying often mention salt is important for... something to do with bright, rich colors. I then stuck the shirt in and let it soak, stirring pretty often, for about an hour.

 
I didn't want to ruin any of my spoons, so to stir this whole get-out I used the wooden/ribbon wands that I made for my wedding. Considering I had about 60 wands left after the reception, I had no problems parting with this particular wedding souvenir. 59 more dye jobs to go!

After I dyed the shirt and took it out after an hour, I spent about 30 minutes rinsing it under water to get the excess dye out. Once the water was turning semi-clear, I threw it in the washing machine with an old towel. At this point, I was anxious to see how my first dye job went. Because of this anxiety, I did something stupid. When this cotton shirt was finished washing I put this cotton shirt in the dryer... on high. I didn't think this one through at all, and in hindsight, I certainly should have because as I took my cotton shirt out of the dryer I slowly realized that it was much, much smaller. Fail. I put on the shirt and knew for a fact that I would never wear this midriff-bearing shirt. Brainstorming ensued.

Finally, I thought of something! Plan: buy some fabric, make a dress. Boom. So I bought some fabric made of cotton/spandex blend that would complement my newly dyed shirt. When I got it home, I realized this fabric was different than all the other fabrics I've bought. How is it different, you may ask. Well...
Ignore the crazy eye - I haven't quite gotten the hang of the red eye remover.
 
I had apparently managed to buy a yard and a half tube of fabric. Not sure how this happened, but it totally saved me from sewing a seam or two. My confusion turned to relief pretty quickly.

I had a piece of elastic in my craft room, so I measured it around my waist and sewed the ends together. As I wanted the elastic on the outside of the dress, I did a fancy-ish seam. My gut tells me it's called a "french seam" but I am unsure on this fact (google it). Basically, you sew it together, and fold it over the seam so the outside looks as such:

 
This makes it just a bit cleaner on the outside than just the cut end of the elastic. I then sewed my cotton/jersey fabric to the elastic. I read on a few blogs that when you're sewing dresses with elastic you should stretch out the elastic while sewing in order to keep a "ruffled" look and keep the stretch in it. This was - well - it was a mess. I kept stretching it, which then pulled the elastic faster through the needle and made the stitches uneven. I then tried to not pull it too hard, and ended up not stretching it at all. I kept going back and forth between great stitches and drunken sailor stitches. Again, no one will climb up my dress and inspect the inside seams, so I let it go.

Then, I cut my shrunken shirt shorter - to my natural waist - leaving a bit of a seam allowance. You'll notice on this picture as well that I'm in need of a longer ruler.

 
Once I had the top and the bottoms on the elastic, it all came together from there! I have a nice new dress with lace shoulders that is very, very comfortable. Check it!


Thursday, April 11, 2013

Darted to Death

Happy Thursday! I hope your week went by well. My weeks since my resignation have seemed to go very, very slowly. They're pretty painful, but I see the light at the end of the tunnel and can't wait for May 6th (which is my start date at the other job). Apparently I love changing my entire life around at the beginning of May. Last May, I married my best friend. This May, I'm changing careers. Wonder what next May shall bring?!

So friends, I gave you a teaser in the last post about the upcoming project. Alas, it is finished and it is a huge, huge fail. It's so destroyed that it is actually sitting in the garbage right now. I may take it out later and try to harvest some fabric, but right now it's in a fabric time-out to think about what it's done.

I had pretty high hopes for this one.
It was a long skirt that I absolutely loved the pattern on! It reminded me of summer and I couldn't wait to make it a cute sundress. The idea was easy - as ideas always are - take it up around my shoulders, cinch the middle, hike the hem up a bit and call it a day. Oh, and there was the little matter of the hooch-tastic slit up the side.

So when I hiked up the skirt to my armpits, it was quite billowy. As I saw it, I had two ways to go on this one. I could throw a belt on it to cinch it or I could actually learn something and do some darts to cinch and fit it a bit more to my body. I decided on the latter - I was going to learn something.

First thing I did was put the dress on Sophie (as you saw in the last post) and put some darts in starting at the bottom of the chest and going down a few inches. Now, I'm obviously no "how to guru" on darts because you know this project turns out to be a huge fail, but basically a dart is put in to fit garments to the curves of your body. They're often found at the bodice, back and chest but could be other places as well (for example on skirts you often see four of them - two in front, two in back). If you look at most of the clothes in your closet, they have darts somewhere or another. Essentially, it's where the tailor pinched the fabric together in the back and sewed a little triangle, chopped off the excess triangle piece and ironed down the fabric. Turn something inside out, you'll see it.

Back to what I did - I pinned on Sophie where the bottom of her chest was and then a few inches down for my starting and stopping point. I did two of these on the front. After I sewed, this is how the wrong part of the fabric looked.

Luckily, I was a smart cookie and tried it on before cutting off the excess. After I tried it on it was absolutely hideous. We'll call this Fail #1. I donned the skirt dress and it was a) uneven, apparently Sophie isn't as symmetrical as we thought b) puckered at the back, I had a full-on back belly and c) puckered at the sides. The sides I was actually okay with - if it puckered there, I could always sew up the side seams that were already there and bring in the puckers that way. The other two problems I couldn't live with, so the handy seam ripper came out in style and I ripped it all out.

It was at this point that I gave up and wrote you a post about all the random things I had done throughout the week. Meanwhile, I scanned YouTube and other tutorials on how to do what I wanted. Let me tell you guys, I. Found. Nothing. Nothing. I found a lot of tutorials on how to do the darts following a pattern and making a dress from scratch. I found a lot of tutorials on how to do a dart on a random piece of fabric. I did not find one tutorial on how to include darts into a refashion of a dress. No instructions whatsoever on where to start them, where to finish them, what type to do on what types of dresses, etc. I know people have done it, but apparently it's such an easy tactic that no one felt a tutorial was needed. I showed them.

Luckily, I was all "learned up" on how an appropriate dart was done. Basically, you start at the inside of the dress and go to the outside of the seam. You back stitch when you start, leave it be when you end and just tie a double knot in your thread. So - I did attempted that.

I mean, it basically did happen. A dart was made. I also made it longer to go all the way down the bodice. I had noticed on the last one that the fabric still folded over itself in a natural fall during the first time around, so I thought if I continued to bring the dart down into the bodice and waist it would really make it nice and fitted (and lengthening lines). Yeah - I was dreaming. I put this thing on and it still a) made me have a back belly and b) puckered at the sides, however we now have a new c) cinched the waist so tiny - I had accidentally taken the dress in about 2 sizes and I now couldn't breathe. Fantastic. So the seam ripper came out again. We're calling this Fail #2.

I found in my random Google travels that there is a different type of dart - the diamond dart. Since I was already on a roll, I figured "why not?" I knew at this point the dress couldn't go out into public anyway - there were major holes in the (what I now knew as) delicate fabric from my seam ripping that you could see tiny dots of my skin all over my waist.

In my mind (again, those easy idea things) this thing called diamond dart was the perfect solution. It would tailor the garment under my chest to bring it in, and the bottom of the diamond wouldn't bring in the waist as much so I could commence breathing. It was settled - I did the diamond dart.

You heard me. I did it. This is actually how it's supposed to look. You start at the seam and end at the seam, back stitching nowhere, and tying double knots from the excess thread to keep it.


Then I put the dress on, and threw a belt in there just to keep it a little more cinched at the waist, since I hadn't kept the dart going all the way down the waist.

Mind not the bra straps. I'm not fancy enough to go all the way up two flights of stairs to find a strapless. Deal with it.

So from the front it wasn't horrible. It's not what I would call the most flattering thing in the world, but it was a strapless dress, cinched at the waist with darts that made it more fitted. AND! There was no back stomach, and only a small amount of side billow-age. It still wasn't going out in public, but it was something I was happy about. I learned something.

Then I turned sideways.

Fail #3 can be summarized, again, via alphabet. a) Pancake boobs. Yes, pancake is an adjective in this sentence and you know exactly what it means in this context. b) Belly pooch - and folks, that's not mine. If it was mine, I would have edited that shit out and never drawn attention to it BUT! this one is not me. The pooch was even larger without the belt. It looked like I carried a baby and a six pack in this pooch, neither of which is accurate.

Although after the week I had at work, and looking forward to the next 2 weeks at work... the six pack doesn't sound half bad...

See you next Thursday, friends. And please don't follow or consider this blog post a "tutorial" or "how-to" post at all. I don't want to be responsible for the result.


Thursday, April 4, 2013

This and That

Hello all, and Happy Thursday!

This one isn't quite a refashion - more of a "taking care of loose ends" post. I was going back through my posts and I never realized that I forgot to show you something that I had teased you about! Remember this post? I had teased you with some fantastic fabric that I was in love with, but because it was an upcoming Christmas present, I couldn't tell you what it was? Well, now's the time! To remind you, this was the fabric.


What was it, you ask? It was a piece of flannel from a rag quilt that I made for my baby niece! I bought a bunch of different colors to make an interesting pattern, but in all honesty I had to make it all around that fabric. I had picked it up and couldn't put it down - I wanted to use it everywhere!

Now, for those of you unfamiliar with rag quilts I'll give you a quickie explanation. It's a quilt that you sew together with one side having all exposed seams and the other nice and clean. On the side with the exposed seams, you allow the seams and edges to fray (a la rags). And then you're done. Easy peasy, right? Well, if you read my post, you knew it didn't go easy peasy as a pair of pliers was needed to fix my sewing machine.

Now for the quickie DIY Rag quilt. First up, I cut out tons of squares of each fabric. You can make the squares any size you'd like - I think I used 6" by 6". I then doubled it up, wrong sides together, and sewed each square. Then I used my floor to put all the squares in a random design until I found something that worked. I then worked on the row's first - I pinned the sides together making a row of 6 squares. Once I had my rows, I lined each row up on the floor again to make sure I had my design still there and pinned each row to itself, making sure I kept all the seams on one side. This is how it looked when the rows were sewn and then pinned all together.


Little did I know, this was the easy part! Sewing all the rows together and trying to make sure I didn't mess up was the hard part. Also, walking on my floor ended up being a bit difficult since there were random dropped pins all over it waiting to jab you in the foot. My cats "enjoyed" it as well.

Once everything was sewn together, I then had to go over each seam and cut little slits it in. This is meant to help it fray. Now, when I say "every seam" I mean every. damn. seam. Around each little square and every single outside edge. This took me quite a while and 3 pairs of scissors, but it happened. I found the trick was to start in the corners where four points came together and then that created enough give in between to snip it down. Also, when cutting such small slits, doing one piece of flannel at a time (as opposed to all four) was way easier. This took a good amount of the seasons of Law and Order: Special Victims Unit to finish.

Once all the seams were cut, I threw it in my washing machine. The first time you wash it you can't use softener. I then threw it in my dryer - this creates a lot of lint so you have to make sure to empty your lint trap about 4 times during the first drying. Then you wash it again, this time with softener, and then dry it again. Make sure you keep checking that lint trap! All in all, you go through the washing/drying process about 4 times to make it look appropriately frayed and to not get lint coming off of it. The more you wash and use it in the future, the more frayed it'll get, but the lint shouldn't be as bad coming out of the 3rd and 4th dry.

Here's the finished project on the seam side.


Unfortunately I didn't get a picture of the other side, but it's the same pattern, but with no frayed seams except the outer edges so it's very clean on the other side.

So you may be asking yourself - what the heck have you been doing all week if there's no new project? Well, I've been overwhelmed. First of all...

I quit my job.

That's right - I'm peacing out of the nursing home. Why? Because I got myself a new, better, more shiny job! Am I excited? Eh. It'll probably hit me when the time to change gets closer, which is around April 30th. That's the last day at the old, and the new one starts on the 6th. I'm not a "change" kind of person but this should be a good change.

I'm also overwhelmed because of all this...

That's right - this is all my scraps from previous projects. I just don't have a place to put them anymore, so I really need to start thinking of ideas for them. Of course, the first thing I did was scour Pintrest for "fabric scraps" ideas. I found a lot - most of which I'm sure I'll try out - but a lot of them needed other items such as ribbon, elastic, etc. that I just didn't have on hand, and my sweatpants were kind of dictating for me not to go out in public. So, I just whipped something up and hope it would work. First up, I decided I'd make a sunglass case.
For this, I used the leftover green flannel fabric from the above rag quilt. I'm actually quite in love with my new case. It's quite large for sunglasses (although I still use it for that) but at some point I'm also sure I could put a strap on the top and use it as a wristlet. The button I got from my huge collection that I picked up at Joann Fabrics on sale. Now, I don't own a buttonholer and have no idea how to create a button hole, but damn it don't I have the buttons to do so! This one was one of my favorites and I thought it went pretty well with the green, making it nice and summery. The latch had me confused for a bit. It was only after I added the button that I realized that the whole point of the button was to actually be able to close the pouch. I rummaged around my craft room until I found some twine leftover from the ring pillow I made my best friend for her wedding. Some sewing, hot glue and 3 burnt fingers later, I owned a sealable pouch!

Next up, I put my eyes on these babies...
That's right little shoulder pad, I'm talking to you! I'm not entirely sure what kind of crazy thoughts I had in my head when I saved the shoulder pads, but here they were, taking up space. I had to figure out something. So... I sewed it together.


What is that, you ask? (You sure are inquisitive today, aren't you, readers?) That is a homemade shoulder pad catnip toy. Once I sewed up the seams I saw that it looked a bit "mouse-like" so I decided to stuff it with catnip and sew up the edges, maybe make a make shift tail of some sort and let the cats go at it. The foil in my plan is that I had forgotten that the little jerks broke into the catnip cabinet and destroyed the bag a few weeks ago. So once I purchase catnip again, this will be filled up and stitched and ready to destroy. Boom.

Now, I had also started a project. Being the little procrastinator that I am, I started it on Wednesday afternoon. Turns out, the project ended up being a bit more confusing and difficult than I had imagined in my head (who would have thought...) and I got too frustrated to finish it. That's what I get for procrastinating and then trying to figure out something on my own that I probably should have googled.

So, I leave you with yet another teaser of the project that is started and is slowly making itself into the "fail" pile. Should be an interesting week! See you next Thursday!