Thursday, June 27, 2013

Improve (and Improv)

As you all know, I had a run that I stupidly signed up for on June 17th. Although I didn't run the whole 3.5 miles, I'm pretty darn proud that I finished it. Also - not only did I finish it, but I didn't come in last! Here I am, all sweaty post-race (for your viewing pleasure, of course)

Although I'm not proud of my time (slow) and not proud of my performance (walked too much), I've certainly inspired myself to be better. Using our Fitness Initiative incentive at work, I'm going to buy myself some nice work out gear and a few health-inducing habits (smoothies!) that should help me improve myself and my well being.

In the spirit of my newfound improvement motivation, this week I went back to a few projects that I left at "eh, good enough" and made "oh hey, it's not that bad!".

The first project I took on was this one:
This one was left in it's "good enough" stage when I left that left side all jacked up. The thread pulled the fabric, which made it bunch and uneven on the bottom. It was also a bit short, making the uneven hem even more apparent. So... under the machine it went!

 
I chopping off a few inches on the bottom, right above where all the mess-ups were, and made a real hem. I also went around the bottom twice. As I learned from the first time around, the fabric was pretty fussy and stretchy, so I made sure to zig-zag stitch both times around.
 
In the end, I have a cute blouse that can be worn with leggings during the weekends, or some dress pants and a sweater for work. I love that I refashioned my refashion.
 
The next project I decided to improve was one that I did very recently:
This project I'm pretty fond of... except I never did anything to the straps. The straps were huge and they had buttons on the back to attach to. The problem? The buttons were on the wrong side! First thing I did was rip off the buttons, then I seam ripped the straps out. My plan was just to make the straps shorter, but then I realized the large straps could be my benefit. I tied them together in a halter (this is the improve part) and "voila!" I ended up solving two problems. The first solved problem was obviously fixing the strap problem so they weren't falling off my shoulders. The second solved problem was the length - instead of making the straps shorter, thus making the short dress even shorter, the halter top enabled me to actually shift the dress down a bit so it wasn't AS short. A+ for problem solving.
 
The last project I improved on was this one. Although - I have no pictures because my camera apparently only "pretended" to take pictures. The flash went off and everything went fine... except when I went to view them at the end of the project and nothing was there. Real funny, camera, real funny.
 
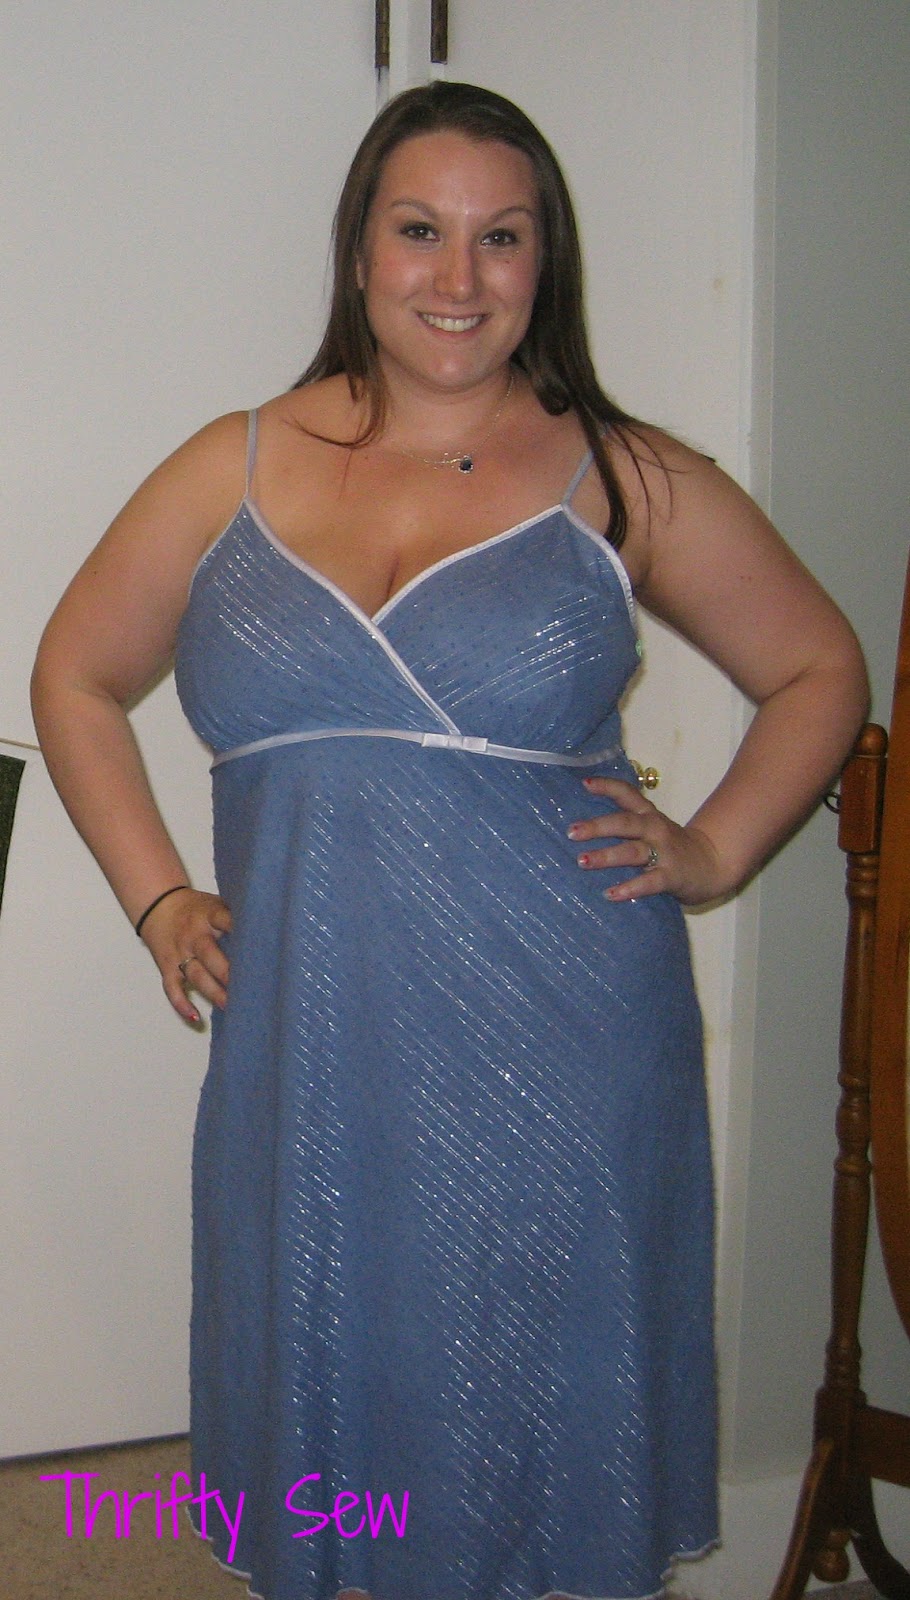
I said at the end of my video that I'd probably keep the dress as big as it was because it was super comfy. Super comfy - yes. Super flattering? Not in anyone's world. I decided to take it in a few inches. The hard part on this dress was that there was the lining of the dress and the shear overlay of the dress and both were separate pieces. This wasn't a project I could just flip inside out and sew up the sides and call it a day (damn). First I worked on the lining. I made sure it was completely separate from the overlay and pinned about (read: improv) an inch on each side. I sewed up those sides and cut off the excess. Then I did the same thing with the overlay - made sure it was completely separate, pinned it about an inch on each side, sewed it up and cut off that excess. Luckily, the two paired up nicely and they ended up being even on the bottom. Next time, I probably wouldn't improv as much on this - after I sewed I was pretty nervous I'd have a dress with half the lining hanging out. Taking the sides in also shortened it (the one time I remember the golden rule...) so I didn't take anything off the bottom. Gotta keep it appropriate, now.
 
So that was the improving that I did. I've certainly learned that I can improve things that are just "alright" and turn it into something livable (you know, the whole idea of this blog) and I can even improve on things that I've already done, no matter if I despised the ending result or loved it.
 
There you have it! Have a fantastic Thursday (and Friday, and every day). As always, feel free to leave comments, suggestions, likes or hates either here on the blog or at thriftysew@gmail.com
 

Thursday, June 13, 2013

Hawaiian Breeze

Happy Thursday, all! I'm coming down from an 11 hour workday, so today's project had to be a quick and easy one in order for me to go to bed at a reasonable hour (and, ya know, not by a big ol' grumpy face.)

So I started off with something that wasn't so bad.

This one definitely had potential, with only a few issues. The print is definitely what drew me towards this. It's been raining like crazy here in New York lately so it is far from feeling like summer. This dress picked my mood right up. The few issues were easily fixable ones - it was way too big, to begin with, the skirt was tiered which was super unflattering and the bottom fell right on top of my ankle - not a flattering look for my 5 foot frame.
 
First thing that I did was seam-rip the dress off at the top tier. This left the bodice and about half of the skirt. I do admit I cut a few corners here and there. Such as - I never actually pulled out the seam ripped threads, so all along the bottom are small pieces of severed red thread. I also may have gotten frustrated with the seam ripping and just straight up tore it. Whoops.
 
Next, I tackled the sizing. I turned the dress inside out and took in the sides about 1 inch each. I then reshaped the waist a bit more to cut in at the smallest part of my waist and then go back out, thus creating a "bubble skirt". The inside red line in the picture is mine, and then I cut out the excess.

 
And believe it or not - that was it! Now, I did forget the golden rule - bring in at the sides and then chop off the bottom, so it did turn out a smidgeon lot short. I am actually quite in love with how it turned out... when I stand still. Unfortunately, as a human, I need to move and such and when I do that in this dress I'm not confident that I'm keeping my wardrobe at a "G" rated level. Because I love the shape so much, I will probably add on some fabric from the original bottom to the new bottom to lengthen it to a more appropriate level as well as bring in the bodice an inch or two more, but otherwise, this is right up there with some of my other favorite projects!
 
 
As always, leave comments below with suggestions/critiques/wow's or just e-mail me at my shiny new e-mail address: thriftysew@gmail.com.
 
Until next Thursday - good night!

Thursday, June 6, 2013

Blogging from Bed

Happy Thursday, all. I'm currently in bed due to one heck of a cold that has knocked me right on my butt. I did start a project yesterday, so hopefully I'll get to finish it this weekend and get it posted as a nice weekday bonus post.

For now, I thought I'd hold you over with a new feature! As you may have noticed, google has now changed my comment section to combine with google+. I don't know what issues you are all having on your end with it, but I am having issues with commenting on your comments (to tell you how awesome you are for commenting, of course). In result, you now have the option to email me! Check out the new page link on top!

Now, if you want to send me a private message or if you're having issues posting comments, shoot me an email! I am not joking when I say I will respond to each and every one!

So here it is: thriftysew@gmail.com

That's handy, right?!

I'll get to work on feeling better, and I hope you all have a fantastic weekend! Check back soon for a belated post, and make sure to check my video in the last post to learn how to dye stuff (it's high skill and stuff!)

Sunday, June 2, 2013

Sunday Bonus (Tutorial Video)

Hey all! Thought I'd try something new ... I made a video! As you'll hear, one of my more popular blogs was from the "Dying Dresses" blog, so I thought I'd take it a step further and do a tutorial video so you guys can dye your own dresses! Let me know what you think! (Please be nice - I'm a first time video editor, creator and poster. It's not perfect, and I'm aware of that fact.)
 
 
Of course I had to add bloopers at the end - they're only the best part of every movie!

As promised, here are the 'after' shots as well. I really like this blue :) And after I made the video, I decided that I definitely will make the dress smaller one of these days. As comfy as it is, it doesn't exactly fall in the most flattering of ways.

Thursday, May 30, 2013

Really Red Refashion

This one is going to be a "quick and dirty" refashion. I've been a busy busy lady this week, and found myself this morning without a project in mind and definitely not one started. I found myself coming home at 6:00 this afternoon, getting dinner on the table at 7, and finally able to get to sewing around 8:30. With my hopes of getting to bed by 9:30... I needed something quick. (The dirty part is because I grabbed it from a Salvation Army bag that I have yet to throw in the washer... whoops.) Why is my bedtime earlier than most middle schoolers, you may ask? Well, as you may remember I signed myself up for a 3.5 mile run in June, so I've been attempting (yeah, sometimes I fail at it) to get up at 5:30am and go running. So far, I'm up to walk/running 1.5 miles which... is no where near 3.5. Hopefully by mid-June I'll be somewhere around the vicinity of 3.5. We will see.

Onto the project. Here is my Salvation Army smelling project:
Don't mind the pants underneath - as mentioned, this hadn't been washed.
 
This dress was priced at $2.99 and was half off. Plus, it reminded me of a dress that I currently owned and am in love with (that I did not buy for anywhere near $1.50.) Why not have two of them? So, I grabbed my dress that I really liked and made it into my "pattern".
As you can see, the red dress is quite a bit larger than my dress that I already owned. I actually did not mind the few inches of room that I had in the dress - it made it a bit more comfortable for errands and general around-town roaming. The arms were not ideal, and as much as I love the dress I owned, I've never been a huge fan of turtlenecks, so I wanted to nix the turtleneck on the new dress. First thing I did was chopped up the red dress:

Chop chop!
 
As you can see, I shortened the red dress, made the sleeves into short sleeves, and took off the turtle neck. I then pinned everything up and sewed it on up. I went around each seam twice because it was a really stretchy fabric. I also didn't end up with what one would call "straight" lines, but I made myself feel better because I had thread that matched the fabric exactly so... no one would notice, right?
 
All in all, it didn't turn out so bad. In hindsight, I may go back and make the dress smaller. The extra few inches of fabric in the dress isn't the most flattering thing on earth - BUT - it is really comfortable. It also goes really well with my new thrifted belt ($3!!), a style that I'm increasingly in love with. I think my bridal gown started the belt trend and I couldn't help but continue it from there.
 
Here she is:
 
See you all next Thursday! With any luck I'll be a running fool by then!


Sunday, May 26, 2013

Happy Updates!

It's fixed, it's fixed! To be honest, not even sure what happened to it in the first place, but the sewing machine is fixed!

My husband took my machine apart and basically gave everything a good cleaning, pulling out the goop, thread and grease that had made its way into my machine. Nothing was actually found to be wrong - apparently the banging and all the other weird stuff that was going on was only caused by a dirty machine. Which doesn't make me feel like a sewing scumbag at all (sarcasm.)

 
So now that that was taken care of, I could finish up some of the projects that I've left half finished. One of these projects was my school marm dress. (See a refresher here.) As you may remember, I left this dress on Sophie all pinned together but not sewed up because I was missing a piece of elastic for the back to hold it up. Well, when I was searching around for the feet that I bought from ebay mentioned in the last post, I pawed through the back of one of my craft drawers and found a piece of elastic about 4 inches long that was perfect! So I went ahead and sewed everything up.

I'm pretty ecstatic about how it came out - the arms ended up coming out a bit weird, but I'm a layerer (that's a word now, deal with it) so it's not often I'd wear a dress like this without a cardigan of some sort. Therefore - the arms shouldn't be too noticable when I actually wear this somewhere.

Here we are:
I will end up making the length shorter, but that is the end of this project :) So stoked that the project that had the most construction turned out to be one of my biggest (and best!) project.

Also, because my husband and I are pretty in love with it, I wanted to show you one of our anniversary gifts. Thomas, one of our groomsman, gave this to us last week for our 1st anniversary and we were so stoked to put it on our wall! It looks fantastic and is just  what we needed, not just to make our home feel like a home, but also a personal touch to really commemorate the best day in our lives. Not only is it a fantastic picture, but we also love it because it is a picture that was taken by Thomas himself on our wedding day when we were walking on the golf course. It's the personal touch and story that makes this so much more perfect. (I know - I got all sappy there. My apologies.) The artsists name is Brooke Elizabeth Ann - once I get contact info (website, etc) I will make sure to post it. From this picture, I can safely say that she. is. amazing.

For those celebrating - Happy Memorial Day! I have lots of family members and friends, past and present, that have served or are currently serving in one of our wonderful branches of the United States military. I love and respect you all, and there are no words that can express how much I truly appreciate you all fighting and putting your lives on the line for our personal freedom. A few honorable mentions: my grandfather, my uncles, both of my brothers and more than a handful of my high school friends, all have whom have served in some sort of war. Superman be damned - you are my heroes.

Thursday, May 23, 2013

Mayday! Mayday!

Sad day, guys, sad day. As I finished the below activities (read on after I get this tragedy out of the way) I went to change the color of my thread and I happened to notice a ball of something inside my machine.That's right - INSIDE. In a place that I could not get to. Upon closer inspection I figured out what it was.
 
A ball of thread. Mangled and tying together a few of the gears in my machine.
 
Panic ensued. I have no idea if this is normal, or if this is my machine doing something terribly wrong, but I decided to stop what I was doing right away and freak out. Afterwards, I did the only logical thing and complained like a 5 year old to my husband. If you've been a reader for a bit, you'll know my husband likes to tinker and tear things apart. Despite some recent trips to urgent care (2 visits in the same amount of weeks, actually) he is very handy and usually can take things apart and put it all back together like nothing happened. He offered numerous times to rip my machine apart and get out the ball of thread and un-mess it up. This idea made me panic again - what if he can't put it back together? What if it's messed up forever? What if he can't do it by the time I have to post next Thursday? I'm usually very confident in his engineering abilities, but this one was so close to home it scared me.
 
Grudgingly, I agreed - but not without a bit of a bet. He bet that he could fix it, I bet that he could not. If I "win", he will buy me a new machine. If he "wins"... well, we haven't decided on that quite yet. Either way though, I think I legitimately win. (Honestly, I think that's why there's no prize on his end. He's being "betting supportive" and just wants me to get back to doing the thing I enjoy.)
 
Plus, he kind of hates when I have my lady-panic fits.

In other news, I've been a shopping fiend lately! Now, don't get too excited - my "fiend" is equivalent of a hundred bucks or so, but I did go out and get myself some new fancy digs. This is where I break readers hearts though - it wasn't anything from a thrift store, and nothing is an intended project. Sad day. I know a few people get upset that I broke my trend - I was supposed to be buying everything second-hand! Here's what I have to say to those folks: I know the value of a dollar. I know I can buy really, really nice fabrics and items at a thrift store for a dollar so if I'm going to  spend 20 of those dollars on one shirt I know it better be a good. gosh. darn. shirt.

In high school, I admit, I used to buy brands, not clothes. It didn't quite matter the fabric or the quality. If it said "AE" or "Aero" it was meant to be in my closet. I noticed when I was shopping recently I totally surpassed brands and paid attention to the garment itself - were they well constructed? Was the fabric durable? Did it fit well? Long story short - I found a new way to appreciate thrift stores and making my own clothes. I know that I don't have to settle for odd fitting clothes or see-through, thin cottons. If I'm going to spend my hard earned money, it is going to be on quality and durability.

What else was included in my haul, you may ask? I finally broke down and bought myself a zipper foot and a hemmer foot. I know, I know - they aren't huge purchases, especially since they were ebay buys for less than 20 dollars and free shipping, but it's more an exciting purchase. I was ready to move on to all the fancy stuff that real sewists (again, not sewers, never sewers) do!

First thing I tried was the hemmer foot. I do admit - I bought the feet from a seller that was advertising that these feet fit Brothers, Singers, etc. A "one foot fits all", if you will. The first success was that it did, in fact, fit my Brother sewing machine.

Hot off this first success, I decided to try my hand at actually using it. I took a swatch of fabric from the last project and tried it out.

Nailed it.
 
So that didn't quite, what one would say, "work". Was it all my fault? Probably. What am I going to blame it on? Having the wrong bobbin. That's my story and I'm sticking to it.
 
So I couldn't get one flippin' hem to come out right. I had wanted to hem the dress from this post. I wasn't sure if the cotton/spandex blend was too thick or too stretchy, but it was not feeling like going through the hemmer foot. Eventually, I gave up and just did a hem with the good ol' fashioned straight stitch.
 
And I have to say... it's kind of the best I've ever done. I even rolled it twice all official and stuff! Check this win out!


I will be back next week. If I don't have a sewing machine, it may not be the most impressive project but I'll do some hand-sewing to get something done. Meanwhile, I'll keep you updated on the bet with my husband. It's pretty unusual to say - but I'm really hoping he wins this one.
 
P.S. The ring in the above picture is my new favorite! It's a handmade aluminum right (thank you, Etsy) that wraps around my thumb and says "Hakuna Matata" on it. I love love love it. Not only is it a fantastic saying and theory, the Lion King was by far one of the best Disney movies. Win.


Wednesday, May 15, 2013

School Marm

Hey y'all! Sorry about last week's hiatus - as I had mentioned in my last post I was mentally tapped. However, now I'm back and in action!

Here's what I was working with that has posed the biggest challenge for me thus far.

I'm not proud of this face, but unlike other weeks, I only took one before picture to choose from. Lesson learned.

So when I bought this, I decided that I was going to take off the vest part and just have a clean white button-up shirt with a teal skirt. Everything was a cool clean linen so it would have been a good summer dress. Then I started ripping it apart....

 
The first thing that I discovered was that the vest, shirt and skirt were all sewn together. Therefore, when I seam ripped the vest off the entire front and back of the dress disconnected from each other. As you can see above, the only way to keep them together was to pin the sides back together as I was seam-ripping, making sure the vest was out and the front and back were together.
 
Then, I discovered that the "vest" was actually just a fake panel in the front. The back of the dress was the teal color (not what I wanted the final result to be). So I did the only thing I could think to do - I took off the back panel. Since the waist was elasticized, I cut the panel about 2 inches above the elastic and folded it down over the elastic and pinned it. This made the edge cleaner instead of just the raw edge that I cut. I thought this would be a nice, backless number that is now pretty popular in Hollywood lately. What I had forgotten was... I have a chest. When I tried on the dress, I was showing a bit more on the sides than I had anticipated. As working the corner isn't my style, I needed to harvest extra fabric from somewhere. So I did what I do; I removed the arms. (Sorry, Mom!). I removed pretty much all of the fabric right up to the collar on the neck, essentially making the collar into a halter top.

Try not to judge the complete disaster that is my craft room. Ever since I brought in all that fabric (!) I have been having some spatial issues. Until I figure out storage... organized chaos is what it'll have to be.
 
I now had to figure out what to do with the back to cover up the side exposures. This is also when I decided I needed something on the back to cover up an eventual bra back. It just wasn't optional. I seam-ripped the arms so they were one flat piece of fabric (instead of an arm tube) I first put the arms on in a way that created a key hole back, as such:

I was actually very, very much in love with this look. I pinned everything up and prepared to sew it up.

Then came the realization: I can't get it off Sophie.

There was no way to pull it over the head, and there was no way to shove it down the hips. It was stuck. Therefore: not able to get it off of Sophie = never being able to put it on myself. I had to think of another option. Although zippers and such were an option, I really don't yet have the tools (read: zipper foot) to do that. I know I could sew it in by hand as well, but I'm just not there yet.

 
I turned it into a true halter top. I took both sleeves and sewed them together in a way that created an entire panel, then I pinned it to the sides of the halter top and to the top of the skirt. The only thing left to do now is to purchase some more elastic to make the top of the back snug to my back so it will stay up. I don't have any elastic left in my craft room and have yet to do my craft haul, so I can't sew it all up yet. Save for a bit more sewing - this dress is done, and I'm super happy with the result.
 
And you know I'll jack it up when it's all said and done. I even have my accessories picked out...

 
Thanks for being patient with me on my hiatus last week. For those that are interested, I ended up signing up for that 3.5 mile run. So, starting tomorrow I will be adding yet another task to my jam-packed days - going to the gym to train. At least it's got me motivated? As always - you will hear how it all goes!

Thursday, May 9, 2013

I Hate To Do This Again

Welcome to Thursday ya'll!

Unfortunately, I don't have a post for this week. I've started my job and it's honestly taken up pretty much 100% of my brain power. When I get home, I typically dive right into creating a dinner for me and the hubster and that's the end of my mental output for the day. I had no idea I would be this exhausted! A big part of it is that I am no longer completely confident in what I'm doing. Folks, there IS fear in the unknown, and that fear is exhausting. I can feel myself already getting comfortable with job tasks, so I soon see myself more confident and, in result, having more energy at the end of the day.

Just a few things that I am looking forward to to keep ya'lls interests piqued:

- Remember at the beginning of the year I made my resolutions? Two of those resolutions were to get healthier, and experience the city of Syracuse more. While I've certainly not managed the healthy part this week (I have yet to eat my lunch all the way through - too anxious to get things done!), my new place of employment has a 3.5 walk/run coming up mid-June that they have invited me to go on. I haven't yet given my answer, but I'm thinking about participating. This is definitely a "two birds with one stone" situation. I will have to complete some training of some sort to run this race, although knowing it's okay to walk and some people are walking the whole thing makes me feel a bit better about that. This makes me healthier. It is also a race that the entire city of Syracuse participates in. Thousands of people join together in the race and have dinner at the end, catered by a pretty popular restaurant here. This certainly makes me experience Syracuse. In summation - I'm thinking about signing up for it. It'll certainly be out of my comfort zone. I will be with my new coworkers, whom I know pretty little at this point, and will be showing them my unfortunate athletic skills. Therein lies the "maybe next year" thought. We'll see how it goes. 

- Even though I don't have a project to present to you this week, it doesn't mean I don't have something in the works! I've been working on a dress that is surprisingly hard. This is part of the reason why you're not seeing it - the additional brainpower it requires was just not there for me this week. I looked through my past few projects and felt a bit discouraged. Yes, I've been practicing and "tweaking" thrift items, but it's been some time since I've attempted to transform something. In result, I chose the worst looking garment on my "to be refashioned" rack and decided "this is being transformed into something great. That "something great" is in process and, as always, bad or good you will see the result!

I hope you all have a fantastic weekend! I will be spending time with my beautiful mother for Mother's Day and working a bit on my new dress, so I'm certainly excited for this weekend to come upon us! Happy Birthday to you hardworking mom's out there - I still don't know how you do it!  

Thursday, May 2, 2013

Pants Off, Dance Off!

Hey, hey, hey! It's Thursday!

I have finally hit the point where my four week notice at work is OVER. I was finished with work on Tuesday, as my notice went to the end of the month. I start the new job on Monday, so I had a whole three days to myself. I know this doesn't sound like much but, save for my wedding/honeymoon, this is the most amount of days that I've taken off since college (a good 5 years ago). I'm just not good at vacations and taking time off.

So for my mini-vacation, I really wanted to be able to kick back and relax. I'm pretty well known for wearing the crap out of my lounge pants - and never really buying new. Therefore, pretty much every single one of my lounge pants have holes in them. Not cute. So I went through my stash of refashion-to-do's and found this beauty:

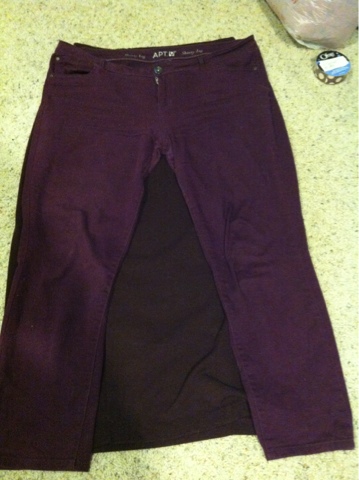
It was a maxi skirt made out of sweatshirt material - what more could a girl ask for? Now, I don't do maxi skirts; they just don't work on my body. Additionally, I'm super clumsy so any extra fabric around my ankles is generally frowned upon. I took the opportunity to try to make my first pant. I wasn't entirely sure how to go about doing it until I looked down. I was wearing my favorite skinny jeans that were amazingly comfortable so I said to myself "why not?". So here's where we get all PG rated and such: I took my pants off, turned the skirt inside out and slapped my pants on top of them to use as a pattern.

It was also at this point I realized I was apparently pretty partial to plum. Go figure.

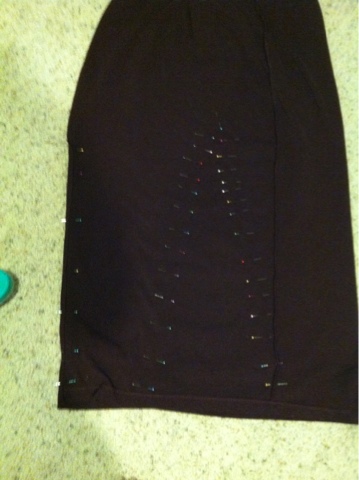
I pinned, using my usual copious amount of pins, all around the legs and the crotch area. I made sure to go in a bit more than the pattern pants because my favorite pants are about a size too big (probably where the pure comfort comes from).


The crotch area was by far the hardest. I knew that the butt part had to be bigger to hold la ba-dunk-a-dunk, but I didn't want to make it too small and end up going PG-13 in this joint. I figured I'd play it safe, do a general apex in the middle, and deal with it later. You also may notice I didn't really use any of the original seams. I knew I should have, but the skirt has a slit on the side that put a bit of a damper on my seams. I knew the random seams (and darts) would make the pants look odd, but as I was just going to wear these at home, I wasn't all too concerned.

After sewing around the legs (only at Thrifty Sew will you hear "alright, let's get my pants back on and sew this) I chopped out the middle.


As anticipated, when I put the lounge pants on, the ba-dunk-a-dunk fit great, but the front looked like I was wearing a man's cup. At first, I wasn't sure how to go about fixing it, so after playing with a few different techniques, finally I chose the least classy way. I put them on inside out, grabbed a handful of crotch and pinned the amount of fabric I wanted to take in. I then took them back off, and pinned a better sew line.

 
In hindsight, I could have brought them in a bit more, as there is still quite the gap in the crotch, but all in all they didn't turn out too bad. They are certainly a very good in-home lounge pant, but I wouldn't go out and prance (or dance!) around town in them by any means. Once the crotch was sewn and I cut off the excess, I donned my new lounge pants and prepared for 3 more days of no worries and no work!
 
I hope you all enjoy the rest of the week and the weekend as well! Also, my wedding anniversary is this Sunday, so I may have to make a special outfit of some sort for that! Stay tuned!