To all my loyal followers...
I'm not gone! I just moved!
You should check me out on my new blog which is all the awesome-sauce of this blog and more!
Definitely follow the posts on the other page and make sure to subscribe to receive all the amazingness in your e-mail each and every time there is a new post. How convenient!
Check it here: http://precariouspinning.blogspot.com
Thursday, October 8, 2015
Tuesday, August 25, 2015
The Art of Tidying Up - Here It Is, Look at My Crap
Well hey friends! Remember me? I'm the one that's super horrible at keeping up with regular posts...
So it's not like I've been doing anything too crazy to keep me away. Sometimes, it's just the simple matter of fun stuff geting in the way of other fun stuff.
One of the things that I've been doing is reading. That's right:good old-fashioned, text-on-paper reading. This book, actually: 
I surprised even myself with this one. Usually (and, in all honesty still most often) I'm a fan of the chick-lit, quick reading murder thriller books. To my surprise, I've found myself really liking non-fiction - mainly business books, how-to and living-life-to-the-fullest kind of books. I barely recognize myself here, guys.Basically, this book has been trolling the internet - websites, YouTube, Amazon etc. and all the places I frequently visit. It's been slowly taunting me for months.
Full disclosure here: I'm kind of a mess. I've never been a "tidy" person. There are very few places in my house that don't collect random crap and I'm fairly confident in sayings that's only because my husband throws out a lot of stuff that I don't notice are gone. Finally, I gave into the slow and constant bullying that is the Amazon Recommendations page and purchased the book. I started reading it (as soon as I found it because, in true form, I immediately lost it after opening the box) and couldn't put it down. It just made sense.
And I thought it would be a good blog series. So... Voila! Here I am - view my crap with interest and learn from my many mistakes! The book claims if I follow all the steps and really put everything I have into it, it will become a habit that I cannot break. Basically - crap-no-more (in 300 pages or less).
Marie Kondo (author) has a pretty simple concept. Look at everything you have, touch everything one by one and ask yourself one thing: "does this inspire joy?" If the answer is yes, the item is kept and you find a place for it to live. It stays in that place forevermore.
What does she recommend staring with first? Clothes.
I had a lot, and none of them were... how shall I say... kept "neatly".

And my messiness doesn't stop there... it also crept into the closet.

So. Much. Stuff. You wouldn't know it by looking at the above picture, but there is an entire clothes rack behind that rack to the left that holds all my husbands clothes. He basically limbo's his way to his shirts every morning.
Step one: Take every piece of clothing you own and throw it in the middle of the floor. Then, go through each and every piece and decide what to keep or what to "discard". (*Side Note* Unless it had tons of holes or was really dirty, I didn't "discard" anything, but bagged it up for donation. Salvation Army is making a killing off of me.)

Don't mind my cat's tail right there on the bottom left. I think he was confident I'd finally lost my mind and wanted to be front and center to that show.
Going through shirts, dresses, pants, etc. was actually quite easy and I got the hand of the "inspire joy" concept very quickly... and then I got to my undershirts, bras and the like (i.e. boring stuff). How does one determine joy from these things? Basically, I switched to the old fashioned "Does it fit? keep it. Is it uncomfortable? Toss it." This wasn't how it was to be done according to the book, but I figured it was the best I was going to do without throwing everything out and starting over. Shopping, of course, gives me joy.
Step Two: Shoes.
I had never realized how many random places I kept my shoes. Kondo definitely concentrates on going in "categories" of tidying instead of rooms. It's actually a pretty smart concept when explained: basically, if you don't truly look at everything you have at once, everything will be continued to be thrown all over the house. The idea of categories is to get everything in the category together, weed through it, and then stash everything in one place. Mind = blown.
Once I had all my shoes together on the floor, I was torn between being proud that I had that many shoes and disappointed that I didn't have more.

It took two pictures to show them all... *pride wins*

So - what were the results?
Altogether, I only kept 18 pairs of shoes. And forgot to take pictures of it. So... there's that. I donated 2 large garbage bags of shoes.
I did, however, remember to take pictures of the clothes post-sorting. This, and the pile of blazers on the couch is what I kept.

And this pile is what I am giving away to charity. This was equal to three large trash bags.

The last category I went through was my purses. And again, I failed to take pictures. I'm out of shape when it comes to blogging, I guess. I'll do better in the next category (maybe). Altogether, I donated 1/2 a large garbage bag of purses.
This is what I kept, and also where I'm now storing them:

This is going to be an interesting set-up, because it is something that I've never done before. Kondo recommends keeping all of your purses together in one area, empty (save for stashing other purses within purses) and also a box of items that you need and/or carry on a daily basis (hence: the basket on the left). Each morning, you choose a purse, and then you put all the items from the basket in the chosen purse. At the end of the day, you empty the purse contents into the basket and file the purse back on the shelves. Currently, I have my wallet, my car keys, my work keys, my wine opener (Don't judge me! You never know when that shit comes in handy) my chapstick, a small bag of touch-up makeup and my eye drops in the basket. So far, it's only been a day or two since I've had this system (and a weekend) so I can't quite judge whether or not this system will stick.
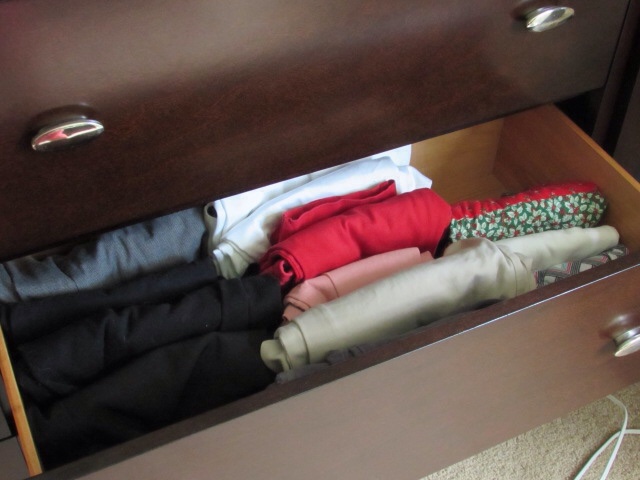
Next, I slowly started filing away my clothes. Why do I use the term "file"?! Because that's essentially what Kondo recommends: only hang in the closet what needs to be hung - sweaters, thick items, super thin blouses, etc. Everything else is to be folded and put in drawers. You can't just fold them though. Nope, that'd be too damn simple. You have to fold it in a special way... let me show you:
My shirt drawer...

And my tank-top and lounge wear drawer...

And my pants and skirts. Yes, that Christmas skirt that I made stayed - heck yes that inspires joy!
So.. not sure how long it will stay this way, but it has surprisingly been working out for the past 3 weeks very well. And - BONUS - so far no clothes have been "filed" on the floor. Every piece of clothing has a place, so when I take it off or it comes out of the wash it has a place of a special spot in the drawer, or in the hamper. This seems like simple concepts when I write it out, but it's truly not anything I was even close to doing before.
Lastly... the closet. This was by far the most drastic change and I've kept this up for the past 3 weeks pretty well. My husband loves that he doesn't have to do a small obstacle course to get to his clothes, so he's on board with my new tidy self.

If I had to be honest - I don't miss any of the clothes that I donated, and I find myself spending way less time in the mornings trying to find something to wear.
Next up: Books and Paper.
Until next time - buy the book and get your shit together. *insert clever winky or sticking-tongue-out emoji here*
Sunday, April 26, 2015
Shopping My Own Closet
Well hey there! It's been a while - 6 months, to be exact. I don't have any other excuse other than this: life. So... let's get on with it!
I have a full rack of thrift store finds, ready for refashioning at any given moment. In true Colette fashion, I had no idea what to do with any of them. So I turned to my own closet.
There, I found a pair of dress pants that I've had for a good 5 years. Of those 5, I have definitely not worn them for the last 2. Mainly because they've always been baggy, long and generally ridiculous looking. Naturally, I just hoarded them away instead of fixing them.
Enter: baggy, big, wide legged dress pants -

I've seen a few Pinterest pins and a few YouTube videos on how to fix pant legs of dress pants, so I had a general idea on how to do it. Although, I should mention that I did not pull up any said instructions, and I just went for it from memory. Clearly, some of this is just completely made up.
First, I put on my pants inside out. This is super weird if you don't have a habit of doing this outside of the early morning hours when you just toss on pants with zero give-a-damn because you are not yet fully awake. (We've all been there.) Don't panic that this has potential to be inappropriate - I kept my leggings on underneath the pants because it's not that kind of blog.

Next step is to contort yourself so you keep your pant seams straight, but are still able to pin the seams to thin out the wide legs. I started just above the knee and slowly tapered it in towards my ankle.
It wasn't pretty.

Next, I took the pants off. Once I cleaned off all the blood from the crazy amount of pin pricks this caused, I put them on the table with the legs hanging off so they had a natural "fall". This is probably unnecessary but made me feel like I was doing something beneficial.
I then straightened up my pins so it was a gentle taper that made sense instead of a line of a drunken seamstress. For the record, I attained the drunken seamstress line without actually consuming alcohol. (Shocked? Me too! Wine probably would have helped, in all honesty.)

Once I sewed my line, I quickly cut off the excess so I couldn't change my mind. My new mantra at this point was "I haven't worn these in years, I haven't worn these in years..."

Now, I thought I took pictures of this, but apparently I failed at uploading them. So the next step was to shorten them so they didn't go past my toes for a few inches. I went ahead and cut off the entire bottom cuff, then created a half inch seam and sewed it up.
Final result? Not nearly as bad as I was thinking! (How's that for a clear show of positivity!)

They still look pretty rough with just bare feet - meaning flats may look a bit goofy. However, slap on a pair of shoes and VOILA - not so funny looking legs!


I do have quite a few other dress pants that have the wide leg (what exactly was I thinking?!) With my short stature, I definitely can't pull it off these days. Never could, really... So I may continue doing this with my other wide-legged pants. Nothing better than waking up your old wardrobe!
Until next time - see you later!
Thursday, October 23, 2014
You Request - I Video
I know, I know - it's been a very, very long time since I've thrown up a blog on here. Usually, I have a really good excuse as to why I haven't produced anything.
This time, I don't. Truthfully, I have really just taken the past few weekends to rest and relax and catch up with family and friends. It was nice. But, I missed a little something-something. Hint: it was this blog.
So, I dove into my e-mails and thought I'd start off with a bang - a video! I had gotten a few requests of more video's from various people, and a few different people requested a video about my life. I found a happy medium - a popular YouTube tag of "50 Things About Me". So off I went - and it was the frustrating damn video I've ever made.
My intention was a cool video on Wednesday. As you may notice, it is Thursday. Believe it or not, that is far from my first fail in terms of this video. My FIRST fail was that my camera was on HD the whole time, which makes the video's bigger. My SECOND fail was that videos in HD form can only be two minutes or shorter to transfer to my iPad, and I did two segments that hit above 2 so they wouldn't transfer. My THIRD fail was maxing out the space on my iPad with the collection of video's. My FOURTH fail was that I tried to upload this on Wednesday and kept on losing my internet. Thus, my FIFTH and final fail was ultimately getting it up on Thursday.
All in all, ya'll are lucky that I still own electronics and they aren't thrown out on my lawn, okay?
So here it is. Don't count them because I'm definitely short of 50 with my missing footage. I wasn't about ready to go back at it though. When this blog gets me paid, that's when I'll start facing my failures. Until then - enjoy my half-assed video!
Remember to keep the requests and suggestions coming!!
Thursday, September 4, 2014
My Life on Overdrive
Have you ever had those months/days/weeks that it seems like it just goes by in the blink of an eye, but at the same time last forever?
It's been like that for me the last two weeks. Mainly because of this:

Our company had a booth at the Great New York State Fair and decided that someone from Human Resources had to be there each and every day of it. Since there are 3 people in HR and one was on vacation and one was the director that had to be in meetings - it came down to me. So I sat at a booth - talking to fair-goers and people watching. For days. In a row. For hours and hours straight. Including weekends - which is why my Sunday posts have been non-existent.
It wasn't all bad though - I certainly had a lot of fun eating a bunch of crap I don't typically allow myself:

Finding a Coke with my hubby's name on it (because you know I'll never find mine.)

And oh yeah... meeting celebrities :)

Why of course I'll take a picture with you, Mr. Alex Baldwin and his mom Carol :)
Mike and I rounded out a long week of work with the season opener football game at Syracuse University.

They never fail to give me a good heart attack. After a lot of overtime, we pulled through and won. After a game like that (especially after 4 hours) you certainly stick around for the playing of the alma mater.

Then I did a bit of hanging out with my brother and his wife on the final Sunday of the fair and caught a free concert of Phillip Phillips. He's the big white spot in between those large heads that were directly in front of me.

I thought I would be back once the fair ended - however now I have quite the cold that is putting me right on my butt. Actually, as I write this, I am on a sick day from work, listening to the Comfort Windows and Doors guys tear up my house to fix their mess up. But that is a whole different story for later days...
See you soon, friends! I promise I have not forgotten about you.
Wednesday, August 13, 2014
Adult Style Birthday Cake
This weekend is my dad's birthday so, naturally, I had to celebrate!
... three days early...
... with alcohol...
... alone in my house...
Let's call it taste testing! I found this pin on Pinterest and couldn't help myself. Luckily, I had all but one item already in my house. And who needs a better reason than that to buy cake flavored vodka? *Hint: Not me.*
First, get all your stuff together - this includes cake flavored vodka, coffee liqueur (I had Bailey's on hand), half and half and vanilla cake mix.

First, measure out a shot or so (the recipe says one ounce) of cake vodka and pour into a shaker.

Then measure out a teaspoon of vanilla cake mix. I wasn't exact on this, and it ultimately became "a heaping" teaspoon.

Then, it's on to your half an ounce of coffee liqueur. I used Bailey's because that is what I had on hand.

Next, add your half and half to make enough liquid to fill the glass, and throw some ice cubes into the shaker to make it nice and chilly. Then - shake it up!

Then pour it into a glass stolen from your wedding limo by your groom. Or any other fancy drink glass you have on hand.

And, of course, plaster the top with some delicious whipped cream and dress it up with some sprinkles. Because you can, and it's awesome.

Ultimate result? Delicious. I ended up adding a bit more vodka to cut the Bailey's taste a bit (it was strong!) but otherwise I didn't change it up too much. If I were to make it again, I would definitely go with Kahlua - my gut says it would make it phenomenal. Then you could add more alcohol and less half and half, as all drinks should be.
See you Sunday friends!
Sunday, August 10, 2014
Painters Frock
Hey friends! This week, I had a very busy Saturday. First thing I did was run to the Salvation Army to pick up some new finds, then it was onto complete this weeks project before jetting off to a girls night! On the agenda for girls night was a "Paint and Sip" where you do just that - get instructed on how to paint a pretty picture whilst sipping (and/or gulping) your choice of beverage.
Now, I am not a neat person when I do arts and crafts, so I knew I needed something cheap that I wouldn't mind at all that I drip drinks or paint on. I found the perfect little frock:

The problem? It was super large. BUT! It was a perfect length for leggings - helping me stay comfortable, cool and covered up the entire time. Win!

Now, I only had about a half hour to get thing ready for wear before I had to head out, so this was a quick and dirty fix. Luckily, the only problem was just the sheer size of it. First, I pinned about an inch and a half into either side of the shirt.

Once pinned, I turned it right side out and put it on with all the pins in it to ensure I didn't take too much or too little in and adjusted as needed. Then, I sewed up my new seams, and trimmed the excess material off.

And that was literally it! I love that just a small thing like a sizing issue is so easily and quickly fixed to take this shirt from super frumpy to totally chic. Of course, I had to take the after in my sunnies to prove how clearly awesome I am.

And how did the painting go? Although the purple paint did a number on my white leggings, I got 0 drops of paint on my shirt, so it will live another day. I think it may end up being a fall staple with black leggings and a cardigan.
And the painting itself? I did not see it going so well, but I am in love with it and once I find a good place to hang it, it will be a permanent fixture soon.

Just makes you want to jump in and relax, doesn't it?
Enjoy your Sunday, friends, and I will see you on Wednesday (spoiler alert!) with a little mid-week cocktail. Because every week needs a work-day cocktail night.
Wednesday, August 6, 2014
Testing YouTube - Two Toned Manicure
I should probably not go as far to call this a "manicure" - it's more of just strictly nail polishing. I'm not one to shape, file or do anything fancy to my nails. They usually break too easily to do anything too exotic. However, I recently saw a YouTube video posted by PopSugar that claimed "easiest nails" and I felt the need to test their definition of "easiest". Here's what you need:


Pretty flowers (shameless gardening plug) and delicious smelling candle are optional, but certainly set a fancy mood.
Basically, you need two colored polishes (or more, go crazy), a top and base coat, tape (stay with me here) and nail polish remover. I could be lying about the polish remover - it says to use "clean" nails, so I did some soap and water and some remover. Do whatever your definition of "clean" would be.
First, lay down your base coat. Then paint two coats of your choice bottom color. I chose myself a bright blue from China Glaze.
Let it dry completely before you move on. Once dry, place tape on your nails to cover certain portions of the nail. The exposed parts will end up being the other color - for me, this is a dark glittery purple, also by China Glaze.
*Handy Tip* Place the tape on the back of your hand and tear it off a couple times before placing on your nail to make it less sticky. If you put it straight on your nail from the roll, it will rip off your polish instead of peeling nicely. Took me a few goes to get this one.
Paint over the tape with the second color.
It's not gonna look pretty yet. Settle down.
Next, let the top color dry for a few minutes until it is tacky but not completely dry and pull the tape slowly off from the bottom of your nail to top.
Let dry, and then add your top coat for some staying power.
Don't judge on the angles of these pictures - it's super hard to get pictures of your own nails!
So - was it easy? Meh. The idea is easy to follow and the steps themselves do not take an art degree. Keeping the tape flat on my nail without bumps, creases or air bubbles was hard, and polish certainly leaked into anywhere I didn't have perfect. My lines weren't exactly clear.
Also, sitting on my couch for so long waiting for all my layers to dry was hard, but it's mainly because I think of everything I have to do with my hands when I can't use them. Every. Time. For this, have a nice movie going to keep you interested.
All in all, it's a fun look and I'll certainly try it again and attempt some clearer lines. For now, these pictures are the closest anyone will see them!
See ya Sunday, friends!
Monday, August 4, 2014
Didn't Forget About You!
Hey friends. Just a quick check in to explain my absence on Sunday. The problem?
I didn't have anything to refashion! *Gasp!*
Here's the deal: mama needed clothes for work. And I love making clothes - but summer clothes! Not too many things I make are work appropriate, and that is mainly what keeps this fun.
So, I recently went out to the local outlets and blew this weeks refashion budget on work clothes.
Yes, I feel bad. But not so bad, because I looked fantastic today in my new dress :)
Payday is this week, so my budget resets and posts will continue as planned. Don't fret!
Until then, keep an eye out for the Wednesday post - who knows what I'll be testing next!
Wednesday, July 30, 2014
Testing Pinterest - Organizing Plastic Bags
I know... riveting title, isn't it? I wasn't entirely sure how to put into words the mess that is my hall closet. Observe:

Yes - this closet it fully loaded with plastic bags. And, since I'm pretty sure everyone has a spot like this in their house or car (I'm talking to you, Mom) I thought I might test a popular Pinterest idea on how to take care of such a thing. The solution? Fold that shit up as tight as you can.
Here's how:
Step 1) Begin a Netflix TV series and have alcohol at the ready.
Step 2) Flatten out bag (and ignore the kittybomb)

Step 3) Fold bag in half

Step 4) Fold in half again.

Step 5) Fold the bottom left corner up until it is even with the opposite side, creating a triangle. Then fold up on the long edge you just created. Next, fold up on the flat side that you created from that. Continue and repeat.

Step 6 - When you get to the last little part of handle, stuff the ends into the pocket that your last fold creates. If you don't see a pocket, you went one fold too far - go back one.

Step 7) Throw completed, folded bag into a pile. Continue to sip alcohol while repeating steps with the hundreds of bags you may own.
Personally, I had 53 in our closet.

I'm not going to lie though - it was quite interesting to get to the bottom of the bags that we haven't used in a while. I found lots of old receipts. The oldest I found? This one.

WalMart, October 29, 2012. I'm sure I had older, but the ink was all smudged off.
So there you are! It's a bit time consuming and tedious, but I now have all 53 bags in one purse on a hook and they are no longer taking up the entire right side of my closet.
Glamorous? No. Super handy? Hell yes.
As a bonus Pinterest test... using a straw to remove a strawberry stem also works. Like a dream. I felt like a freaking genius at work today while doing this.

Subscribe to:
Posts (Atom)