Thursday, October 23, 2014

You Request - I Video

I know, I know - it's been a very, very long time since I've thrown up a blog on here. Usually, I have a really good excuse as to why I haven't produced anything.

This time, I don't. Truthfully, I have really just taken the past few weekends to rest and relax and catch up with family and friends. It was nice. But, I missed a little something-something. Hint: it was this blog.

So, I dove into my e-mails and thought I'd start off with a bang - a video! I had gotten a few requests of more video's from various people, and a few different people requested a video about my life. I found a happy medium - a popular YouTube tag of "50 Things About Me". So off I went - and it was the frustrating damn video I've ever made.

My intention was a cool video on Wednesday. As you may notice, it is Thursday. Believe it or not, that is far from my first fail in terms of this video. My FIRST fail was that my camera was on HD the whole time, which makes the video's bigger. My SECOND fail was that videos in HD form can only be two minutes or shorter to transfer to my iPad, and I did two segments that hit above 2 so they wouldn't transfer. My THIRD fail was maxing out the space on my iPad with the collection of video's. My FOURTH fail was that I tried to upload this on Wednesday and kept on losing my internet. Thus, my FIFTH and final fail was ultimately getting it up on Thursday.

All in all, ya'll are lucky that I still own electronics and they aren't thrown out on my lawn, okay?

So here it is. Don't count them because I'm definitely short of 50 with my missing footage. I wasn't about ready to go back at it though. When this blog gets me paid, that's when I'll start facing my failures. Until then - enjoy my half-assed video!


Remember to keep the requests and suggestions coming!!

Thursday, September 4, 2014

My Life on Overdrive

Have you ever had those months/days/weeks that it seems like it just goes by in the blink of an eye, but at the same time last forever?

It's been like that for me the last two weeks. Mainly because of this:

Our company had a booth at the Great New York State Fair and decided that someone from Human Resources had to be there each and every day of it. Since there are 3 people in HR and one was on vacation and one was the director that had to be in meetings - it came down to me. So I sat at a booth - talking to fair-goers and people watching. For days. In a row. For hours and hours straight. Including weekends - which is why my Sunday posts have been non-existent.

It wasn't all bad though - I certainly had a lot of fun eating a bunch of crap I don't typically allow myself:
Finding a Coke with my hubby's name on it (because you know I'll never find mine.)

And oh yeah... meeting celebrities :)


Why of course I'll take a picture with you, Mr. Alex Baldwin and his mom Carol :)

Mike and I rounded out a long week of work with the season opener football game at Syracuse University.
They never fail to give me a good heart attack. After a lot of overtime, we pulled through and won. After a game like that (especially after 4 hours) you certainly stick around for the playing of the alma mater.


Then I did a bit of hanging out with my brother and his wife on the final Sunday of the fair and caught a free concert of Phillip Phillips. He's the big white spot in between those large heads that were directly in front of me.
I thought I would be back once the fair ended - however now I have quite the cold that is putting me right on my butt. Actually, as I write this, I am on a sick day from work, listening to the Comfort Windows and Doors guys tear up my house to fix their mess up. But that is a whole different story for later days...

See you soon, friends! I promise I have not forgotten about you.

Wednesday, August 13, 2014

Adult Style Birthday Cake

This weekend is my dad's birthday so, naturally, I had to celebrate!

... three days early...

... with alcohol...

... alone in my house...

Let's call it taste testing! I found this pin on Pinterest and couldn't help myself. Luckily, I had all but one item already in my house. And who needs a better reason than that to buy cake flavored vodka? *Hint: Not me.*

First, get all your stuff together - this includes cake flavored vodka, coffee liqueur (I had Bailey's on hand), half and half and vanilla cake mix.
First, measure out a shot or so (the recipe says one ounce) of cake vodka and pour into a shaker.

Then measure out a teaspoon of vanilla cake mix. I wasn't exact on this, and it ultimately became "a heaping" teaspoon.

Then, it's on to your half an ounce of coffee liqueur. I used Bailey's because that is what I had on hand.

Next, add your half and half to make enough liquid to fill the glass, and throw some ice cubes into the shaker to make it nice and chilly. Then - shake it up!

Then pour it into a glass stolen from your wedding limo by your groom. Or any other fancy drink glass you have on hand.

And, of course, plaster the top with some delicious whipped cream and dress it up with some sprinkles. Because you can, and it's awesome.

Ultimate result? Delicious. I ended up adding a bit more vodka to cut the Bailey's taste a bit (it was strong!) but otherwise I didn't change it up too much. If I were to make it again, I would definitely go with Kahlua - my gut says it would make it phenomenal. Then you could add more alcohol and less half and half, as all drinks should be.

See you Sunday friends!


Sunday, August 10, 2014

Painters Frock


Hey friends! This week, I had a very busy Saturday. First thing I did was run to the Salvation Army to pick up some new finds, then it was onto complete this weeks project before jetting off to a girls night! On the agenda for girls night was a "Paint and Sip" where you do just that - get instructed on how to paint a pretty picture whilst sipping (and/or gulping) your choice of beverage.

Now, I am not a neat person when I do arts and crafts, so I knew I needed something cheap that I wouldn't mind at all that I drip drinks or paint on. I found the perfect little frock:
The problem? It was super large. BUT! It was a perfect length for leggings - helping me stay comfortable, cool and covered up the entire time. Win!

Now, I only had about a half hour to get thing ready for wear before I had to head out, so this was a quick and dirty fix. Luckily, the only problem was just the sheer size of it. First, I pinned about an inch and a half into either side of the shirt.

Once pinned, I turned it right side out and put it on with all the pins in it to ensure I didn't take too much or too little in and adjusted as needed. Then, I sewed up my new seams, and trimmed the excess material off.


And that was literally it! I love that just a small thing like a sizing issue is so easily and quickly fixed to take this shirt from super frumpy to totally chic. Of course, I had to take the after in my sunnies to prove how clearly awesome I am.

And how did the painting go? Although the purple paint did a number on my white leggings, I got 0 drops of paint on my shirt, so it will live another day. I think it may end up being a fall staple with black leggings and a cardigan.

And the painting itself? I did not see it going so well, but I am in love with it and once I find a good place to hang it, it will be a permanent fixture soon.

Just makes you want to jump in and relax, doesn't it?

Enjoy your Sunday, friends, and I will see you on Wednesday (spoiler alert!) with a little mid-week cocktail. Because every week needs a work-day cocktail night.

Wednesday, August 6, 2014

Testing YouTube - Two Toned Manicure

I should probably not go as far to call this a "manicure" - it's more of just strictly nail polishing. I'm not one to shape, file or do anything fancy to my nails. They usually break too easily to do anything too exotic. However, I recently saw a YouTube video posted by PopSugar that claimed "easiest nails" and I felt the need to test their definition of "easiest".  Here's what you need:
Pretty flowers (shameless gardening plug) and delicious smelling candle are optional, but certainly set a fancy mood.

Basically, you need two colored polishes (or more, go crazy), a top and base coat, tape (stay with me here) and nail polish remover. I could be lying about the polish remover - it says to use "clean" nails, so I did some soap and water and some remover. Do whatever your definition of "clean" would be. 

First, lay down your base coat. Then paint two coats of your choice bottom color. I chose myself a bright blue from China Glaze.
Let it dry completely before you move on. Once dry, place tape on your nails to cover certain portions of the nail. The exposed parts will end up being the other color - for me, this is a dark glittery purple, also by China Glaze.
 
*Handy Tip* Place the tape on the back of your hand and tear it off a couple times before placing on your nail to make it less sticky. If you put it straight on your nail from the roll, it will rip off your polish instead of peeling nicely. Took me a few goes to get this one.
 
Paint over the tape with the second color. 
It's not gonna look pretty yet. Settle down. 
Next, let the top color dry for a few minutes until it is tacky but not completely dry and pull the tape slowly off from the bottom of your nail to top. 

Let dry, and then add your top coat for some staying power. 
Don't judge on the angles of these pictures - it's super hard to get pictures of your own nails!
So - was it easy? Meh. The idea is easy to follow and the steps themselves do not take an art degree. Keeping the tape flat on my nail without bumps, creases or air bubbles was hard, and polish certainly leaked into anywhere I didn't have perfect. My lines weren't exactly clear. 
 
Also, sitting on my couch for so long waiting for all my layers to dry was hard, but it's mainly because I think of everything I have to do with my hands when I can't use them. Every. Time. For this, have a nice movie going to keep you interested.

All in all, it's a fun look and I'll certainly try it again and attempt some clearer lines. For now, these pictures are the closest anyone will see them!

See ya Sunday, friends!


Monday, August 4, 2014

Didn't Forget About You!

Hey friends. Just a quick check in to explain my absence on Sunday. The problem?

I didn't have anything to refashion! *Gasp!*

Here's the deal: mama needed clothes for work. And I love making clothes - but summer clothes! Not too many things I make are work appropriate, and that is mainly what keeps this fun. 

So, I recently went out to the local outlets and blew this weeks refashion budget on work clothes. 

Yes, I feel bad. But not so bad, because I looked fantastic today in my new dress :)

Payday is this week, so my budget resets and posts will continue as planned. Don't fret! 

Until then, keep an eye out for the Wednesday post - who knows what I'll be testing next!


Wednesday, July 30, 2014

Testing Pinterest - Organizing Plastic Bags

I know... riveting title, isn't it? I wasn't entirely sure how to put into words the mess that is my hall closet. Observe:
Yes - this closet it fully loaded with plastic bags. And, since I'm pretty sure everyone has a spot like this in their house or car (I'm talking to you, Mom) I thought I might test a popular Pinterest idea on how to take care of such a thing. The solution? Fold that shit up as tight as you can.

Here's how:
Step 1) Begin a Netflix TV series and have alcohol at the ready.
Step 2) Flatten out bag (and ignore the kittybomb)
Step 3) Fold bag in half
Step 4) Fold in half again.
Step 5) Fold the bottom left corner up until it is even with the opposite side, creating a triangle. Then fold up on the long edge you just created. Next, fold up on the flat side that you created from that. Continue and repeat.
Step 6 - When you get to the last little part of handle, stuff the ends into the pocket that your last fold creates. If you don't see a pocket, you went one fold too far - go back one.
Step 7) Throw completed, folded bag into a pile. Continue to sip alcohol while repeating steps with the hundreds of bags you may own.

Personally, I had 53 in our closet.
I'm not going to lie though - it was quite interesting to get to the bottom of the bags that we haven't used in a while. I found lots of old receipts. The oldest I found? This one.
WalMart, October 29, 2012. I'm sure I had older, but the ink was all smudged off.

So there you are! It's a bit time consuming and tedious, but I now have all 53 bags in one purse on a hook and they are no longer taking up the entire right side of my closet.

Glamorous? No. Super handy? Hell yes.

As a bonus Pinterest test... using a straw to remove a strawberry stem also works. Like a dream. I felt like a freaking genius at work today while doing this.


Sunday, July 27, 2014

Dying to be Different

Happy Sunday! I just gotta start this by saying - I totally freaking love this dress! I was super excited how it came out. I also want to let you know beforehand that I totally failed at taking pictures of the process. So... you win, you lose, right?

I started out with this:
This dress may or may not have been homemade. There was a tag but it literally said nothing but a word that I couldn't read. I had no idea what the fabric was, how to wash, etc. It was also a very nasty color, stained in a few places, and just generally ugly. It's been hanging on my refashion "to do" rack for quite a while- until this weekend when I had an "AHA!" moment. What a perfect job for these guys:

I got a few of these on sale at Joann's, so I brought home some colors I thought may work for this dress. Once I got everything home I decided that red was the way to go.

Once I had the hot water and red dye in the bucket, I thought "well hey, let's get dye crazy" and added in a bit of the tangerine as well.

And this is where the pictures stop, friends. Here's the short checklist of items:
1) Dye in a bucket for a few hours, rinse and spin in the wash and toss in the dryer
2) This dress was way too small in the arms and a tad too small in the bust. To fix, I got rid of the arms altogether - they had holes anyway - and I made more a V-neck in the bust to let those babies breathe a bit more.
3) Chop chop! I cut off the bottom so it no longer stopped at my calves. Why is that a thing, anyway?

And that's it! Super simple changes to make a boring brown dress into something that totally stands out!

Hope you guys are having a great weekend. Stay tuned for Wednesday - we're testing Pinterest!


Sunday, July 20, 2014

Back with a... Fail

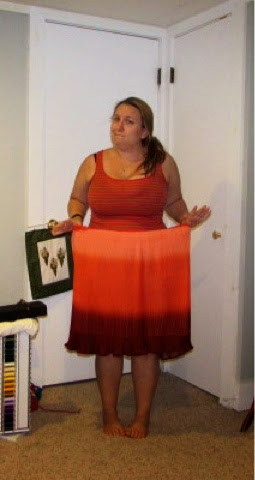
So, I always tell you guys that I will always let you know when I fail. Well... I wasn't lying, and I'm back to blogging and starting off with one. I've had this piece for quite a while now, but was totally stuck as to what to do with it. I am a huge fan of orange so this screamed my name this past spring as soon as I saw it.
The problem? I had no idea what to do with it. Every time I put it on, I hated how it looked but didn't know how to make it better. Finally - today -  I thought I would come back with a bang and conquer my personal challenge. I adored the orange ombre-look, but those horrible flowers on top of my rack needed to go. away. So, I got to chopping and (looking back, thankfully) chopped only the flower front from the plain arm strap of the back.

So then, as with all of my projects, I went ahead and played with different ways to change it up. I figured now that the first cut was made I would automatically find myself a solution.


But this didn't look right.


And this didn't quite work either...

Umm... nope. Not that either.

So this is where I got frustrated. When this happens, I try to start myself back at square one. So, I put the dress back up where it was supposed to be. Since I had already cut the straps, I just pinned the flower straps to my shirt to see if I could get an idea of what direction to go with this son of a bitchin' dress.


Suddenly, it dawned on me: the only thing I didn't like was that the flowers were on top of my chest. How did I never think "just move them down"? So I played around with pinning the straps and once I simply shifted everything down a bit, I liked it a lot more. Also, without the front connected to the back it created a gorgeous hi-low hem with the see through fabric that I immediately loved.


So the solution? It was actually super easy, but I couldn't complete it - here comes the fail! The solution is to cut and sew the back straps into an open back and add a ribbon to create a halter. The problem with this plan? I don't own orange ribbon and since we just resealed our driveway and were stuck at home not being able to drive on it, I couldn't go buy some.

Here's the look with just simple pins and a simple plan.

Happy Sunday, friends! Enjoy the rest of your weekend and, as always, sound off in the comments or my e-mail thriftysew@blogspot.com.

Look out this week (around Wednesday) for some new and exciting !

Testing the Food Network: Peanut Butter 'n' Banana Ice Cream

So I don't know about you guys, but I watch the Food Network quite religiously. I think the cooking shows are the most fun and could truthfully watch them all day long. Confession: Sometimes, on Saturdays, I do just that. I also share my day with the HSN and QVC shopping channels. Don't judge.


So anyway, on Saturdays, there is a new show on the Food Network called The Kitchen - and I am obsessed. I won't go into details, but you need to watch it.

Anyway, two weeks ago on The Kitchen, they made a quick and easy "healthy" ice cream with bananas. And I had banana's. So, during the next commercial break I got right up and threw my banana's in the freezer. And then I ran straight back to the couch to continue watching. A few hours days later, I remembered my intentions and got all the ingredients together, including: frozen banana's, plain Greek yogurt, peanut butter, Nutella (or the cheapskates version, as I have),


I didn't quite think about the banana's when I was tossing them into the freezer. It didn't dawn on me until I brought them out that I had no idea how to peel a rock solid, frozen banana. Youtubing commenced. Turns out, you let it thaw for 5 minutes, cut off the ends, cut it in half and the peel comes right off with a little help from a knife (or your finger nails when you get frustrated with the bits that remain.)

Once peeled, toss them into your food processor in chunks.
Next, add to the banana chunks your Greek yogurt. This recipe calls for full-fat, original flavored Greek yogurt. Naturally, this is what I purchased.

Honest, I swear the "low fat" was hidden in the store... it appeared while in my fridge...
Next, add a gob of peanut butter into the food processor along with your yogurt and banana chunks. A gob is obviously the technical term for "however the hell much you want". I put this much:
Next, you turn on your food processor and let it rip until it's creamy and chunk-less. I turned mine on and... nothing happened. I played with it for a good 20 minutes, but it just wouldn't lock. So, for the sake of the blog, I swore a lot about the multiple dishes, but I got out my blender and wished it luck.
But... I didn't care all that much because I had a trusty friend by my side that tends to keep my stress down.
Next, you put your mixture into a bowl and "fold" in a gob (refer to the peanut butter part for definition) of the Nutella. This makes it look... well.. not so edible and delicious.
I didn't let it phase me, although it tried because my Nutella never really did "fold" in nicely, but instead stayed in small chunks that resembled poop. (It's what we were all thinking - I just put it in writing)

After a few hours, I took it out of the freezer to see how it developed. The top of the bowl resembled ice cream, but the middle and right underneath the top was still pretty runny, so I put it back in the freezer and vowed to come back to it in a few hours.

3 days later, I remembered it was in the freezer when I went in for some real ice cream. I grudgingly surpassed the real ice cream and took out the bowl of, lets be honest, mashed bananas and gave it a go. It was hard as a rock and looked a little like this:
After a quick microwave and a sit on the counter for a bit, I finally had my taste of concoction.

Results: Yup. Tastes like frozen bananas. And if you do this, definitely eat it a few hours after freezing instead of a few days.

As a side note: I'm not completely believing this is a "healthy" alternative to regular ice cream. I made one small bowl out of two bananas (200 calories), a yogurt cup (100 calories), a scoop of peanut butter (probably 100 more) and a scoop of Nutella (about 50). Together, this small bowl is 450 calories. I'd rather just indulge in a bowl of regular ice cream of the chocolate variety for just about the same and know I will enjoy it much more.