Tuesday, January 15, 2013

No Sew Fo Sho!

So today I was totally in the mood to sew but didn't want to have a two hour ordeal. I was looking for something quick and simple - so I turned to a no sew project. I know, I know - that doesn't make much sense. But I've had two things swirling around in my mind for a while now that I just wanted to get out of there. The first was that I wanted to use this new product that I bought called "Liquid Stitch". The second, was that I really wanted a shirt at WalMart but couldn't bring myself to spend the 7+ something on it. My thrifting (as well as the knowledge that the fabric was cheap as all et out) has made me a smart shopper... or an obsessive one. Take your pick.

So here's the shirt that I wanted at WalMart. I decided I was going to make one for myself - it couldn't be that hard, right? So I went in my heavily overloaded drawer of t-shirts and picked a simple pink one that I haven't worn in years. Good thing I'm a slight hoarder! This was a light, cotton, stretchy shirt. There was nothing wrong with it, really, other than it was begging to be cut up.


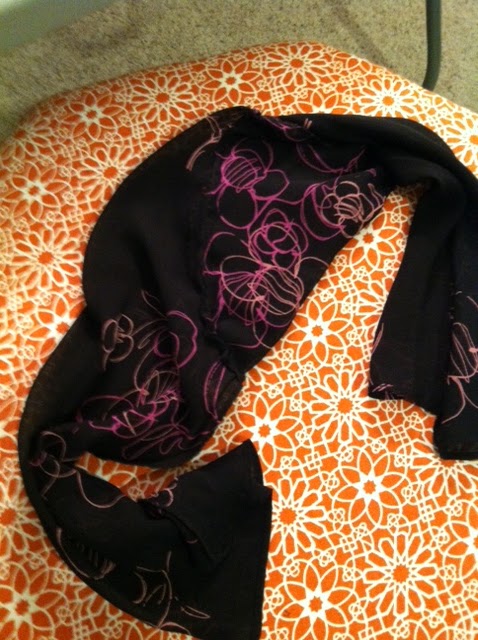
So the first thing I did was take a piece of chalk and draw a line on the back where I wanted my open back to be. Then I cut one side, folded it over and followed that edge to cut the other side.


At this point, I had not yet decided to use my Liquid Stitch. It was something I knew I had, but wasn't entirely sure what to do with it so kept it in the back of my craft room. It was when I folded all my raw edges under from the shirt and realized exactly how thin and stretchy the fabric was that I decided to break it out. I definitely didn't want to put this fabric under my machine. It would have been hilarious and entertaining, I'm sure, but I kind of wanted to get my night going without having to swear and throw things. So I got out my tube of Liquid Stitch, used a totally unnecessary amount of pins to pin down the edges, and went to work.


Upon opening of the tube I was unimpressed. I would have sworn that I got taken by the maker's of Elmer's glue. It appeared as glue and smelled like glue and I'm pretty sure if I were to schmeer (yup, schmeer) it all over my hand and let it dry it would peel off in a gross see-through layer like glue. Don't try to act like you've never done it.

At this point, the process was started so I had to finish it. I followed the directions, putting a little bit of glue - er, Liquid Stitch - down at a time, using my finger to make it even and then pressed the fabric down into it. I then made a bow-like shape from the cut-out that I had and "stitched" that down as well. Then, continuing with my direction-following, I let it sit for more than 30 minutes. In all actuality it "rested" for a good hour and a half because the fat kid in me got distracted by dinner and the couch. When I went back to it, the "stitching" was completely dry and not even hard, as glue would have been. I've decided Liquid Stitch is one notch above Elmer's glue - good enough for a quick fix, but probably not something I'll use in my normal rotation. I then grabbed a small piece of leftover fabric from my Muu Muu Magic project and wrapped it around the middle of the bow to make it "scrunch" up and more bow-like. This is what I ended up with:

 
So it's not the most drastic change this girl has done, but it was quick, simple and certainly added a bit more "pizazz" to a regular ol' t-shirt. Who knows... this shirt may actually make it out of the t-shirt drawer now.

I also wanted to update y'all on my New Year Resolutions. The first resolution, to get healthier and get rid of some of that holiday poundage has successfully failed, as predicted. This pretty much always happens to me. Why? My birthday is 10 days after the New Years Resolutions are created. You can't really resolve to eat healthier and lose weight, and then stare at a birthday cake (and the leftovers!) without breaking that resolution like a stick. So yes, I gorged out for my birthday, and I plan to do the same thing in an upcoming trip to Lake Placid. So, maybe this one will continue once my January festivities wind down.

My experience Syracuse one is going along swimmingly though! That same weekend I made a trip to Oswego with my sister-in-law and we checked out a new thrift store. It was a blast and we had tons of laughs, and I got a full WalMart bag full of fantastically hideous items to remake for only $3. Then, just today I found a store named Clothes Mentor. I had never been in this store, although I've driven past it plenty. The prices were a bit more expensive than Salvation Army, ranging from a few dollars to over $50 (and above) but it was all very well made items from known designers and in good condition; they refuse to take it if it looks even slightly used. I picked up a cute skirt, a dress and a belt for $16. Not my usual deal, but I was okay with splurging just a bit for the cause.

As for the "choosing a regular blogging" day, I still haven't. Sorry all. At some point, I'll get into a nice routine when I can choose a regular sewing/blogging day and then I can break it out. For now, I'm here to please and choosing a day and not blogging on said day would cause a bit of disappointment, and that's not ideal. Someone suggested to me that I should make a bunch in advance and then just post my blogs on the regularly scheduled day, even if I don't sew. Two problems with that - most of my projects are 3+ hours and require at least one glass of wine to keep sane. This cannot be a daily thing, folks, and nothing would come out well if I do a marathon project weekend to get ahead of myself. The second problem: every time I complete a project, I am WAY too excited to post it. I would never be able to get ahead of myself because my excitement would bubble up too much and I'd end up posting each and every project that same day. So... just stick with me and sign up on the side of the blog to "follow" me (stalker) and roll with me while I try to figure this all out.

What'd I learn? 1) Liquid Stitch - easy way out, not ideal for anything other than impossible fabric. Gets. Everywhere. 2) It's pretty fun to try to copycat items I see at the stores. I see a Pintrest board coming out of this one.

So... as I finish up my post (and my current glass of wine) - Cheers :)

Saturday, January 12, 2013

Whole Lotta Flowers

This title was inspired by the sentence that my husband couldn't stop muttering every time I came out and asked "does it look ANY better?" I don't know how I feel about this one folks - mainly because, well, it's a whole freakin lotta flowers. (Like how I changed it up there?)

First, let us back up to the inital state that this atrocity was born. It looked like this:
No laughing at the un-makeup'd face or the glasses.

There were 2 things that I enjoyed about this dress: it actually fit me well enough that I would not have had to take it in - the waist was already naturally cinched, and I also kind of liked the print. I'll regret that second one later. There was a way longer list of things that I didn't like: the altogether old lady look, the weird arms, the even weirder shoulders, and the awkward length to name a few.

First thing I went for were those awkward shoulders. Initially, I thought it was shoulder pads that I would find. This was not the case, because what I found was even more odd than shoulder pads:


They were two scrunched up pieces of hard, thick tissue paper-esque type fabric. No wonder they were so itchy. So I ripped the fabric out which, incidentally, also solved the weird arm issue because they were sewn right into the seam of half the shoulder. In the process of ripping out the weird shoulder pads (not even sure if that's what I can call them) it also ripped off half of the arm. I just continued, at this point, to seam rip and ended up with two arms separate from the dress. Goal accomplished. While I was taking things away from the dress, I took off about 3" from the bottom to hike the hem up a bit.

I soon realized that the 3" wasn't enough, so I cut off about a good 2 more inches. My goal was to keep this a work dress, but also didn't want to show up looking like an old school marm. The definitions of our dress code, according to the policy book, is that dresses and shorts have to come to "mid-knee". That's right - not mid-calf, not knee length, but "mid-knee". Considering the fact that the patella is maybe 2 inches in diameter, this is a pretty specific length, but that's for other times.

So along with the length, I decided to try to get more flowers out of this dress. In my attempts, I decided changing the neckline was the way to go. I decided to go with the simple V-neck again, so I cut a straight line down about 3.5 inches down the front and pinned them down. This dress was ready for the big bad machine.


Now. I hope you all are sitting down reading this because I am about to say something that has never happened ever to me. Are you ready? I actually sewed all of the hems (arms, bottoms, v-neck) without any mess-ups. That's right - that is no misprint. Everything went smoothly and I didn't even have to rip out one stitch. I may or may not have completed a full-out happy dance after discovering this fact. (P.S. If this "may or may not" confused you - I'll clarify with... it happened.)

At this point, I had completed everything that I had wanted with this dress. So I put it on. And it was still a whole lotta flowers. Shit. It is better - but it's still not exactly the awesomeness that I had pictured in my head when I started. I did try to class it up a bit - I put on a long necklace and a black cardi, but it didn't save it. The hubsters idea was to break up the pattern with a belt. I do grudgingly agree with that fact, but the problem is that I don't own a wide black belt. Or many belts. With any luck, a few more trips to Salvation Army will solve that issue.  So... here it is.

Ignore that face too. And the white socks. Let's be honest - you're lucky I don't have sweatpants on under this.
 
So it's not the best, but it's what I have. I'm happy that I've finally completed something without messing up royally, but I'm not all that happy with the final product. I'm debating now on chopping it in half and using the top as a shirt so I can get rid of the "whole lotta flowers' with some black slacks.
 
I'll throw it out to you guys - chop it in half, or keep it as is and go with a wide black belt? Leave your comments below!

Tuesday, January 1, 2013

Green Dress

Happy New Year!

It's 2013!! How exciting - so many good things happened in 2012 (my wedding, working on our new house, this blog!) that I am so excited to see what 2013 is going to bring to the party that we call life.

As for Day 1 of the New Year, this is what it has brought me:
Well, that and some fantastic homemade pizza, but this blog ain't about the food. You'd have to jump over to my gal Danni for all that fantasticness - check her out here. 

This dress wasn't all too horrible, so I thought I'd start off with an "easy" one. HA! Should have known that wasn't an option in this craft room! There were a couple issues with this dress. The first being that the armhole openings were very tight; they were all sorts of jammed up in my armpits. (You're welcome for that visual.) The second...


It had some hooch-tastic slits going up both sides of the dress. But, I fell in love with the bright emerald color and knew in the back of my mind that I had that black lace from this project that would look great with it. In all honesty, I've been thinking about this dress all week. Thinking about these projects in my mind for hours (sometimes days) before I actually start has been quite the annoying habit that I'm falling into. I can't promise that it has helped these into getting any better, so don't get too excited about the pre-planning.

Anyway, a few days ago I played around with this dress on Sophie and came up with this:
No, I did not plan on only have one lace sleeve, but I wasn't going to pin up lace on both sides just to decide I wasn't feeling it. So in this one, I pinned a lace "sleeve" onto the dress and used the last of the lace as a belt (as is my fashion preference lately). I then prompty asked my husband to report to the craft room for his input on this. His response? "It looks goofy". So.... back to the mental drawing board I went. I mainly took into mind that the armholes were extremely uncomfortable. So there was only one thing to do.

Chopped! (and we ain't talking the Food Network Show)
After my small one-person celebration party for actually cutting a straight line, I got out the elastic from my rapidly growing scrap craft pile. I measured the elastic on my body, then sewed the ends together to make a big loop. I then flipped the dress inside out, lined up the elastic to the outside of the dress, folded the fabric over and pinned it all down. Boom! Done. I also pinned up the hooch-tastic slits on the bottom and headed over to the sewing machine. One would think the ease of all of these activities is proving that my skills are improving. My avid readers, though, know that the sewing machine is where it gets disastrous (and entertaining).
The first time I sewed it down (yes, the first time) I used a straight stitch and stitched underneath the elastic. I didn't think it was a problem until I took it off the machine and put it on my body and pulled an apparent Hulk moment when I blew out all my stitches. So... back to the machine I went (after seam ripping out everything I did.) I then went at it again, this time sewing a zig zag stitch, changed the thread to one that matched the dress - not sure why I thought black was a good choice the first time - and this time sewed right through the bottom of the elastic. I put on the dress the second time and it worked perfectly, with not one busted stitch. Bonus. This is what I ended up with after adding the lace "belt":
 Don't mind the major bumpage around the chestal area - it was again cold in my craft room so I just pushed down the straps of my undershirt instead of taking it off.
Now, it wasn't a HORRIBLE look, but I felt like it could be better. So I switched up the lace a bit.
All I did here was tie the lace "belt" apron style and fanned it out instead of scrunching it all up. I think this looks better, and the bow jazzes up the back a bit.
You can also notice in this picture that I sewed up the hooch-tastic slits to more appropriate length. I went ahead and called this dress done... for a whole 2 minutes. Until I put it back on Sophie and messed around with the styling a bit more.
On Sophie, I kept the same belting technique, but added a halter to the dress. I made the elastic tight enough that I don't necessarily need a halter for additional support, but sometimes completely strapless can look funky on me if I don't have an appropriate necklace. If this is the ultimate route, I would go for a ribbon halter so it isn't as itchy as lace.

I thought I'd throw it out to you guys - nothing but the bones of the dress have been considered permanent, so what are YOUR opinions? Stick with what I've done, or add the halter a la Sophie's styling? Leave your comment below and I'll update you later on with the ultimate decision!

Additionally, I wanted to share another fantastic milestone of 2012 that I had achieved - this blog has officially hit over 1000 views! Yeah, I had my own Sally Field moment:

 
Yesterday's post pushed me way over (1036) - I suppose I should give things out more often?
Thank you everyone!

Instead of posting what I've learned at the end of this post, I've decided to go ahead and post my New Years Resolutions. Some of them are my annual staples - you know them, the ones that are broken around mid-January. Others, I really do hope to stick to because they straight up make me happy.

1) Work off all the post-holiday extra poundage. This would be the annual one mentioned previously. Considering I have a Lake Placid trip planned January 21st, the mid-January prediction will probably be right on as well.

2) Experience Syracuse. I've lived here for a good 4+ years - since my 2008 college graduation - and still haven't experienced any of the festivities that Syracuse offers - the beer/wine festivals, the home shows, the Tastes of Syracuse, or any other festivals and other happenings in the area. Except for St. Patricks Day. I said I was interested in the events, not batshit crazy. Keeping the wallet in mind, of course, I would really like to be present at more of these events this year; especially in my new town of Phoenix. They have a Strawberry Fest I wouldn't mind hitting up (you had me at shortcake) and their annual craft fair on the locke seems to be right up my alley.

3) Find more thrift stores! I can't believe I have not discovered these stores sooner! This resolution I decided to hop right into and have discovered a new thrift store in Oswego. This new place has a "fill a bag for $5" special going on, and all day everyday their clothes are $1 each. How could you say NO to that?! *Hint: you can't* I haven't actually gone there yet (only google-stalked them) but I will let you know my findings as soon as I go!

4) This last one is the one that I really want to keep both for me and for you all (in all 11 countries that follow me!) I want to post projects on a more regular schedule. I'm not sure when my regular posting day will be, but sometime in the next few weeks I hope to get a schedule together and will let you all know!

Monday, December 31, 2012

Holiday VoxBox Time!

"What is a VoxBox?" you may ask. "What is the new project?" you may ask. Well - I've got excitement and I've got disappointment. No projects in this post. That's the disappointment. The excitement? *Drumroll please*... reviews of everyday items you all can benefit from!

No, this is not going to be an every post thing, it all depends on how often I receive VoxBoxes - which brings me to your first question. This is a VoxBox:
Let's take it from the beginning. So as I was stalking reading other blogs, I saw that one blogger joined a website - www.influenster.com. Being the copying little blogger that I am, I had to check it out. Turns out, it's a website that you go in and do reviews of products/objects/styles/foods/beverages/books/anything you want and, of course, read the reviews as an informed consumer to purchase the good stuff! The website feeds on social networks - as a member you advertise what you get, what you see, what you're doing (blogging about it) and you get points as to how active you are on the social networks and, mostly, the reviews. Then there's the VoxBox - the more active you are, the more helpful you are with your reviews, and the more things you're interested in, the more stuff you get delivered to your door to test out and blog and review about. I was skeptical until I got this fantastic e-mail saying "You're receiving the Holiday VoxBox 2012!" Sure enough - on my doorstep was this box chock full of fun things to try out.

So here goes. First up - Quaker Real Medley's Cherry Pistachio Oatmeal, $1.79 per cup
When I got this my first thought was "ew" because I am not a fan of oatmeal. But, I promised to review it so I sucked it up. As soon as I opened the package, it had about 1 inch of food in it. I was unimpressed by the quantity - it's an awfully big cup for such a little amount. Then I noticed huge chunks of cherries and pistachios and was instantly impressed. When I used to purchase flavored oatmeal to give it a go for attempted health benefits, all of the flavorings were ground up and when it was put in with water it turned into a mushy gushy mess that was unappetizing, to say the least. This one, you added boiling water to and put the cover back on, waited 3 minutes and opened the lid to a way better bowl of outmeal. (There was a microwave option too, but we have a teapot at the office that this was the easier route.)

I was so impressed with the taste when I opened it up and tasted it. It wasn't mushy at all! In fact, it had the crunchy taste of oats, nuts, pistachios and the tang of real (because they were!) cherries. It was very delicious! I was beyond surprised and ended up buying these at my next grocery haul. I am also impressed with the ingredients -  it's in the "healthy enough" category that I don't mind making it a regular in the breakfast rotation. Here's the ingredients: whole grain rolled oats, dried sweetened cherries (cherries, sugar), multi grain blend (whole grain rolled oats, rolled barley, whole grain rolled rye), brown sugar, pistachios, almonds, nonfat dry milk, whole grain rolled wheat, natural flavor, salt. Altogether it's 290 calories, 8g fat, 49g carbs and 9g protein. Kept me nice and full all morning, too.

Score: 4.5 out of 5, due to the small portion in a large cup. I don't think I would have been so taken aback if they were just honest about their portioning and put it in a slightly smaller cup.

Next up: Goody Quikstyle Hairbrush, $11.99 per brush
I didn't quite know how to deal with this. How does it dry? Wouldn't it mold? How does it actually work? All the answers were on the back: Usage: Use it like a regular brush. The idea is that it dries your hair faster because the microfiber bristles soaks up excess water. Drying? Air dry. The bristles are "protected by antimicrobial properties" that prevent mold and mildew. I used this brush this morning and I'm not quite so sure about the results. First off, I noticed that the hair brushing bristles were very hard and had no give or flexibility whatsoever. The microfiber bristles didn't have a different feel but, as you can probably see from the picture, they tended to mat themselves down so I wasn't sure how well they were actually going through my hair. The brush did address this, saying on the back "After a few uses, the microfiber bristles may begin to look a little flat" and tell you to fix it by running a comb through it and then turning it bristle-side down and tap it a few times to "fluff" them back up. Not sure how I feel about having to comb my brush after every few uses; and, to be honest, I didn't quite see much difference than if I just brushed my hair, ran a towel through it, then brushed it again. Did having it all together save me time? Maybe a bit. Would I have bought this brush? Probably not. I'd probably tend towards a brush that had bristles with a bit more flexibility.

Score: 2 out of 5. It certainly served the purpose of getting my hair brushed, and maybe it did dry my hair a bit more than a regular hairbrush - but so does a towel. It's a bit on the expensive side for a brush as well.

Next up: NYC Color LIQUID Lipshine, $2.49 per lipshine.
The color they sent me was "Nude York City" which I thought was very clever on their part. It's advertised as a lip shine that is non-sticky and moisturizes lips with Vitamin E and is supposed to have a "creamy and soft textured feel". This smelled absolutely delicious, and had a big wand that made for some good lip coverage. I don't agree with the non-sticky claim - it was pretty sticky but the creamy and soft-textured description certainly had a leg to stand on. It made my lips stick together and drinking from a glass awkward. It did moisturize a bit, but not any better than my regular lip balm. As the lip "shine" is the obvious claim to fame on this product... how'd it do? It did great. The shine was max-impact like and I really liked the nude color. Although this comes in 10 shades, I'd probably stick with the nude.

Score: 3.5 out of 5. I loved the smell, the wand and the shine and the price wasn't too shabby either. It was sticky, and it's advertizing is clearly proud of it's "non sticky" claim, so I think that was a bit of a downfall.

Next we have Kiss Nail Dress, $6.99 per box (one box has 28 strips, for fingers and toes)

I do confess - this I have not tried yet. I'm hoping to put them on for New Years with my new dress, so once that all happens, I'll be sure to score this one out and tell you how it goes. Essentially - it's a sticker that you put on your nails and then file down into shape. From the sounds of other reviews, they work out pretty well, but as soon as dishes are done (or 2-3 showers) they will unpeel themselves. It's for this reason that I didn't put them on earlier. I am very impressed with the designs and colors though - the ones Influenster sent me are rhinestoned out and seem to match the colors of New Years perfectly. You'll see soon enough.


Next: EBOOST, $28 for box of 20 powders, $39 for box of 30 powders, $39 for box of 12 shots

This advertises as a powder (or shot, but I got the sample of powder) that boosts your mood, focus and immunity with natural ingredients and no crash. I don't know what to say about this other than - don't do it. It's not absolutely horrible - but it's not "good" either. This powder turns regular water into some sort of effervescent liquid that seems to mini-shock your tongue when sipped:

I would not know if it does anything with focus, immunity or energy because I could barely get through half my glass. It was so weird because it wasn't a bad taste, per say - it was pink lemonade - but it definitely is not what you are expecting. And those prices? I get that it only averages out to be $1.40 per drink, but for that same $1.40 I can buy my Coke Zero and get my caffeine fix (focus, energy) and then pop a Vitamin C for the immune boost. I'm good on this one.

Score: 2 out of 5. Blegh.

Lastly - Sole Society, www.solesociety.com

This is an online website for SHOES! This had my name written all over it. I do confess, I have not yet used my coupon that they sent me for $25 off my first purchase. I went on the website and checked out the new shoes, popular shoes, etc. for some ideas on what to buy but I could not make up my mind! I will definitely use it soon though, so I will be sure to update you on the purchase price and the fit of the shoes that I did buy. So far, I am extremely impressed with the shoes, as well as the site itself. It's an easy website to use (with all the shoes on one page to go through them all in one click) and it has free shipping BOTH ways, all the time. With $25 off offer, I was anticipating a larger dent in my bank account, but with most of the shoes going for $49.99 or $59.99, Influenster has essentially given me a "half off" code for most of the website. BONUS! Also, when I went to check it out on Friday, December 29th they had a special going for buy one get one free - making for a 49.99 or 59.99 discount! Unfortunately, the $25 off does not combine with the buy one get one (yes, I tried. Who doesn't want to try to get 2 pairs of shoes for just $25?!). Once my bank account recovers from Christmas a bit, I will certainly try this code out.

The extra bonus?! I can give the code out to all my wonderful friends (that's you!) On that note, please head over to www.solesociety.com and use the code INFLUENSTER25 for $25 off your first purchase! Take a little time to hum and haw over it - the code expires on January 31, 2013.

Score: 5 out of 5 for appearance, website ease of use, pricing and shipping costs. I may have to amend this score, depending on how fast the shipping is and (hope this doesn't happen but maybe) how easy returns are.
See - aren't you much happier reading a post that gives away stuff at the end? Enjoy, all my shoe-loving friends. And try that oatmeal.

Thursday, December 27, 2012

Snow Day Sewing

Today, Mother Nature decided to dump over 12 inches of snow into our yard and as of right now, 4pm, it is still falling. Thankfully, I have quite a few vacation days saved just for this such occurrence, so I called in a "snow day" at work. Sure, it uses up some of my precious vacation time - but I'd much rather just stay home and do chores, sew and shovel instead of risking the un-plowed highway and back roads. It works for me :)

I had a fantastic Christmas this past weekend and am lucky enough to call it a weekend because we truly did spend 4 days full of Christmas festivities. It was pretty amazing. I had such a great time with all our family and friends - I haven't laughed that much in a long time.

In the spirit of the holidays, I decided to get a jump start on New Years. Although plans are certainly not made yet - my dress will be.

Here's the gorgeousness I will be ringing in the New Year in:
Oh yes - this is an asymmetrical, flutter see-through sleeve dress. Also, it doesn't seem important now, but take note of the high back that runs along the back of my neck. This will be important come the end of this. In a twist of fate, who saw this coming:
Made by Jones New York! Almost broke the budget with this beauty - it was a whole $5.75. But I saw the black and the pretty pinks and purples and sucked it up.

First thing I did was to take off those sleeves! Although fluttery and pretty, they were an awkward length and see-through - not ideal. So, and you knew this was coming, the seam ripper came out in force!
Bye bye sleeves! I then put on the dress and wanted to do something about the awkward asymmetrical bottom that hit me at a weird spot. So I took the slip part underneath the dress and grabbed about an inch all the way around and pinned it up. I then sewed it and cut off the excess fabric. This left it looking as such:
It certainly wasn't pretty, but all of those seams are covered up by the outside fabric so it didn't have to be attractive. Putting it back on, it hit just above the knee, which was much better than cutting me off at mid-shin.

Next, I couldn't face just tossing out the arms. Although not pretty on my arms, it was still a rather gorgeous, soft fabric. So - I sewed together the two arms and made a belt. This action I so modestly call: genius.
When wrapped around my waist, the seam isn't quite as obvious, so it worked out that that wasn't all that pretty on its own, too. Seeing a trend yet? Then I put it all together.

I was okay with this result, but I was quite uncomfortable with the amount of cleavage going on. So... I went to backwards town! I turned the dress around, where the high neck gave me the ability to make any sort of neckline I wanted. As I've never created a neckline before, I wanted to make something "easy" so I decided just a simple V-neck. I measured the dip of the original neck and it was 7", so I measured 5" down on the back (from now on, the "back" will be the front. Stay with me on this one) and cut a straight line down. Then I folded back the sides and sewed it down. This was much more appropriate, not to mention way more comfortable as well.
Don't mind the sweatpants - I was chilly!
There is still some hand sewing that needs to be done on the V part of the neckline, but other than that, I was happy with my newly created neckline. And the deeper V definitely looked more appropriate on the back of the dress.

I'm actually quite happy with this dress! Again, it's New York so I will have to definitely throw on a sweater and some tights of some sort for New Years, but it's definitely a fluttery, non-constrictive dress that I can also wear it during the summer on its own.

I should probably mention that I had a little help on this dress. Her name is Sophie.
That's right! I got a body for Christmas! That sentence, coming from an ex-Mortuary Science student, may worry some so I should probably re-explain - I got my dressform for Christmas (thanks to my brother's family and my sister!) Using a dressform certainly helped with the pinning and propping and playing around with different styles, and I was pretty thankful to get it.

Speaking of thankful, I got another object for the craft room that will be extremely helpful in all my projects.
A sweet free-standing mirror! No more taking pictures in my small, behind the door, broken mirror. Thanks Mom and Dad! Once it's all cleaned up and wiped off from all of it's box-dust, I'll be putting this beauty to work. Whew!

Lessons learned in this project? 1. Pay attention to stitch length with different fabrics - when I sewed up the sleeves after tearing off the original ones, I used a longer stitch length and it pulled and scrunched up. It didn't end up horribly, but when I sewed the neck I made sure to make a short stitch length so the neck didn't bunch and scrunch in the same way. 2. Don't be scared to create necklines. I was terrified to mess with this one because I didn't want to mess up the whole ordeal. What pushed me into doing it was my husbands voice of reason. I believe his words were something along the lines of "What's going to happen if you mess up? You'll be out a whole six dollars. Big deal." Although $6 is a good chunk of change, in the perspective of amount spent on hobbies and learning experiences, it's a comparably small amount so I decided to jump into it. I'm glad that I did, because it worked out. Maybe next time I'll even venture into a square neck? Let's not get crazy, now.


Friday, December 21, 2012

Sweater Swag Fail

I'll warn you now - this is not pretty, and I'm not happy about it. I'm sure I'll re-visit this project at some point, but here's where it was left. This one was inspired by Pintrest, the site I'm extremely obsessed with and totally okay with that fact; it gives me a lot of good ideas. Recently, I had pinned an outfit that I liked and it had a boatneck sweater that was gorgeous. So when I saw this sweater, much like the one that I pinned, I had to snatch it up for $3.99.


Voila! It wasn't perfection yet, but I swore I could get it there. (Spoiler: I was wrong. Very, very wrong.) And yes, I realized that I did the "hand on the hip" thing again that I swore I wouldn't do. So... here you go.

So yes - no hand on hip happens, it's just not my favorite way to "pose". The plan: a) cut off turtleneck in boatneck-esque fashion b) sew up the hem c) be done for the next 4 days of Christmas vacation and wear my sweet new comfy sweater for the drive between the parents houses.

So task a commenced:

Done. So far so good. So then I pinned it all around and sewed the seam to complete task b. This is where things got shady. First of all, the sweater was puffy and didn't want to fit under the footer very well, so I may or may not have freestyled a lot over the manufacturer's seams where it certainly wouldn't go under the footer when it was down. One would think this was the issue but alas, it was not (although it could have been. Who knows - I'm new at this.) So I finished the hem and put the sweater back on. And it rolled like no tomorrow, making a HUGE gap in between the sweater and my skin. So I decided to do a second hem to make it a bit more stable. It didn't help.

When I walked out like this, my husbands first reaction was "it doesn't look bad. What's wrong with it?" And then I put my arms down and the whole thing fell down to my elbows. Problem found. So, I turned the whole thing inside out and pinched the top seams together. Knowing that this certainly would have been too thick for my sewing machine to handle, I hand sewed the seams together so it wasn't falling off my shoulder. To my absolute horror, this is what I saw when I put it right side out and put it on:
It looks like a shoulder pad in there, but it most certainly is not. That is the result of my hand sewing at 11pm. I don't even know how this happened. The worst part wasn't even this nub (my husband called it a shoulder nipple) - it was the fact that I tried to cut off the excess fabric creating the nub, and ended up with a huge hole in the shoulder. This is where I threw in the towel for the night and decided that I would attempt to fix it after the holidays. For now - no cute and comfy travel sweater.

The only success I had in this project is what I did with the turtleneck. I didn't to waste a pefectly good circle of pretty purple fabric. So I cut the neck in half, and sewed up the hem to make two cylinders. The idea here? Well, have you been in shoe stores and saw the legwarmers that they are now trying to play off as "boot toppers"? Although I know they are legwarmers, and the world knows they are legwarmers, something about calling them "boot toppers" makes them a bit more 2012 appropriate that they are all. the. rage. So I slapped these babies on my calves and made my own legwarmers boot toppers.
 
 
All I have to say? Glad something worked out.
 
So I'll get back to this sweater at some point, when I can figure out how to fix these shoulders. I really do love this sweater, and I still like my idea... I just have to work on my process and application of my ideas.
 
 
What did I learn? Stop sewing at 11pm; not start at 11pm. Also, always work on my work table. This project I did primarily on the floor because the usual spot in my craft room that I use for my work table was taken up by these beauties:
 
Okay, at least it makes me happier to look at them and know I'm spending a fun, family-filled weekend with Christmas festivities. Smile restored.
 
Merry Christmas and a Happy New Year!


Wednesday, December 19, 2012

Party Dress

I have been waiting to write this one for weeks now, but I didn't want to explain all my mishaps with this dress and then wear it to a party - it's like everyone knowing your secrets! Plus, I was a bit flattered by people doing the surprised "you made that?" question; it tells me I didn't do too bad of a job!

So I don't quite have a "before" because this dress I put together with a yard of fabric and a tank top - so here are the general pieces, as well as the general idea of the look I was (trying to) head for.
Sorry about the straight up blurriness - not sure how that one happened.

So I bought the tank at Salvation Army for $1.50 (50% off "original Salvation Army price - love that they do sales on their own low prices). The above picture also shows my general idea - put the fabric at empire waist and sew down. Easy peasy was what I was going for! However, the yard of fabric was quite the headache. My initial idea was to buy a thick piece of elastic and then add a fun piece of fabric to the bottom for the skirt and do it on the cheap. While in line to have the fabric cut, I saw this fancy taffeta fabric (already connected to elastic) and thought "Shortcut! Sweet!" and the fact that it had a huge 50% off sign on it helped quite a bit as well. So I had them cut that fabric instead - never looking at the price, mind you - and happily skipped walked to the register.  Come to find out, my "shortcut" fabric was originally priced at $30 dollars! So I forked over my $15 and learned my should-be-obvious lesson of looking at the original price before saying "1 yard please!" There goes my holiday dress on the cheap. Here's a close up of the fabric:


I have to admit, though - it's really pretty! So once I sucked it up that I spent too much on this dress, I pinned it together and went to the machine to sew the fabric onto the tank. And this was my first mistake.

So this is the tank, inside out, with the fabric pinned inside it, and it's all jammed up inside my poor, poor sewing machine. It was at this point that I realized a) I probably should have known this was not going to work and b) there was no way this was going to rotate easily with the huge excess of fabric I had all jammed up in the arm (or whatever it's called... where's my book?). At this point I had a breakdown - you know, like a totally rational adult. I even pulled the hubster's into the craft room begging him to use his engineering skills on the fabric that I was quite obviously not going to fit on the machine like I wanted it to. His response? "I seriously have no idea what you're doing. You'll figure it out". And with that overwhelming sense of "oh crap", I took a break. He and I went to go pick up his parents at the airport and had a fantastic dinner. I only thought about the logistics of the dress a little, I think. By the end of dinner, I was back to my sane mind and ready to go at it again.

The way I figured it out? I pinned it up how I wanted it to look and then broke it down in both my head and in its physical being and finally figured out how it had to go so that I could send it through the machine like a regular old piece of fabric. Here's what I figured out:

The dress had to go inside the shirt, and one had to be inside out and the other had to be right side out. (I'm sure you can see how the wine helped on that one). So I pinned it all up and sewed it together. Then I cut out the excess shirt on the inside of the dress. I didn't finish the edge because I knew no one would ever see the inside of the dress. For pure comfort, I should have kept the shirt whole and not cut off the excess, but that's for future reference.

Luckily, that is literally all I had to do with the dress - it was done.


So I slapped on my favorite shoes (which are literally what I built this dress around), and threw on some accessories and gave it a go. I think it turned out rather well! Then I realized it was December in New York, and slapped on a sweater:


Done and DONE! Although the sweater was not warm, I knew the party would be inside so it would make due (do?) But I did decide that black tights were the way to go to be a bit more comfortable, as well as some added warmth. I bought a pair of clearance patterned tights at WalMart for $4 dollars and the party dress was done! Altogether, I spent $20.50 for my homemade party dress. Not too shabby, but I'm still a bit angry that it's a higher price than I anticipated.

So what did I learn? Mainly - look at prices when shopping outside of the Salvation Army. In Salvation Army I'm in pure "cheap-o" mode, but outside of it, I get into an impulse mode that I can't seem to stop. Time to take a breather and look at tags. Also, making clothes is a bit more difficult than I thought, something that a dressform (I may or may not have already named my future one Sophie) may make a bit easier. That's for way in the future when I know better than to jam up everything into my sewing machine arm (seriously, is that what it's called? That's what it sure looks like. Where is that dang book?!).

Hopefully, I'll be writing again soon after Christmas for a breakdown of my Christmas gift! Unless the recipient does not like it; then I will hide that post forever in my computer and never let it come out again. Just kidding - I promised I'd even post my fails!

Monday, December 10, 2012

Christmas Carols in Clothing Form

Hiatus is OVER!  I've been waiting for this project for months now, and I'm so excited that I was able to get it under way! Hubby and I were all sorts of in the Christmas spirit today. We went Christmas shopping (separately) and checked off both of our shopping lists, and then we put up our tree and got our house into its entire Christmas outfit. With all this spirit going around - I knew this was my chance to break out this gorgeousness...


This was at Salvation Army and I had no idea why it was there, but I knew I had to have it. I mean, who could honestly pass this up? Not to mention, the $3.99 price tag on it was unbeatable. Immediately, I was thinking a fun Christmas skirt; something to wear at Christmas to get the nieces and nephews, who are forever getting older and more and more "too cool" for Christmas, into the spirit of the holidays.

First thing I did was to cut off the bottom for the skirt because it was a ridiculously awkward length. When I noticed that the whole thing, once chopped up, was a huge circle I knew that I had to add some sort of elastic to get it back into skirt form (in an A-line fashion). In result, I made a one inch seam around the top.


Then, I cut the 3/4" elastic to the size of my waist and used a safety pin to inch it through the seam. It was a slow, slow (did I mention slow?) process to get the elastic all the way around. When I got it through, I pinned it and tried it on. Now, it doesn't seem like much but I was immensely happy that I had the forethought to "try it before you sew it". I'm not sure if I measured wrong the first time or if all that time spent threading the elastic made me lose a few inches, but I had a good 4 inches of elastic that was entirely unnecessary. Had I sewn it without trying it on it would have never been on my waist and forever at my feet. Not quite the "family friendly" holiday most have in mind.

After everything up top was all nice and pretty, I moved my attention to the bottom. I wanted to keep a bit of the green on the bottom for "trim", but I certainly did not need the whole five additional inches of that damned Santa figure - seriously, what is he doing? -  so I pinned it up. As I was pinning, I was ecstatic pleased to see this:


That uneven seam right there folks, was NOT. MINE. This was done by the original seamstress of the dress. It put a little smile on my face to see that I'm not the only one that messes up. Even professionals go for the "fake it 'till you make it" attitude sometimes. (Maybe they knew no one would look so close at a Santa-laden dress - oh how they doubt me!)

Once all pinned up on the bottom, I went about sewing the bottom hem. It was around this point that I was thinking "huh, this seems to be a bit easier than I thought - maybe I'm getting better!" Around the same time this thought was forming... so was this.


*Sigh* Shit. Did I know how this happened? Not so much. Do I know what caused it? Not at all. Did I know how to fix it?... not without tearing it apart. So I got out the handy-dandy seam ripper (I seriously keep it next to me every time I do a project now. It's just inevitable, really, that I will need to rip something apart, mistake or otherwise) and went to town on it. Then I did it again. Practice makes perfect, right?... Right?

When all was said and done, I ended up with lots of things to experiment with. What top should I wear with this and, way more importantly, what shoes? So I experimented....


I look like a jacked up Christmas carol! I was actually pretty excited that it looked extremely Christmas-y and I think it is exactly what I needed to get the kids excited about Christmas as well. This may or may not be the outfit I wear while I make Christmas cookies (you're welcome, hubby). Also note the experimentation of shoes - I was dying anxious to find a reason to wear those fantastic green shoes but, alas, they are a bit too bright (ha!) for this outfit. So, I finally decided on this slightly toned down outfit:


Don't mind my lone slipper back there - it was FREEZING in my craft room!
 
So there you have it - my "Christmas Excitement-Inspiring" skirt. By no means a church-going skirt, but something to smile and laugh about on a wonderful holiday with family and friends.

And... if ever I'm invited to a Christmas spirit or Ugly Sweater Christmas party, I can just throw the top back on...

... and the prize will be mine!

Merry Christmas!

No real list of end-of-post thoughts. Maybe just that I should research a bit more on appropriate length of elastic so it's not loose (as mine was, even with taking that additional 4 inches off) or too tight. Also - I really need to stop doing the cheerleader pose. What is with that hand on my hip?! I guess there's not much you can do whilst standing in front of a mirror, but I have to think of something. We'll see!