Showing posts with label refashion. Show all posts

Sunday, June 1, 2014

Home Stuffin;

This weekend was one filled with family. I had a great weekend. It started with a barbeque at my brother's new house and then finished with a day filled with my favorite things - chatting with the family, going to my favorite restaurant for my favorite sandwich, and ending things with my wedding cake. You heard me - my wedding cake. We have it every chance we can get.

So when I got home, it was only natural to make my home more... well... homey. I decided to finally cover those pillow forms that I bought. (You can see my mini-haul that these were mentioned in here.) I decided to make the easiest pillow covers ever. Bonus: they aren't permanent so I can switch them out to my liking or just take them off and wash them. (I drool. Don't judge me.)

First thing, measure your pillow. You measure the width first (left measurements in picture below) and then you measure what would be the "height" (obviously the opposite of whatever you just measured) all way around the pillow. I had a square 16"x16" pillow, so it was pretty easy. To figure out what to cut you add two 5/8 inch's for seams to the width, and then you add two 1 inches to the circumference. I'm not fantastic at math, so don't look too closely to my adding of fractions. After cutting, I didn't really pay much attention to how long my seam allowances were, so this step probably wasn't all too necessary.
My first cut didn't go well. I was watching Netflix and for some reason had 8" in my head. So, my first piece was cut completely wrong. Damn Netflix.
The top strip is my "whoops" cut. The bottom is what it is supposed to be. Quite the difference. Probably should have noticed that before cutting.
Next, on the shorter sides, I folded up the edge 1/2" and then again for another 1/2". I ironed that down (yes, I ironed, pick up your jaw) and sewed up the two edges.
Next, I laid the fabric down with right side up and folded up the sides to overlap each other, a la this:
Thus giving me something that looked like this:
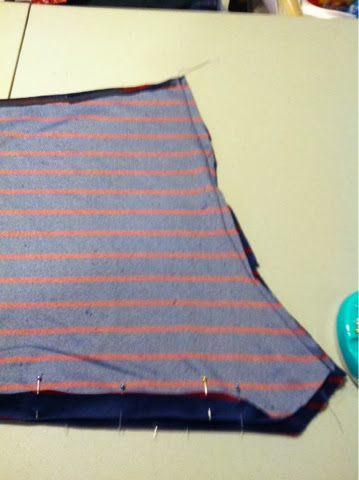
Remember that 2.5" overlap that I factored in? (check my math above... but not too close and all judgemental-like) This is where that comes in. You make sure the two ends overlap each other by the 2.5". This is kind of important because it takes this from just a square of fabric into a square of fabric you can jam pillows into.
Then you sew up the two edges to close everything in and trim the corners so they aren't all bulky.
Last - turn it inside and out and stuff in your pillow.
And voila! You have a pillow cover that is removable, changeable and washable. In my video, you may remember I wasn't a huge fan of this red on my couch when I just placed the swatch of fabric on it. However now that it is in actual pillow form...
I love it!

I can't wait to make more of these. It is legit super easy (not that fake easy that people say and no one I can't get past step number one) and took a max of a half hour to make. A little bit more for me since I a) cut wrong b) stopped mid-sew for some grilled pizza. That stuff is delicious and you don't pass it up for anything.
Are you still thinking "what the heck are they doing eating wedding cake?" You shouldn't be - you should just be jealous you don't have this deliciousness in your life.
Have a great Sunday!


Monday, May 26, 2014

Memorial Day Awesomeness

Happy Memorial Day! Today is a day to remember those that fought for our freedom. I saw a perfect saying today "Home of the free, because of the brave". I think this encompasses the spirit of the day very well. Both of my brothers, numerous uncles and my grandfather are all included in that brave, and I am more than proud to say I am related to and support that kind of dedication to our country.

I had to find an awesome dress for this weekend, and this one fit the bill:
It had good bones and a fantastic pattern... but it was completely see-through. Not all that appropriate for any sort of public festivities - or just public in general.

With time not on my side (gorgeous weather! cookouts! family time! Ice Cream!) I made a quick three cuts. That was all it took to make this into a great top. I cut the bottom portion of the dress off (it's not like a see through dress was of any use to me), shortened the arms and made the neck less constricting.


With a quick sew on the arms and the bottom hem (I kept the boatneck with a cut edge) my shirt was ready for the holiday!
And because the holiday is one to celebrate the soldiers - I threw some red, white and blue together in the spirit of freedom.

Along with a National Holiday, today is also my husbands birthday. With the weather being absolutely gorgeous, it demanded us being outside. We went to a National Park near us and took a quick three mile hike around the lake. The views, however few and far between, were quite awesome.

Oh yeah - and I may or may not have dyed me hair pink. 

Answer - may not. I ain't crazy! Although, hair chalk on sale at TJMaxx saw me coming a mile away.

Enjoy your holiday all! Happy Memorial Day!

Monday, May 19, 2014

Quick and Easy

Sorry this post is a day late. Tends to happen when you forget to hit "Publish".

What happens when you've got somewhere to be real quick-like? Or when you've got an idea for a project but don't want to make it final by sewing it quite yet? Or when something is just not quite right?


Safety pins. (And shameless plugs of old wedding decor that I swore I'd use again)
Here's what I started with... When I bought it, I thought I was getting a sweet deal on a dress. I threw it in my cart when I saw the $3 price tag, and danced out of the thrift store. Then... I put it on..


What is this?! (The dress, not the slippers. The basement is chilly!)

I had to get rid of those flaps, but didn't want to just cut them off because I'd have to tear the entire dress in half. Eventually, that'll be where I go with it. For now - ain't nobody got time for that. I had a summery weekend to enjoy. So, I went with the following steps. 

1. Gather weird flaps. 

2. Stretch flaps and bring together. 

3. Tuck it in like you do your phone when you have no pockets. (Come on, I can't be the only one! Anyone? Anyone?!)

4. Pin until it doesn't look weird. 


With one simple fix in four easy steps, my dress is no longer a "what is that?" dress. 


Coming up: it's rummage sale season! I'm excited to try to pull my experiences whilst rummage saling into my posts - possibly with a "day in the life" or hauls. If you hate it, let me know. If it interests you and want to see more, let me know that too. As always - comment away or reach me at thriftysew@gmail.com!


Sunday, March 9, 2014

I Accept Challenges

Happy Sunday, all! Hope everyone is enjoying their weekend. I had a great weekend of cleaning out my closet, wandering around Target and just generally enjoying the nice weather. It's been mid-30's here lately, which I will take any day over the negative degree weather we've been having the past few weeks.
I get sent quite a bit of pictures from you guys with a random "can you do this?!" or "check this out!". I recently received one from my sister-in-law that got my gears grinding. It was cute, and something that I was pretty sure I could handle. This is what she sent me:
Seems easy enough. Take a few shirts, spin 'em into awesomeness. Got it.

Off I went to Salvation Army. After I donated 4 large bags of giveaway items from my and my husbands' closets, I popped into the store part to see if I could find any shirts that would look ombre-esque. As I wasn't a huge fan of the above colors - I improvised.
Close enough. 

Each shirt was $2 or under (the light purple was $1) so altogether this dress cost me $7. That's comparable to some scores that I've found on Target 75% clearance rack, so I will take it.

Now, I'm short, but I was skeptical about this project. I wasn't entirely sure if these shirts would hit the ground. Especially since I, unlike the inspiration picture, am more partial to empire waists than drop waists. So, I got out my pins and before doing any sewing, I thought it out. 
As you can tell from my ecstatis thumbs up - this plan will work. I think.

First, I cut all of the purple shirts off at the armpits. Then, since all of them were quite obviously different sizes, I cut them all to the same size.
Learning from my many past mistakes, I did make the bigger shirts a tad larger than my goal, to leave room for seam allowance. How's that for thinkin' ahead? There may have been a happy dance involved at my noticing that I remembered this. Post-dance, I sewed up the seams so I had three equal sized tubes.

Next - a lot of sewing ensued. I sewed each tube to each other, making sure that all right sides were where they were supposed to be. I also made sure to made the darkest shirt, the bottom, so that the bottom of the t-shirt was the bottom of the dress. This was for no other reason than I hate hemming. Hate it.
Go fancy sewing machine go!

Once I had all the purple sewed together, I cut the black shirt a bit lower than my natural waist, and sewed my large purple ombre to it on the light purple section.

When all is said and done... I can't walk in it and will be sewing a slit in it VERY soon. It's super pencil skirty.

With that said though - it didn't come out all that shabby! Challenge accepted and sort of mastered.
Hope you all enjoyed this weeks project. It was a pretty easy going one. Like I told my husband - I'm not sure if this was a super easy project or if I'm getting better, but the whole project took me an hour. And that does not subtract the time I spent watching random YouTube video's (there were a few). 

Have a challenge? See something on Pinterest that you want me to mess up? Send it my way to thriftysew@blogspot.com. I'll see what I can do with it. As always, whether I mess it up or master it, you know I will show you.


Sunday, March 2, 2014

See Ya Skirt

Finally got to play around with my sewing machine and it is all sorts of awesome. It's like I don't even need to know how to sew - I just put things under the needle and it happens. Here's a little insight into my random practicing. It includes a button hole and a bunch of lines of different stitches.
I mean - how cool is that?!
So here's what I had to work with this week:
This is a Talbots skirt that I scored for $1. When I got it home, I realized why it was only a dollar - the under skirt was a mess and the closure to the dress was nonexistent. I wasn't sure if someone ripped off the zipper or what, but nothing was there - including a button hole for any would-be button closures. I was lost.

So I did what any self respecting sewer would do when faced with something completely confusing - I made stuff up.

I started with making a 10 inch slit on the inside of the skirt on the side seam. I then cut the outer skirt in the same slit and then sewed it all down. See where this is going? I only had a vague idea too.
This would be an arm hole - surprise!
 
I then put on my new garment, sewed out a neckline and chopped off a few inches on the bottom of the underskirt. What was the result? A somewhat unflattering tunic that was perfect with leggings.
I only had made one armhole because I was super uncomfortable making it and was unsure what I was doing. Now that I see the result of it, I should have made two - I enjoyed the look of the shoulder and it wasn't all that hard to create. Next skirt, I suppose. 
 
Hope you all are enjoying your Sunday - the hubster and I are enjoying a quiet night at home doing homework (him) and watching Netflix and Pinterest-ing (me). Big night for us.


Sunday, February 16, 2014

Ready for Spring Shorts

Happy Sunday all! I took to my craft room and attacked my stacks of fabric again. Not sure what got into me, but I got it into my head to make some shorts. It was probably while I was staring out my window, looking at my three inches of snow. I just want spring to come. I'm done with winter. Thanks, Mother Nature, it's been fun, but please haul out any day now.

The only problem with my whole idea was that I have no idea how to make shorts. After a few quick google searches and youtube video watching, I decided to just get on with it.

I grabbed a pair of shorts from my drawer - a pair of Old Navy shorts that I was quite partial to this summer. I folded the shorts in half and also folded the fabric in half. I put the straight edge of the shorts on the folded part of the fabric and traced around it.
Then I did that same thing a second time to end up with two pieces of fabric in the same shape. Then I put one piece on top of the other, right sides together. Keep in mind, although I left room for seam allowances, I did not measure (true to form, I suppose). Should I repeat this process, I would certainly measure and make a deaper curve.
Next, I sewed the two curved sides together. Only the curved sides. This is important. Believe me... I learned that.
Next, I hemmed the bottom so the legs would be properly hemmed. I wasn't going to do this (lazy), but the edges kept rolling anyway, so the thread in the hem weighed it down just enough to stop rolling
Once the hem was sewn, I folded the entire shorts from the middle  to put the two side seams together. I know that comes out confusing so maybe these pictures would help.

Find middle:
Put the seams together. See what's happening here?
The next step is to sew up the crotch. You should see it form at the bottom so you'll know exactly where to sew. This was my second mistake - the crotch was rather flat, when it should hae been a distinctive V. Although I knew this, I didn't want to cut into it and totally ruin it, so I let it be. Next time, I'm cutting that crotch into a V. (P.S. Read in the wrong context, this post may become PG-13, My late apologies.)
Next, I worked on the waist. For this, I needed an old friend... non roll elastic.
I sewed the elastic onto the inside of the shorts (keep the shorts inside out and sew the elastic around the band). I then folded down the elastic to completely cover the elastic in fabric, and sewed it down again. Once finished..
And voila. Girl's got herself a pair of shorts. They are certainly not perfect - the crotch area, for most of the reasons listed above, turned out not quite right. It had a bit more fabric bunching than a girl needs, but they are certainly comfortable. I've got myself a new pair of pj shorts. The fact that I made them out of a fancy beach-towel material also played to the fact that they would never see public. Next shorts I make will be an attempt at beach shorts, but maybe I'll wait for better weather to go about doing that. For right now, I'm back in my sweatpants and sweatshirt, cuddled under a blanket and sitting in front of a space heater. 

In other news....

I bought myself a sewing machine.

Yes, it was the one that I was eyeing and I ended up getting it for a pretty great deal. Thank you everyone for your thoughts and opinions on the subject - especially all of the super helpful e-mails. In the end, I made the decision on the reputation of the Singer brand and, most importantly, my budget. The fact that I had gift cards to Joann's certainly played a good role as well. 

Enjoy your Sunday, friends. I hope it is as relaxed as mine has been. Hopefully next week will be a nice shiny new project on a nice shiny new machine. 

Sunday, February 9, 2014

Bye Bye LBD

Happy Sunday all! Things are starting to look up - it's actually above 0* and I have had a great Friday at work (just Friday... the rest sucked). I spent a congratulatory Saturday wine touring at some of the best wineries... it was a fantastic weekend.

So this weeks project was pretty fun to do. I even got Sophie involved. Here's what I started with.
Pretty gorgeous, right? This had little black dress potential, but felt more like a jacked up mermaid dress. Something had to happen here and frankly, I was sick of dresses. So, I pulled out Sophie and decided to make myself a shirt of a different kind. I literally had no idea what I was doing - so I just winged it.

I knew I wanted to keep the little skirt at the bottom, but was unsure where I wanted to put it. Once it was on Sophie, I decided to bring the skirt up to an empire waist. No one hates an empire waist. I turned the dress up and took an inappropriate picture of Sophie. This is all for you guys.
I pinnned the seam from the skirt to the area where I wanted my new waist to be.  Unfortunately, I did not take any pictures other than the above one of the process so... get out your imaginations.

I sewed a new seam where the pins are in the above picture and then cut off all the excess below the pins. Then I turned eerything right side out and had myself a peplum style empire waisted shirt. The skirt made the peplum super puffy, so I brought the sides of the lower part of the shirt in about 4 inches on each side so it wasn't quite so "bubbly" around my middle. I have 4 gym sessions a week that call to the fact that I don't want anything extraneous hanging out around my middle.

In the end, I didn't hate the result. I wasn't in love with it, but I adore the fact that I did it correctly that it didn't look like a dress that was half sewed upside down..... because it was.
I've decided to bring back a trend that I started at the end of last year but didn't quite continue because my weekends were hectic: slow cooker meals. I decided to bring it back to my homestead this weekend. I bought a packet of slow cooker sauce at Target. For those interested, they were having a special for $1.50 each and, when buying 10 you got a free $5 gift card (essentially making them $1 each). I only picked up one because I had no idea how they would taste. It was pretty easy to throw together. It was literally the packet of slow cooker sauce and a 2-pound pork shoulder.

VERDICT: It had good taste, but was super salty. Although it was super easy to put together and pretty inexpensive for the amount of meat it produced, I probably would not repurchase because of the salt.

Hope ya'll enjoyed this week's post. As alway, feel free to leave comments or click on the "Contact Me" page to sned me a message.

Sunday, January 19, 2014

Quick T-Shirt Refashions

Happy Sunday all! Ever have one of those days where you just want to take it easy? That was my day. I'm getting over a cold that has left me exhausted and congested, so I decided to keep this one easy. To the point where 75% of it is no-sew. Non-sewist's rejoice!

This week I went through all my drawers for all my super comfy clothes to lay around in. The answer is yes: I am pathetic when I'm sick. Much to my surprise, I found a drawer of t-shirts. A whole drawer. Of t-shirts. Ones that I haven't worn in years. I know this because they have years on them - 2005, 2007, 2008.... it's just embarrassing how I've squirreled these shirts away. I found myself on Pinterest soon after, looking up easy ways to refashion shirts. Without further ado... here are my findings, and my attempts.

We'll start with the easiest one. And rock my alma mater. Yes; we were the Kangaroo's. It happened.
Do not judge on the pose, the hair, or the face. I finally got a new camera and didn't realize how well it picks up details such as my just out of the shower hair or my no-make up'd face. It'll be fixed in the afters.

My main focus for these t-shirts was to go to tank tops and summer shirts. I'm getting a bit of cabin fever, so I wanted to do a small prep for summer. I made two cuts:
And that is literally it. 

Next up is a t-shirt I got at the 5K for my job. Although I'm proud to wear a shirt that says I'm recovering lives... the weird bubble made it so that I will never wear it. Ever. Chopped it will be!
I made five cuts on this one. Three are rather obvious; the arms, and the neck. The fourth and fifth cuts are to open up the shoulders so the front and back were separated at the neck.
Then, I tied one of the shoulders together, as such, and made one additional cut to the other sides armpit to make it a slightly larger hole. 
Then I put the shirt on, pulled the other shoulder's ends to the side that was already tied, and tied them up to. Ideally (and in real life) the first knot is off the shoulder and the second is on top of the shoulder to create the "cut out" effect. I didn't catch that effect on camera. (Camera fail)
Next came another alma mater shirt. I just can't get rid of these shirts, despite the fact I haven't worn them in 6 years. This project came with a bit of sewing. 
I started off with the three cuts that pretty much every t-shirt refashion on the internet ever starts off with.
Next, I folded down the front about an inch, and did the same with the back, pinned it down and sewed it up. These will serve as a casing for my straps.
Next, I deconstructed the long sleeves to create two tubes as straps, and fed them through the casing using the trusty safety-pin maneaver.

From there, it was just a matter of sewing the ends together.

This next one made me want to make a gym shirt. I have been going to the gym pretty frequently and have been in the market for some gym wear. All I've found are super tight lycra, low cut tank tops or unflattering shirts. When I saw this old Planet Fitness shirt in the drawer, it got my gears spinning.
Unfortunately, I have zero pictures of the process. Basically, I cut off the arms, and cut off the collar. I made the front neckline rather modest, as one of my pet peeves of gym-wear are the low necklines (who could possibly be comfortable working out when you're barely staying in your shirt?!). On the back, I cut a large, long scoop to just about the middle of my back. I then tied together the straps with some black polka dotted satin ribbon I had laying around.
The front looks like a regular ol' tank top, but the back is now a lot more interesting. I put this on over my sports bra, but I would definitely put a tank top underneath for the gym - a bright color that will pop.

So that ends it for today. Four quick t-shirt refashions that I completed in under an hour. Not all of them are glowing successes, but it certainly opens the mind up to a lot more possibilities than a boring old t-shirt. I encourage you all to open up your t-shirt drawer (I know you have one!) and cut away. Feel free to send me the results (thriftysew@gmail.com).