Sunday, November 3, 2013

Denim Dare Me!

So this week I've got a bit of a copycat going on. I've been playing with the idea of chambray shirts. I can't decide whether it's just a fancy denim shirt and children will laugh at the trend in a few years, or if it's a fun trend that I want to jump on. Looking at stores around me, I didn't find any prices that I was willing to pay. For instance...
You can find this Gap shirt here for $59.99. What. A. Steal. I knew I could do better and, with a little work, I could make it perfect. So, I found this and knew it was meant to be.
First thing I did was lit a candle and got some liquid courage... I'm slightly in love with the tiny little candles available at Bath and Body Works. They're cheap, they burn for hours and they smell delicious. I'm good with that.
The dress was a bit big, so I took it in about an inch or so on each side. I did a straight stitch first, and then followed it with a zig-zag stitch to really lock it in there and not have any embarrassing holes should a stitch break somewhere. This didn't have to be pretty because no one would see it. Once it was sewn, I cut off the excess.
Next, I cut the dress shorter. I cut it about waist-length and hemmed up the bottom. I saved the bottom scrap, as it was a rather large scrap and a very soft denim as I'm sure I could use it for something. I also made sure to pop off and save the buttons - never can have too many buttons!
That was that! It was a super simple fix and, in my not so humble opinion, it looks fantastic. Bonus: it's super comfortable. I rolled up the sleeves to make it look like the original and I was good to go.
This is probably going to be a normal addition to my weekend rotation. Until children start laughing at the trend.

In other news, I'm getting back into the habit of doing crock-pot meals on Sundays. These are so easy and laid back and super simple to throw together and go about your day. I've decided I'm going to make this a bonus on my posts - whenever I throw together a crock pot meal while I sew, I'll include the recipe on here as well. I hope you benefit from lazy Sunday's as well by using some of these recipes (often stolen from Pinterest).

Today's Crock Pot meal - Chicken and Stuffing.
Ingredients:
- Chicken breast (skinless, boneless and what have you)
- Stove Top stuffing (1 package)
- 1 can cream of chicken soup
- 1/2 cup sour cream
Here's my favorite part: throw shit in the pot. Put the chicken on bottom and cover with the stuffing mix. Mix together the sour cream, the soup and 1/4 cup of water and throw that on top of the stuffing. Then put the cover on it and stick it on low for 4 hours.
*Disclaimer: As I'm writing this during my 4 hour wait, I can't really tell you it's delicious. It could suck, but that's just the risk you take.*
Happy Sunday :)


Sunday, October 27, 2013

Stay tuned...

Stay tuned, faithful readers, for a mid-week blogging. I caught myself a nifty little stomach bug that put me down for the count on blog day. Once I feel better, I'm hoping to get something together in time for Halloween, which is the best time of the year. 

Sunday, October 20, 2013

Always a Bridesmaid...

... once a bride!! (Eat that, ridiculous old saying)

Last weekend's wedding festivities were so much fun that I could not resist the formal attire rack at the Salvation Army this weekend. These dresses aren't just dresses; they are symbols. Symbols of fantastic nights, best friends, close family and bringing two lives into one. Maybe the dress went through a crazy night, a stressful night, a funny night, or maybe the dress even wound up in jail and had to get bailed out (well hey there, lifetime movie). It's so much fun to imagine what types of activities these dresses went through. I couldn't resist but to pick one up, and this $7 dollar beauty fit the bill.

This was very obviously bridesmaid, including the telltale sash and everything. It was pretty well taken care of, and all in all in not too bad of shape. The worst things I could see when I was at the store was that it was sized at an 18, so it was going to be too big, and the back lace-up was missing, I figured it wasn't too big of a deal and scooped it up.

I should definitely preface this post with this: I am always awesome in my head, and my plans always work out well. Also, in my head, everything turns to be out super easy because I can break it down step by step. Keep in mind - this is all in my head. Because reality, especially for this project, is a witch. (Feel free to swap in the "b" if you are aged 18 or older.)

The first thing I noticed was that, although sized at 18, it was fitted to a much smaller size. I should have seen that coming, really, because I know the three truths that are involved in buying a bridesmaids dress: a) order a much larger size than you are b) get your fitness on because you want to look as fantastic as possible and c) get the dress fitted to you (usually at your new size if you did the fitness part well). So that was the first bonus: I didn't have to take this in.

The first thing I did was deal with that awful sash. Sashes look very pretty at weddings; however, that sash will never, ever be in that "you can totally wear this again" bride mentality. Now, I'm not sure if wedding shops are just getting nicer, or if this one (Alfred Angelo) just decided to save on thread, but this sash was connected by three whole strings.

This was simple enough to snip off and I found myself confident that this was going to go well. In hindsight... I'm silly.

Next, I put on the dress and measured down to my knee. Then, I took off the dress, made the measurements all across the front and back, and connected my dots with my seamstress wheel chalk thing. That's obviously the technical term.

Next - and here was the mentally hard part - I cut the dress up the side seam and chopped off the bottom.
This all went very well so my confidence was only a little shot when I put the hem on my lining of the dress. I really, really botched this, and had I known it would start off a terrible pattern of messing the rest of it up, I would have ripped it all out and tried it again. Alas, I could not see into that future, so my thinking at this point was "it's just the lining - no one will see".
It bunched, it pulled, it wasn't even - it wasn't good. I came to the conclusion afterward that I should have used a straight stitch (for some reason I'm mildly obsessed with the zig zag stitch. My machine often doesn't leave it...) and also should have put my stitch length much longer so it didn't pull and bunch. This will be the first lesson I follow when I decide to go back and fix this dress.

Next, I attempted the hem of the body of the dress. You know, the one people see. I knew it had to be some sort of blind stitch, but my machine does not have the capability for that. So... I had to do it by hand. Mind you, I have only blind stitched by hand a few times and it was mainly on pant legs that no one sees. Knowing this, I probably should have googled the activity further, but instead I just hopped into it. I didn't take a picture of this process, but you'll see in the end that my by-hand blind stitch leaves much to be desired.

Next, with my confidence no longer even slightly existent, I decided to create a cord from the bottom of the dress to make a new tie for the lace up back. I cut an inch wide sash off the entire bottom scrap and folded it in half, rights sides together, with the intention of sewing it up and bringing it inside out to have a nice cord with no seams. After it was all sewn, it did not want to go inside out. No matter how many pencils I attempted to stick in this tube, it was just not happening. Eventually, I just laced up the back with the wrong-side out tube full of seams so I could see if it was at least long enough to work if I were to make a cord correctly. Luckily, it was long enough.
It was at this point that I called it a day. Sometimes when you're plans aren't going as they are in your head, you just need to step back, expand your knowledge on the subject and come back to it with a fresh mind - and that is what I plan to do. Eventually I will come back to this disaster dress, seam rip all my work and re-do all the hems and the back cord to the point where I'm able to wear this in public without being totally ashamed. I mean - I guess I could wear this out in public... in bad lighting and with the assurance that everyone is too drunk to even know what a proper hem looks like. Until then, here is the visual to give you a giggle.
Maybe I can pass off the wonky hem as ruffles? Anybody? No?
 
Better luck next time. This is one dress that will not see a wedding again anytime soon.

Monday, October 14, 2013

Pretty Plaid

Happy Holiday Monday! This weekend in the US was Columbus Day Weekend. For most, that means a 3 day weekend. For me this weekend meant a wedding and travel filled weekend with a bonus day off. I had an out of town wedding this weekend that was fantastic - everything we did was a lot of fun and we had a great time hanging out with the family.

Now, I'm sitting home on my bonus day off (this isn't one of our paid holidays so I just took the day off as a vacation day) and making up for my lack of posting yesterday. Luckily, this one was super simple that I could use the rest of my day to rest up and take a relaxing few hours to myself.

I started off with this beauty:
When purchasing this, I had St. Patrick's Day in mind, but there was no way I could let it sit for that long. I could not quite figure this dress out - it had some strange layering that had me going for quite a while.
My only saving grace of knowing I had this on right was that the tags were in the back. That was literally it.
 
First thing that had to go was the shoulder pads. Snip snip!
Next thing I did was separate all the layers. This was probably the best decision I could have made because it all fell into place at that point and it was super simple to come up with updates for the rest of it. So simple, in fact, that I just jumped right into it and didn't take any pictures of the process. Whoops!

Basically - I took the weird layer off of the top, and found that there were buttons in the back that were supposed to be buttoned up once the dress was all set and on correctly. The arms were also super large. After I took this entire piece off, all I had to do was turn it around so the buttons were in front and boom - I had a cropped plaid jacket. Literally no sewing involved. Just a matter of letting it shine on its own.
This is how you know Colette is having a lazy day. I didn't even take the time to put on real pants, ya'll. (But seriously... loving leggings on lazy, rainy days like today!)

Once I had the poncho-esque layer off, I was left with a dress that was actually really pretty. The top was a lining, but was a thicker lining that wasn't see through, so all I had to do was throw on a trusty undershirt and the top was set.  Next, as the dress went down to my ankles, I took up the hem quite a few inches. This ended up being knee-length. I will probably keep it this length for Christmas, but then hike up the hem for St Patrick's Day in March to switch up the look a bit. It's nothing if not versatile, eh?
I was very happy with this dress and super pleased that, once it was all torn apart, it took very simple steps to throw this back into an updated, fashionable (maybe?!) look.

As always, comment below or shoot an e-mail to thriftysew@gmail.com. Always love hearing your comments.

Now, I will most certainly take a hint from my cats and cuddle up and enjoy the rest of the day. I suggest everyone does the same! Cheers!

Sunday, October 6, 2013

Daring to Dye

Happy weekend, friends. This post is coming up a bit late, but it's only because it was a pretty fantastic weekend. First, it started with this:
That is tailgating at a college football game, my friends. My apologies for the bad iPhone photo, but I wasn't planning on this picture making the post, but I had too much fun to not say anything.

So we went to the Syracuse vs. Clemson game. And for those of you that haven't seen the Syracuse campus, it's pretty much the original Hogwarts.
I mean, it's not, but it looks pretty legit.

The stadium was absolutely packed though - a whopping 48,000+ people.
So the project for this weekend was one that was laid back and able to keep me focused on weekend football, as I was already in the mood to watch. I chose a skirt that I picked up for 50 cents.
This skirt was overly large, and in a pattern that I wasn't a huge fan of. I took the opportunity to use up some extra products that were in my craft room...
Neither bottle of dye had enough liquid in it to do much damage on a single piece of attire, but together they had enough to make something... hopefully purple. So, I threw it all in the bucket and let it sit for a few hours while I sat down to a relaxing weekend of doing... pretty much nothing.

My grade school logic turned out correctly, because when I dumped out my dye bucket, this gorgeous purple is what came out.
After a quick rinse and spin in the washer and then a dryer tumble, out came my new skirt. It was a bit more subdued of a pattern, but still had enough interest to not be a "regular" old black skirt.
Altogether, it came out pretty well. After taking in the skirt about 2 inches or so, it started to become something wearable. I don't see myself wearing it anytime soon to work, but I feel like it has some possibility of Halloween costume or comfortable weekend wear. (Who knew there was a single piece of clothing that could be in both categories!?)
 
So not the most exciting refashion in the blogosphere, but I did get my dying practice on and even got a bit of mixology (boom!) going with *gasp* accurate results.
 
As always,. comments are welcome as well as e-mails to thriftysew@gmail.com. I've gotten a few comments about my lack of updating the Before and After page - and you are correct, I have slacked big time on that page. I will be doing updates soon, and hoping to make each picture a link to the corresponding post. Stay tuned, and keep checking. I'll stop being lazy at some point.

Sunday, September 29, 2013

Happy Blog-Day!!

Happy Blog-Day!!

Why do I call it that, you ask? Well - this day last year was the day that I decided to go ahead and build this blog; to put myself out there, failures and all, for all of you to see, criticize and enjoy. Today, I'm still at it and even have a following. I'd call it success, for sure.

Today's project was chosen strictly because of its color. I had gone to Joann Fabrics a while ago and bought a bunch of thread, unknowingly purchasing two teal colors that I already had at home. So... I had a lot of teal to use up. Luckily, I found this:
Pay attention to the dress now - pay no attention to my just-showered mop of hair.

This wasn't actually too bad of a dress - the color was pretty and the waist elastic was still in fantastic shape. I was not, however, a fan of the many buttons going directly down my chest. It was super unflattering, and when you add it to the mid-calf length, it wasn't a flattering dress in the least.

There was definitely potential though. My first step was to chop off the bottom to make it at least knee-length. This necessitated my using my  new favorite toy - the chalk wheel. You literally just draw on clothing. It's pretty awesome.
I then pinned up my new bottom hem, and brought a new character to the party...
 
That's right - I actually ironed my seams down before I sewed them. This is what we call: professional.

I then needed to work with the rest of the dress. After playing with the buttons quite a bit, I had a thought: these buttons would look way better on the back. So, because I do basically whatever I want, I put on the dress backward. This worked out quite nicely, save for the new neckline that was now cutting me off at the jugular. I almost put in the standard V-neck, but decided to veer off that well-beaten path and branch out a bit... to a scoop neck. (Oooooh, ahhhh, ohhhhh) As I didn't see anything else to help me out on this, I looked down and realized my tank top I was wearing had a pretty fantastic scoop neck. So... off it came and down on the table it went.
I traced the neckline, cut that half out, folded it over on the other side and used that part as a guide to make the other side even.  At that point, it was just a matter of sewing it down and throwing it on.

Final result:
It ended up being an overwhelming amount of teal when viewing from the front, so that is why I added a belt to break it up a bit. But the back I fell instantly in love with.
And what did I do with my shiny new dress, you ask? Well, I went straight to Wegman's to get Sophie and me some birthday cake. Because we deserve it.
1 year baby!
Here's to hoping it settles onto Sophie's hips and not mine.
As always, feel free to leave me some comments below, or I always enjoy your e-mails to thriftysew@gmail.com as well. I hope you all enjoy this gorgeous Sunday, and feel free to grab yourself a tasty dessert and celebrate 1 year with me :)

Monday, September 16, 2013

Fall Fever

Hey all - thanks for sticking with me while my internet was out. I'm up and running now and all set to post away :)

This post, as mentioned, is a bit different that what I normally do. I was sick with the stomach bug all weekend and finally felt a bit better on Sunday Funday, so I went into the craft room and quickly ran right back out. Why? Because it was straight up freezing in there - around 50 degrees. I love you guys... but that just wasn't going to happen.

So, since it's finally feeling like fall, I decided to do some baking to warm up the house. What better place to find a delicious fall baking creation? Why hello there, Pinterest. Besides, my kitchen was all spic and span and I couldn't let that go for long.
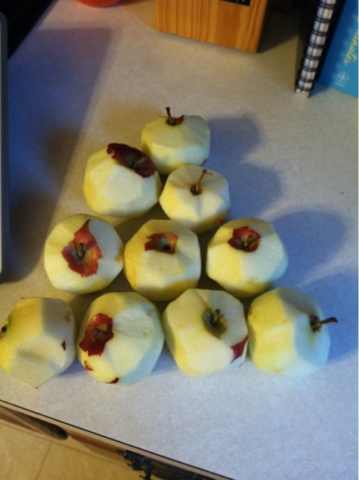
I decided to make a Crock Pot Apple Crisp. See all those apples in that basket there? Neither my husband nor I enjoyed them to snack on, so my options were: wait until they go bad or find something to bake. I decided with the latter, as I wasn't about to waste them. Plus, I wanted to get rid of them so I could convince my husband to take me apple picking. Don't really have a leg to stand on when asking to go apple picking when there's a basket of apples on the counter...

So I got all the ingredients together. Unfortunately, I forgot to take a picture of all the ingredients lined up on the counter (I'm not used to this foodie stuff), but I did get a picture of the most unappetizing "crumb" topping I've ever made in my life.
It was not looking promising at this point, but I powered through because that is what I do for you all. You're welcome.

I also powered through because I was super excited to use my spice rack. *You can see how I made it here.*
Once my gross "crumb" topping was created, along with a cornstarch mixture, I peeled 9 apples. Then, once I realized that my triangle was not complete, I peeled the 10th one to top it off.
Once the apples were peeled (sorta), cored and cut, I threw it all into the Crock Pot. I tossed in the cornstarch mixture along with some apple cider vinegar (it calls for lemon juice but I don't own it), then topped it with my "crumb" topping.
From there it was just a matter of turning it on and letting it go - which is the absolute beauty of a crock pot. Since our internet and cable were both out all night, my husband and I snuggled in for an afternoon/night of movie watching. A few hours later, we had some hot apple crisp to warm us up, since we are too cheap to turn our furnace on. Don't judge - that shit's expensive :)
 
Unfortunately, I was too busy thinking "oh please don't let this suck" while I was scooping into it to think about taking an "after" picture, but basically just imagine the above picture but fluffier. The result? It was actually pretty dang delicious. Put delicious along with "ease of baking" and you have a perfect dessert for this girl.  
 
The original recipe can be found at www.keyingredient.com (link is on my Pinterest), but I'll type it out for you because I'm nice like that. Plus, I still feel bad about not posting yesterday.
 
Ingredients:
1 cup flour
1/2 cup light brown sugar
1/4 cup white sugar
1/2 teaspoon ground cinnamon
1/4 teaspoon ground nutmeg
1 pinch salt
1/2 cup butter, cut into pieces
1 cup chopped walnuts (I used almonds, which I just had on hand)
1/3 cup white sugar
1 tablespoon cornstarch
1/2 teaspoon ground ginger
1/2 teaspoon ground cinnamon *yes, again. don't judge it, just do it*
6 cups apples, cored peeled and chopped
2 tablespoons lemon juice (apple cider vinegar turned out okay, I guess)
 
Directions
1) Mix flour, brown sugar, 1/2 cup white sugar, 1/2 teaspoon cinnamon, nutmeg and salt together in a bowl. Combine butter with the flour mixture using fingers *I used my fingers. Not recommended. It's messy as hell* or a fork until course crumbs form *Or until you give up because it's gross, like I did* Stir in walnuts and set aside.
2) Whisk together 1/3 cup sugar, cornstarch, ginger, and 1/2 teaspoon cinnamon. Place the apples in a slow cooker, stir in the cornstarch mixture and toss with lemon juice *or vinegar, if you're a rebel* Sprinkle walnut crumb topping on top. *Or mash it because "sprinkling" was not happening with this globby nightmare* Cover and cook on High for 2 hours *that's what I did - ain't nobody got time for 4 hours on low* or Low for 4 hours, until apples are tender. Partially uncover the slow cooker to allow the topping to harden, about 1 hour.
 
This is where I may or may not have messed up. I was unsure what that last sentence meant - do I uncover it for the last hour of my two hours, or is this another hour on top of my two hours? Do I turn it off? Tell me, recipe, tell me! But it didn't, so I just uncovered it after two hours, shut off the cooker, and let it sit for about 45 minutes. The top didn't get crispy, but I have a strong feeling that it was not the fault of timing - I mean, did you see the above pictures of the "crumb" topping?
 
All in all, this was quite delicious, albeit not perfect, and I would certainly make it again.
 
As always, feel free to comment below or send your thoughts, ideas, complaints and refashions of your own to thriftysew@gmail.com.

Technical Difficulties

Happy... Monday? Is there ever such a thing?

Last night, in the middle of prepping for my post, my internet went down. Currently, it is still down and I am posting at work (naughty, naughty).

Once my internet is back up and running, I will be sure to post Sunday's posting as soon as possible. Sorry for the delay.

You can go ahead and blame Time Warner Cable for not being able to read about the majestic-ness that I created last night. It was even *teaser* completely different from what I usually write about!

Sunday, September 8, 2013

A Little Goes a Long Way

Happy Sunday! It's back to football season, so I'm enjoying my new Sunday schedule of sewing and writing up my blog while watching football and noshing on food that's not good for me. I shouldn't make it a habit, but... I'd like to :)

A chill is in the air and summer is certainly winding down. According to the weatherman this Tuesday and Wednesday are going to be in the high 80's so since Mother Nature decided to go out with a summery bang, I figured it wasn't so bad to do just one more summer dress.

I started out with this:
This certainly wasn't the worst project I've picked up, and as I'm sure you can tell from my title that I really didn't do all that much for a nice update. I like that I don't always have to do a drastic overhaul to make things new and wearable again. I like when I can just do a few tweaks to make it my own and still keep the idea of the original designer. It makes me feel like they wouldn't be horribly mad at me for screwing up their design too badly.

There was certainly something that had to go, and it was this collar.
I'm a huge fan of lace, which is what drew me to this project in the first place. However, extraneous, itchy, tall lace around my neck that creates a mock-turtleneck is not in the cards for me... ever.

Seam ripping out the collar panel was a quick and easy job.
Next, I brought my attention to the lace details on the chest. As mentioned, I'm a fan of lace. I'm also a fan of ruffles (in small amounts). Lace ruffles? That's just too much. Luckily, the two lace ruffles that went down either side of the chest was added on as an afterthought by the designer, and were easily removed without messing up the rest of the lace on the bodice.

All in all, this was all that was removed.
Then I turned my attention onto the skirt. My first thought was to make it a high-low hem, so I put the two side seams together and put down my ruler to see how drastic of an angle I wanted.
Obviously, my ruler is more than lacking for this task.
Besides having a pretty useless ruler, I was very unsure about this high-low. I love the trend and think it looks good.... on other people. On me? I'm too big of a wuss to find out. Plus I'm a sucker for a circle skirt and this was a perfect one.

So I just decided to bring up the hem an inch or so because it hit me in a weird spot right below my knee. As I plan on wearing this dress to work, I didn't want to go to short with it, but still wanted to keep it flattering.
 
This is where I cheated just a little big time. The original hem was just about one inch, so I used it as my guide to roll it up and pin it down. This way, no measuring was needed and the bottom hem looked nice and neat. All it needs after I wash it is a nice ironing to make sure it stays put.
All in all, not much was done to this dress but I think the small tweaks was a vast improvement on the overall look. This just goes to show that you don't have to be a master of sewing (or really, know anything about it) to make a dress your own and tweak it to be flattering for you. Just a cut here, rip there, and a few pin stabs (it happens!) and you've got yourself a classy dress that you can now say " Thanks! I made it" (and whisper "sort of") when people say "Hey I love that dress!"
 
Here's a close up of the nice, clean lace-turtleneck-free neckline.
Note to self: Let's look more presentable in the next project, k?
As always, comments are welcome and e-mails to thriftysew@gmail.com always make me smile. Enjoy your football, or whatever else you choose to do on this gorgeous Sunday!


Sunday, September 1, 2013

Thrifty T's

Happy Labor Day Weekend :) This weekend is a holiday in the US and so we have a nice long weekend to celebrate our labors -- by doing nothing. I enjoy it :)

It's also a big weekend in Syracuse, where I live. Around these parts, Syracuse University sports reign and yesterday was the season opener of football. Back in the day, we (as in Syracuse University) were "da bomb" at football - football legends such as Jim Brown and Ernie Davis took over the field. Now... well, not so much. Things aren't going well for Syracuse University, but that doesn't stop my husband, an alumni, and me from being orange-blooded fans. So, in Syracuse Orange spirit, I wanted to create a dress using the SU colors while rooting on my team.

Who would have thought finding an orange dress at the thrift store was so hard? But I didn't let it get me down - this is what I chose.
That's right - two t-shirts! I must be out of my mind, right? Well... only a  little. These were a steal though. Both were white tags, which conveniently were 50% off the day I bought them, so I got the blue Aruba shirt for $1 and the orange shirt for $1.50. A $2.50 dress was certainly looking good for my budget!

The first thing I did was cut off the top of the blue shirt where the Aruba picture was.
Next, I took the remaining tube of blue fabric and matched it up to the bottom of the orange shirt and cut it roughly the same size. I made sure to cut on the seam so when I sewed it back up the seams would all match. I also learned my lesson and left a seam allowance so I didn't end up making it too small when it was ultimately sewn up.

Then it was to the sewing machine to sew up the cut and make it back into my tube. I did mess up a bit here. I used a short straight stitch that bunched the fabric up like crazy. I didn't rip it out because I had places to be, people to see. I struck it lucky because it actually worked out to be unnoticeable. In any other case, though, I would have ripped it all out and re-sewn it with a longer zig-zag stitch.

After this, it was just a matter of putting the blue tube around the bottom of the shirt, inside out and upside down (with the orange shirt right side out) and sewed around the bottom. I made sure this time to use long zig-zag stitches, then went around a second time with short zig-zag stitches. This kept it from bunching but it was stretchy enough that I wouldn't blow our the seams when I put on the dress. when the bottom was all sewn, I just pulled the tube down at that point and I had my SU themed dress!
Let me tell you - this is possibly the most comfortable dress I have ever worn; probably because it was made from two super comfy cotton t-shirts. It was also a hem-free project, as the bottom of the blue shirt is the bottom of the dress. I highly recommend making a t-shirt dress. I also made sure to make it a bit longer, so when I get all jumpy and nuts while cheering on my team I don't get all R-rated in the crowd too.
 
However, when the game is over and we are hopefully celebrating a win, I can jack it up for a night on the town celebrating.
As always, feel free to comment below or shoot me an e-mail at thriftysew@gmail.com :)
 
Enjoy your holiday (and your football!)