Thursday, March 21, 2013

Purple Passion Refashion

Happy Thursday! How's that for follow through on promises?

I found myself another muu muu. (For a refresher on the first one, click here) With this choice, I'm pretty sure I was channeling my mother with the purple. The color brought me in first, the muu muu brought me in for further inspection, and the fun flowers nailed my decision: I had to have it. The fact that it was $2.50 had a certain appeal as well.


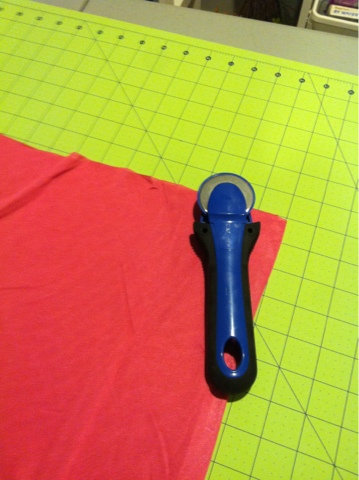
It was a massive dress (with pockets!) that got me all sorts of excited. First thing I did was seam rip the arms off. I know, I know - I always do that, but I had goals of making this a summer dress to bum around town with so shortsleeves was a necessity. Also, the fabric was a bit thick for summertime so a little editing was much needed for summertime comfort.

After taking off the sleeves, I threw the dress on Sophie inside out so I could pin the sides and take a lot of the width in. This was - and I'm going to try to avoid the many, many swear words that were coming out of my mouth during this task - pure hell. I took it in a few inches on each side while trying really hard to keep some pocket in tact. Too big. Then I took it in a bit more, sacrificing the pockets. Too small. It was like a real life Goldilocks going on in my craft room. Finally, I found my happy medium and sewed up the sides. This, unfortunately, took out a lot of the draping, but after so many times of seam-ripping, one tends not to give a dang about draping.


Once the sides were finally at the right spot, I moved onto the neckline. I made a nice hem all the way around the armholes and around the neck and sewed everything up. On one side, I kept stopping and starting and skipping over the places that didn't need to be re-sewn. On the other side, I did one fluid seam, resewing the manufacturers spots even if it didn't need it. As it didn't really make a difference, I decided that one fluid motion was better - not because it looked better, but because when I get into a groove, I'd rather just roll with it.

Lastly, I decided that I would cut the bottom off to a length that wasn't quite so matronly. I picked a spot on the bottom of the dress that was a good length, and chopped it off about an inch below that length.


This is where hell rose again. I tried to do the hem that a sewist is supposed to do by rolling up the bottom edge and then rolling it again in order to make the inside all nice and neat. This did not go as planned, as it kept on getting unpinned, rolling under itself while I was sewing, and generally being a huge pain in my side. Eventually, I decided that it wasn't worth it and no one was going to crawl up my dress and inspect the seams on the inside, so I just rolled up the bottom edge once, ironed it (you heard me - I actually ironed) pinned it and sewed it. This went much better and no one would know the difference.

I used the bottom portion that I chopped off for a sash just incase the dress was too billowy that it needed to be sinched. I cut the bottom into one long piece, then folded it in half lengthwise, making sure to put right sides together (learned that one the hard way.) Then I sewed it all up and turned it right side out into one long tube and sewed up the ends.


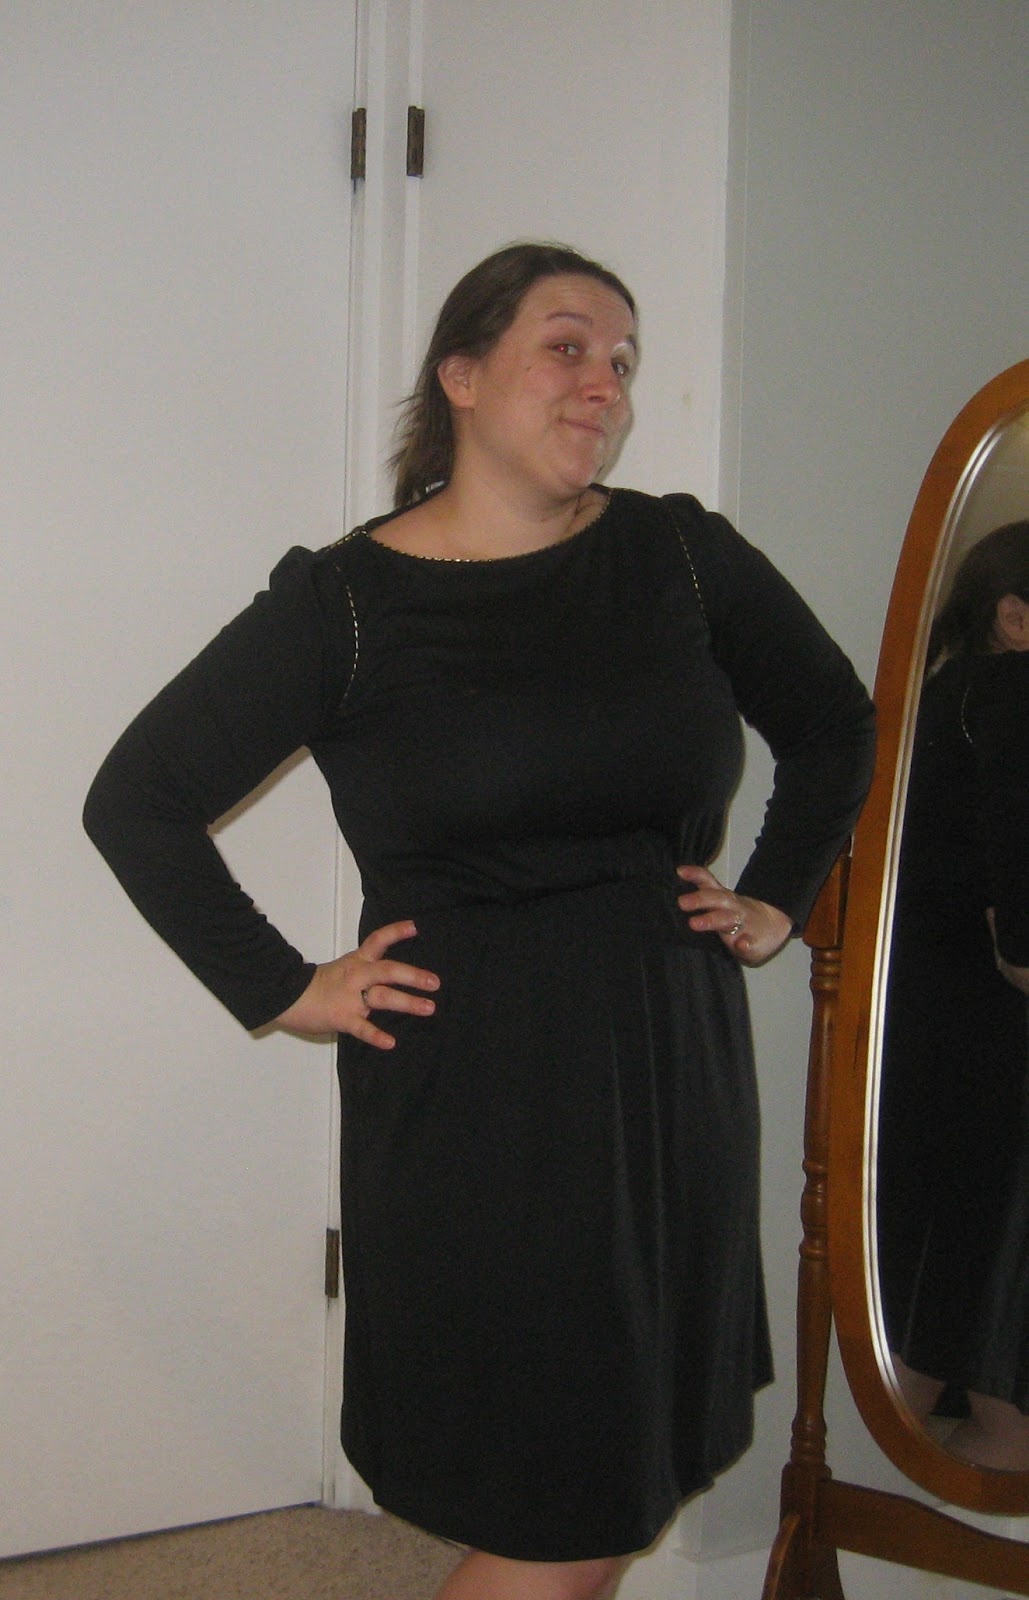
So this one didn't quite turn out as I was hoping. I enjoy the neckline, the pattern and the color, but I'm not entirely convinced on the length that I made it. At certain angles it looks a bit nightgownish. The sash didn't quite work out as planned either - it made the dress awkwardly short that I knew I would never wear it.

Final product?

Upon further inspection, I actually noticed that I had totally messed up one of the side hems (not a surprise, really, when you think of how I did the seam 3 times and was pretty frustrated by the time I was done) to the point where it was bunching to be even shorter. I also found a few holes on the sides that were probably made during my side seam-ripping fest. I think I may re-visit this refashion when summer gets a bit closer. If I wear it as is (it is really comfortable!) then I will leave it as is and fix the holes and re-sew the weird side. If I don't feel comfortable wearing it as is, I'm going to chop it off at the waist and make it a pretty flowy blouse.

Win-win? We shall see.

Wednesday, March 13, 2013

Pillowcase for a Cause

** BREAKING NEWS** Regular blog post day has come upon us. I have made the decision that Thursday nights will be THE. NIGHT. for new blog posts. Check back every Thursday for a fantastic new redo, remake and/or refashion! Now back to our regular programming...

Sad news - no before pictures today! But there is a reason for that: I'm sewing for a cause tonight. I stumbled upon this site that had a charity drive of pillowcase dresses going on. I'm all for charity - I used to volunteer lots and lots of my time when I had lots and lots of time to spare - so I figured one that crossed charity and sewing just absolutely had my name on it. Basically, this little girl and her mother help out Uganda's children effected by the war as much as they can. On this next trip to Uganda, this girl is collecting pillowcase dresses for both the little girls that she has sponsored, as well as the other little girls in the villages in which she visits. This girl is pretty amazing to have suchy a caring outlook on a world that isn't always a fantastic place. Kudos, child, kudos.

After reading about her mission, I went right out and bought some cheap pillowcases at the dollar store and some ribbon on sale at Joanne's. There are a lot of tutorials online for pillowcase dresses so I wanted to do the first one at low-cost in order to really get the hang of it.. I picked up some pillowcases that were in "micro jersey" and knew that jersey was stretchy i.e. the perfect fabric to stretch and move with active little girls. Well, it turns out my idea of "micro jersey" and the manufacturers version of "micro jersey" are very different because this fabric was very thin and very see through. Unless this dress was going to be for a girl who participates in corner-like activities, this was not something I was sending to Uganda. I decided I'd use it as a template, see how it's put together and figure out the measurements.

First up, I cut off the end of the pillowcase that was closed shut to make a large tube.


Next, I measured the u-shape for the arms. Not having kids myself, I had no way of measuring, so I just kind of guessed. Turns out, I guessed wayy too big. I did the armhole 4" across and 5" down. It probably should have been 2" across and about 4" down. I'll know for next time. I then folded it in half and cut the u-shape through all four pieces, making sure they were all even.

Okay, I lied. I actually didn't do that, but that's how you should do it. I cut both sides separately before I remembered this little gem of advice, so when I actually did fold it in half, it was way uneven and I ended up having to cut it all again.


I then pinned a hem on both the u-shapes, the front and back panel, and sewed it up.

Okay, I lied again. I knew this was practice so I didn't create a hem on the front and back panel. Again, though, this is something you should do.

Action shot!
 
You may be asking "why the heck is she using black thread?" And that is a fantastic question. In all honesty, I did it because that was the thread/bobbin that was already in my machine. In the end of the project, it did actually make it easier to tell what I did for when I make future ones. Also, for the benefit of this blog - all the black stitching will show where I sewed in case you want to do one too and I've accidentally left out describing a step (or two).
 
For the front and back, I folded the top down into a casing a little larger than the thickness of my thread. In the below picture, you can see where the black thread is dark at the beginning and ends of my stitching - this is because I always backstitch a few (probably too many) stitches whenever I start. Unless it's a stitch that you want to break, it's always a good idea to backstitch each time. Otherwise, you'll have some unintentional poppage going on somewhere.
 
Then I took my high-tech safety pin and put it on the end of my ribbon and brought it through the front casing. Repeat on the back side.
 

If it wasn't see-through, the measurements that I ended up doing would actually be a pretty nice summer shirt for me. Alas - it is see through so you'll just have to look at good ol' Sophie sporting it.

 
So that is my own little how-to on pillowcase dresses. I do hope I've inspired you to go to the website, check out the cause, and get involved. It is fantastic practice for other sewists (not sewers... never sewers) like me, and surprisingly quick and easy to do. I definitely plan on doing more and sending them to Mallory to bring to Uganda for the little girls. I'll be sure to photograph the final package!
 
See you next Thursday!

Tuesday, March 12, 2013

Spice Rack Labels

So I have a confession - this post has nothing to do with sewing. My last problem-solving post created an itch - an itch to solve all my problems on the cheap. What problem did this bring me to? My spice rack. I became the new owner of this old spice rack about 3 years ago. I was moving into the apartment and I thought it would make me look like a real chef right there on my counter for the world to see.

The problem? I never used it. It still had the old spices from the first owner, half the bottles didn't have labels, and most of the spices didn't actually come out of the bottles becasue they either created moisture and were stuck in there... or they were just too old to move. I searched and searched for labels that would fit the tops to no avail. So, this spice rack just followed me around from the apartment to the house, sitting uselessly on the counter.


Along my Pintrest travels - I came up with an idea. Chalkboard paint! I've been craving to use chalkboard paint for a long time. Pictures of grocery lists and cute, changeable sayings on my walls floated in my brain. Finally... I had a chance to put this in motion.

I went to Lowe's and the smallest container of chalkboard paint I could find was a quart. A quart was way more than I needed, so I guess I'll just have to use the rest of it for something else... oh darn *cue the sly smile*. This sucker was very specific on its needs - it needed to be painted on metal or wood with a brush of polyester bristles. So there I was, in Lowe's, staring at too large 2" brushes, none of which were screaming "I'm polyester!", with full intentions of painting my plastic tops. We're off to a great start.
As I'm pretty much on a first name basis with Joanne and her fabrics, I went there to see what could happen in the craft aisle in the way of brushes. After my sheer astonishment at the prices of single paint brushes wore away, I finally picked up a $3 dollar nylon brush. I had a 40% coupon so I didn't pay too much... and I was done with trying to find polyester. I figured nylon and polyester were both clothing fabrics, so they must work the same good enough.

First up, I removed all the tops and cleaned them off. I also removed the labels of the few that had labels left with some hot water. There was a bit of glue left over on the tops but no big chunks that the naked eye could see. I then set up shop in my dining room, as the weather was absolutely gorgeous for New York in March (in the 60's!) and the windows in this room are huge. It's kind of like being outside.
I then made sure to throw out all the old spices and wash the small glass jars as well. I did this bartender style - set up one sink of hot, soapy water and the other with a rinse and then just shook the hell out of the jars in each sink. Worked out pretty well, and didn't leave a residue. Too bad this doesn't work on the rest of my dishes.


I then painted all the tops with the chalkboard paint. I didn't do the sides because I wanted to keep those as my gripping areas. It took quite a few coats to get it the pure black that I was looking for and not seeing any white plastic show through. Don't worry, I wasn't bored waiting for the paint to dry (3 times). Extreme Couponer's on TV kept me company. Man, I'm way impressed with that show.

Once I had all the coats on, I noticed that I wasn't exactly "neat" when I painted the tops. There were globs of paint going all down the sides. I then turned to my craft room. Realizing I didn't have any small ribbon to line the sides, I did notice that I had plenty of washi tape leftover from our wedding that I had full intentions on using but never actually did. They fit the sides perfectly! I lined the sides with the tape, went around twice because it was see through, and called it a day.

I was pretty impressed with how it all turned out. I think sometime in the future I may replace the washi tape with some actual ribbon - even going around the top twice you can still see the drips, drops and globs of paint on the side.

At this point, I realized that I needed some chalk in order to actually fill the jars and know what is in them. So, back to my craft room I went. The only chalk I could find was the chalk that I use to mark cut marks on clothing, which is short and fat - but I rolled with it. My writing could certainly be neater, and I'll have to invest in a chalk pen with a finer tip but, all in all, it's slightly legible and certainly serves its purpose for now.


Next up - I promise some sewing refashions from something really ugly from the thrift shop!

Thursday, February 28, 2013

Make-Up Mess

I bring you today an off-weekend post. Surprise! Recently, my bottom had an unfortunate "how do you do" with the pavement of my driveway (darn black ice!) so I'm taking it a bit easy this week. Luckily, "taking it easy" is synonymous with "more time to post projects".

For this project, I've decided to problem solve. What is the problem, you ask? For that answer, I have to take you into my bathroom...


This is the issue. This sandwich lunch baggie has been the holder of the make-up for just about 4 years. It started at the end of college, while I was packing up. That was December 2008. It followed me through the renting of my first apartment, my first lay off, my first live-in boyfriend, a year and a half engagement, our first house, our wedding, our honeymoon - I think you get the picture. This sucker has held right on there. However, now that I'm a mature adult (stop laughing) I think it's time to up the ante on my make up bag.

On that note... there's no way in heck I'm spending more than a few dollars on a make-up bag. I barely spend a few dollars on the make-up that goes inside, so there is no way I'm investing more than $5 dollars on the bag to hold them. This is obviously the thinking that lead me to the sandwich baggie in the first place.

So in my cheapness, I looked around to see where I could find a cheap bag. My first stop was Macy's - they're always giving out free crap with purchase, most of which is in a flowery bag. I went, I looked, I remained unimpressed. I was being cheap here, so I wasn't going to buy some sub-par bronzer for 29.95 just to get a free bag. That sort of defeats my purpose. So this brought me to WalMart, as all cheap thoughts tend to do. Even at WalMart the bags were 10-20 dollars or more.

What was a girl to do? Then it hit me... DUH! I make cheap clothes all the time, I'm sure I had something in my refashion closet that could be some sort of bag. Voila! I found... this.


This dress wasn't too bad... up top. The tank top cut was pretty cute. However - it was a stretchy, form fitting fabric that made me feel like a sausage. And not only that... it was see-through (I have sweatpants and a tank top underneath this so it doesn't look see through in the picture, thankfully). To sum it up - it was a hoe dress.

I decided to fold it sideways, along the back zipper, and cut out (through both sides of fabric and right through the zipper) a rectangular piece. Unfortunately, my phone decided to delete all my pictures that I took of this process, but it wasn't really all that exciting. You just kind of chop it up into a semi-straight line. Then I sewed around the three open edges. I also sewed right through the zipper where I had cut it, so that the zipper pull had a place to stop. The most important thing I learned was to do this inside out... I didn't the first time. The second go-round though, I had it all set. So I sewed up the three sides and through the zipper (again), and turned the whole thing right-side out.

... and holy crap on a cracker it worked! I had myself a new make-up bag with a zip top! Check it!


Pay no attention to the "semi" rectangular shape that it ended up in. Apparently my "just wing it" cutting process wasn't exactly as perfect as I thought it was. I did have a small fleeting thought that I didn't put some sort of liner on it. Then I realized - it's totally washable! Any sort of spill or mark that I get on it, I will just follow the washing instructions on the tag of the dress! Thankfully, it's machine washable... not that I actually pay attention to that all the time. Hand wash? That means gentle cycle... right?
 
Are you wondering what it cost me yet? It cost me a whopping 25 cents. The dress was one of the garments I picked up at the "Fill a bag for $3" thrift store. Score!
 

Sunday, February 24, 2013

Aimin' to Please

Some pretty fantastic things have been happening lately. Most recently, one of my projects just managed to win a Top 5 spot on a popular refashion blog :) This was a pretty proud moment for me, as I never anticipated being anywhere near the top 5. It was a "Link Party", which basically means that you post one of your blog posts on their website and people can check it out. I submitted my own, so I can't say they "chose" me... but I did have one of the Top 5 clicked links, so I'm gonna go ahead and call it a win. You can check it out here.

Secondly, I totally got some major props lately. First off, I should say that my parents are always always always supportive and they tell me all the time how much they enjoy reading the blog. During one of the conversations, my mother brought up the question "why do you always chop off the arms?". My initial answer to her was that I do that because I don't know how to do arms and they're hard to do. As we hung up, I realized it was a cop out - I started this blog for practice, so what am I doing saying "I can't"? The other props that I got was from one of my high school friends. She had some pretty fantastic things to say about my blog that made me smile. She also had some pretty fantastic critique that ran around the lines of "your mirror pictures are horrible!" And I totally, fully agree. These mirror-pictures were pretty bad, but I didn't want to take the time to get out my real camera with the self timer, transfer it to my computer, blah blah blah. This lead to my second "what am I doing by saying 'I can't'?" Now, you may be asking - why do I like people saying negative things? That's because it's not negative - it's constructive critism and tells me that people care about my blog enough to tell me how I can make it better. It's totally welcome (and encouraged) by anyone! So... here I am taking my criticism and hopefully turning them into good things for the future of this blog. Ya know, becasue my goal is to quit my job and do this all day, everyday. HA!

Hey there, self timer.

This one was a cotton black dress with an awkward length, long sleeves and gold details at the neck and around the arms. My initial idea when I bought it was to chop off the sleeves (surprise!) and to shorten it up into the infamous "Little Black Dress". However, keeping my mothers's critique in mind, I decided I was definitely going to keep the sleeves.

... just not the full length that they were.
 
I chopped off about 6inches of the arm to make it a 3/4 sleeve. I pinned it up and sewed it up - and I was right, arms suck. It's just such a little opening to go through a machine! I did manage it though. It wasn't straight, and I swore quite a few times at my pins getting all stuck up on each other, but it happened and the arms have a new hem. Althought it's not straight, the 3/4 sleeve wrinkles a bit at my elbow so it's not obnoxiously obvious. I think.

Also, I found out what I was doing wrong with my bobbins. I downloaded a new app on my phone called Craftsy that had a troubleshooting video of machines. Come to find out, I had been putting my bobbin in all wrong - and when it was right and I didn't have issues, it was by complete mistake luck of the draw. Turns out, it has everything to do with "minding your p's and q's".

 
This is the "q". This is how I need to put my bobbin into my bobbin case (because mine is underneath). If I had a fancy drop in bobbin, I would flip it around so it looks like a "p". I often put my bobbin in in a "p" position and that is when I got the clunking, the uneven stitches, and my bobbin falling out. Good thing it only took my 5 months to get this down....
 
Initially, I wanted this dress to be one of those high-low hems that you see in fashion nowadays. I figured for my short stature, keeping it higher (read: knee length) in the front and lower in the back would make me look taller. I pinned up the front a few inches, as such...


Truthfully, I'm so glad that I tried it on before I sewed this up. This looked HORRIBLE. It made the front pucker out a bit in a "she's pregnant" kind of way. Not what I'm going for. So I unpinned it and just did a regular ol' hem, bringing the hem up about 3 inches so the original awkward length would hit me just above the knee.
 
 Once I tried it on, I felt like it needed something else. I didn't want to get rid of the gold details, so I knew the neckline had to stay. The dress already had elastic at the waist to bring it in, so it didn't need a belt. I couldn't figure out what it needed. Until I turned it around. The gold detailing went around the back of the neck, but usually when I wear dresses I wear my hair down, so it wouldn't be noticed anyway. Images of all those fantastic deep-v backs that are often seen at Grammy and Oscar award dresses kept on flying into my head. So - it was decided - I was going deep-v in the back. Well, maybe not that deep of a V. I didn't want to get too racy. And I wanted to still wear a bra, and that certainly couldn't show. Okay so maybe a slightly-deep-v back. (That was literally the entire internal conversation with myself.) So I had my husband pin the back of the dress while I was wearing it to about 1/4 inch above where my bra sits on my back. I then measured to the middle of the back, and used chalk to draw a line from the top all the way down to the pin that my husband put in for me.
 
 
I then got out my handy scissors and slit that baby into a slightly-deep-v neck. I pinned the corners down and sewed it up.
 
Here's the final result:
 
This was also a self-timer fail, because I had the camera in the wrong place and cut my head off. But the dress was shown pretty well - so I rolled with it.
 
 
This is my attempt at doing the 3/4 turn, look over your shoulder pose of the aforementioned Oscar/Grammy stars. This attempt is pretty much a a fail too, but at least you see my back slightly-deep-v result.
 
I also do have to mention, I couldn't resist doing a mirror picture. I just could not get the camera set up well enough to show everyone how I jacked this up. These are both accessories that I bought that I had NO idea what to wear them with. They were cute, therefore they were an impulse buy that had to be mine. Lo and behold - I've created a dress that puts a use to both:
Gold shoes and a gold asian-printed clutch? Too good to be true!
 
I have also discovered something else about this dress. *Parents and Children*: Avert your eyes now.
 
It totally is two dresses in one! If I'm feeling risky (and have a good amount of double sided tape) I can flip the dress around and have something a bit more... flirty.
 
And... done. I didn't chop off the arms, and I didn't take mirror pictures. Well, I took one... but it was really necessary to show you the shoes and the bag. Really necessary.


Wednesday, February 13, 2013

V-Day Victory

...loosely named, of course. As always, don't look too close to the seams. So here's the beginning:

 
Not gonna lie. This was a nightgown. There's something about (irony maybe) taking a picture of myself in a nightgown while wearing my own pj's underneath. It's certainly a generational experience, that's for sure. This fabric was "well loved". It was faded, thin and very see-through. I am also pretty sure that it was handmade - the stitches were obviously hand sewn, and after trying to sew the fabric myself I can certainly tell why.
 
First thing I did was try to take out the bib in the front. My original intention was to take the bib out and leave the lace - I'm a sucker for lace. I don't know if I just wasn't paying attention (likely), or if the bib and the lace were just not feeling the garment anymore, but when I started seam ripping the entire front panel fell off the back. If not for the side seams, the whole nightgown would have fallen into 2 pieces.


So this is when I had my "make it work" Tim moment (yes, I have been watching Project Runway). I looked down and saw myself wearing one of my favorite shirts - a basic from H&M. So, I took off my shirt, plopped it on the nightgown and used it as a pattern.


I pinned up the sides and took it in. This was mess-up numero dos: I didn't take into consideration that the H&M shirt was made out of stretchy fabric and the nightgown fabric was definitely not. Therefore... it was very very tight. To fix this issue, I chopped off the bottom so it was no longer a dress. I tried on the new shirt/nightgown, and it was still a bit tight, but I knew I could fix it when I was hemming it up.

So then I still had the problem of the top of the front of the shirt being completely separate from the top of the back of the shirt. This was my second "make it work" moment. I ended up taking the extra fabric from the side seams that I cut off and measured how long I had to make them to make them into straps. I then put right sides of the fabric together, sewed up the seam and turned it inside out to make "tubes". I then sewed the tubes to the front and the back of the shirt to create straps. It was by no means even... but it worked and at least now I had something resembling a full shirt.

 
Then I got to the problem of having to hem all of my raw edges. So far, every time I've sewn this fabric it has bunched like crazy. This shirt was small enough that I certainly didn't need any more "bunching" going on. More bunching would have made a shirt more in the size of my thirteen year old niece rather than myself. So what did I do? I turned to my good old Liquid Stitch a la this post. I "stitched" all the raw edges on the back, the arms and the front, and then I "stitched" the entire bottom hem as well. My hands were stark white and sticky as hell when I was finished. I also remembered why I was not all that partial to Liquid Stitch before - it creates a very stiff hem. The shirt no longer "swayed" as a normal cotton fabric would. I'm hoping after the mandatory 24 hour drying period, it'll have a bit more movement to it.
 
I also should mention, when I put on the straps, I decided to keep a bit of fabric in between the straps in the front to create a type of cowl neck. I was hoping it would drape down a bit and show off the cami's that I always wear under my shirts (which often include lace) so I thought this would be very pretty. Between the Liquid Stitch and the too-little amount of fabric that I left in between the straps, that baby was by no means draping and definitely had no resemblance of a cowl neck. See for yourself:


So it wasn't horrible - but it sure wasn't awesome. And the fact that my husband straight up laughed at me when I showed him didn't quite boost my confidence. So in a "quick fix" method, I cut from the neck down about 2 inches, "Liquid Stitched" it down and created my go-to v-neck. After I did this - the whole shirt was WAY better.


So here's the final product. My plan is to wear this to work with a pink sweater on top for Valentine's Day tomorrow. We don't have many plans - and I'm extremely okay with that - so it'll be nice and festive and I won't have to do much else. Plans = solidified.
 
What Did I Learn: 1) Stop buying thin fabrics. I always think the Liquid Stitch is a good idea - and I never turn out to be right. 2) Leave myself a seam allowance and stop getting antsy with the scissors. Or at least try it on before I start chopping out excess fabric. 3. I definitely bought the wrong bobbins. When I use the ones that come with my machine I have absolutely no problem. When I tried to use the bobbins that I bought... horror. Thread went everywhere, the bobbin kept on falling out of it's little case, and it only puts about half the amount of thread on the bobbin when I thread it (is that what that's called?) I'll have to make another trip to Joann's... and I'll probably have to drag that damn instruction manual along.
 
Happy Valentine's Day, friends!

Monday, February 11, 2013

Lake Placid Surprises

Forgot to tell everyone the fantasticness that was 2 weekends ago! We went to Lake Placid for a long weekend. It was a pretty fantastic mini-vacation and VERY much needed. Despite the way below freezing temperatures (we woke up to -18!) we had a great time exploring the town and checking out the fantastic Olympic Center. Although we didn't go into the Olympic Museum because our cheap butts didn't want to fork out $6, we did check out all three of the huge ice skating rinks. It was pretty fantastic. The shopping was great as well - there were some very cute things going on in those shops. Plus, they had heat. That was a major bonus when you're hanging out in 2* weather.

So I just wanted to show off post my pictures of some of our weekend. First up - this is what I woke up to every morning :) And yes, this is literally what I woke up to because those windows right there? They didn't have curtains. Why hello there, sunrise.


Also while in town, we went to a local brewery. Ever since my husband and his friends and family began home-brewing, I have been very interested in craft beers. Read this as "interested" - not necessarily as "like". Some of them are pretty nasty. Although I know this fact, that will not stop me from trying any and all craft beer available. Therefore, when I saw this tester... I knew it was mine.

One of my favorite parts of this tester (apart from that bottom middle one... that was tasty!) is the serving platter. It was a slice of tree with nester circles for the glasses. Tres cool, in my opinion.

Finally - and I'm sure you're asking - what does this have to do with my blog? Well, faithful readers, I found something in our room that I could not help but get really giddy and excited about. I found this beauty:

Sorry about this picture, it was hard to get the inside picture just right and it won't rotate... use your imagination.

I found an old Singer! I didn't want to play with it too much as I'm more than a little accident prone, but the entire thing is a very sturdy steel - bobbins and everything. Nothing on this baby was plastic. I quite literally jumped in surprise and squeeled in excitement when I figured out what this thing was! My husband just thought it was a plain ol' desk, but as soon as I saw the old foot pedal, I knew it was way more special than that!

I'm going to go ahead and take this as a sign that sewing is something that is just meant for me. I may not be great at it, and things may not turn out well, but boy does the machine follow me around!

If any of you recongnize the model, know the year, or know that I'm getting any of this information wrong - please let me know in the comments!

Saturday, February 2, 2013

P-P-P-Polka Dots!

This has been one of my favorite projects. It's also the one that took the longest and that I put the most work into. I could get all philosophical and think about what that implies... but umm... let's move on.
 
I've been pretty excited about this one since I saw this beauty in the thrift store:
Yesss....
 
I've said it before and I'll certainly say it again - I've had a huge crush on polka dots, especially in these colors. I saw the beauty in this, but everyone who I've showed this dress to has asked, in one way or another "what were you thinking?!" The mentions of nightgowns, bedspreads and horrid pillows did not sway me into changing my mind - this was gonna. be. awesome. I think.
 
First thing I did was take away some of that fabric. This had to have had about 3 yards of fabric in it. Not only did it have a built in bib and neck ruffles, a long skirt, and long arms with even more ruffles, it also had a lot of extraneous fabric on the inside.
 
All that right there? Cut that shit out!
 
I was not 100% sure why they left all the fabric on the inside; my only (and best) guess was that they wanted to keep this fantastic dress around for the long run and wanted the full opportunity to take it out later, essentially allowing the dress to "grow with the owner".  First thing I did was cut out the bib, seam rip the sleeves, and cut out all the extraneous inside fabric. I also cut off about a foot of the bottom of the dress. I had quite the pile of junk fabric going on in my living room.
 
Whole lotta fabric.
 
After removing all the extra fabric, I tried on the dress. At this point, it was already better so I sighed a breath of relief knowing that I haven't royally failed yet. Happy dance ensued.
 
At this point, I took the sides in about an inch. After I tried it on again, I noticed that the armholes of the dress were a bit weird and right underneath my arms there was a HUGE gap. So - I improvised. I'm a bit ashamed that I just (how do you say "wing it" eloquently?) threw it together, but I ended up sewing a triangle shape from the seam into my armpit so it would "cut in". Not sure if this is how the pro's do it, or even if that's the verbiage they would use to describe it, but it did work. And yes - a second happy dance ensued.
 
Takin' it in, choppin' off the excess.
 
Once I had the armpit situation under control, I tucked in the arms all the way around and pinned it down. Armholes kind of tick me off because they are actually really hard. I read somewhere (probably one of the blogs that I stalk) that if you make small slits on the armholes you can manipulate the fabric a bit better in order to make a better armhole that doesn't pucker. I made slits. Did it help? Meh. They still ticked me off, but they got done, and they're pretty much even - considering I didn't measure or anything.
 
Then it came to the neck - I debated for a good 10 minutes on the ruffles. I wasn't sure if I should tuck them all in and sew them down, leave it half in/half out, or just keep the ruffles the way they were. I asked my husband about 14 times, explaining to him that I wasn't sure if taking them off would lose the integrity of the original design. He so eloquently replied "the polka dots are the integrity of that monstrosity". Realizing that he was right (but not telling him - I'm not crazy) I decided that I would leave it half-in/half out. I tucked in the ruffles from the shoulder around to the back of the neck and sewed them down. If the ruffles on the chest bother me too much, I can always tuck in the rest of the ruffles later. 'Cause I know how. Boom.
 
So how did it end up? You tell me. Because I'm actually pretty dang proud of it!


Proud.
 
Of course I had to jack it up.
 
Personally, I like it all jacked up. I think that the red belt is certainly breaking up the dots. I also like that it is removable, so I could always accent it with different colored belts or even just a white  belt if I want to wear some fantastic stand-out shoes or something.
 
What did I learn? First off, I learned that I don't have to go crazy with the measuring and planning, although the copious amount of pins is still necessary. The bottom of the dress I just chopped off by following the original hem of the dress. The armholes I didn't measure either - I just did a "fold and go" method but everything seemed to come out okay. Additionally, I learned to pay attention to all the tidbits that I've learned from reading other blogs. I did make a rookie mistake on this one but luckily it worked out okay. The general rule is to bring in the sides of a dress before chopping off the bottom. Taking in the sides makes it shorter, so if you chop off the bottom first and then do the sides, you tend to get into a "hooch" look. Luckily, the way I chopped off the bottom the first time it was still too long, so when I took it in on the sides, it brought it up but kept it at an appropriate length.
 
So that's it ya'll. And you betchya that I will be wearing this to work on s Monday that's not too cold and snowy!


Wednesday, January 30, 2013

Alive, Awake, Alert, Enthusiastic

This post title was inspired by one of the most annoying, and most beloved, HOBY (Hugh O'Brien Youth Foundation) morning - anywhere from 6am-7am - wake-up songs.

So... there are a few things I haven't done in quite a while:

1. Sew
2. Blog
3. Sleep
4. Breathe out of my nose and clear lungs

In all honesty, number 4 is the one that is hindering the first three activities. The *dun dun dun* cold has remained and apparently it's taken up a long-term residency. I haven't gotten to any projects, as I mostly come straight home from work and plop on the couch and take DayQuil, then NyQuil when it's an appropriate time to go to bed (around, oh, 9:00pm - that's totally normal, right? Right?!)

I have, at least, gotten to the bottom of the cause of this cold. Recently at work I was given a new floor to audit - I work in a local nursing home. That same floor that I was given to audit recently got closed due to a "severe respiratory illness" that is averaging about 3 weeks to recover from. Mystery solved on that one. Oh the joys of working in healthcare... Anywho, everyone on the floor was tested for flu and tested negative - so thankfully, I can pretty much assume that I do not have the flu as well. That, in small favors, is called "lucky".

With the average recovery time going about 3 weeks, I'm a good halfway through it. I'm hoping to speed through the next half of this cold and get back to sewing, blogging and sleeping as per usual. As soon as "normal" happens, I promise you will get a project. In the meantime - just know that I'm still alive and awake, and currently working like a champ on the alert and enthusiastic parts.

Monday, January 21, 2013

Skirtin' the Sickness

So this weekend I had tons of plans that got side-railed by *dun dun dun* a cold. It started on Friday and has yet to get it's butt kicked by a healthy dosage of DayQuil and NyQuil. It's quite the fighter and it has chosen to stick around. So here I am: on a sick day, on a Monday, sittin' on my couch blogging. I live a crazy, crazy life.

Last night, I finally felt a little better (by better I mean I finally got out of bed) so I decided to try some sewing. I took a mens shirt that I had picked up on my trip to the thrift store in Oswego that had an "everything you can fit in a bag for $3" sale. I crammed a lot of stuff in that bag, so I picked up this shirt for about 25 cents. At this price,even if my sniveling, sneezing butt messed it up it wasn't exactly a what I would call a "loss".

Sophie will be kind enough to model the shirt, as I was by no means going to take a picture of myself in this sickly state. I make no apologies because really, I'm doing your eyes a favor.


The SAS logo really hindered my use of anything up top, so I decided to go ahead and chop it off at the armpits, as such.


I really adored the pattern and the fabric was stretchy, warm and pretty fantastic. Being that the bottom of the shirt was uneven - the front was shorter than the back - I cut off the back hem and flipped the shit upside down. I then cut about 1 inch off the side to make it more fitted. I then sewed my top hem about 1 1/4 inch down, in order to make room for the elastic. I used the safety pin trick to weave the elastic into the top hem. Then I attempted to sew the two ends of elastic together.

At this point, disaster struck. My bobbin on my machine kept falling out of its little bobbin hole thing and the thread kept on breaking. I had no idea what was happening, so like a rational adult I had a straight up hissy fit and yelled "I quit", called it a night and went back to bed.

Today, I came back to it. I looked at the bobbins that I bought and realized that I had bought the wrong ones. I'm not even entirely sure if this is why I had all the problems last night - it's a toss up between that and my machine being totally dirty/dusty - but I decided I did not want to go through all that again. Besides, I started this blog for practice, so I saw it as an opportunity to practice my hand sewn blind stitch. I actually got this right on the first try and it looked pretty good. I couldn't muster up the energy for my usual happy dance when things go right, so I just settled on a sip of orange juice and a snotty "hell yes".

A half hour later or so, I ended up with this - again, modeled by Sophie.


And of course, I had to style her up.


This shirt is a lace shirt that I bought at the Salvation Army. I had full intentions on it being my first dye project, but I think I like it too much to play with it. At $1.25, there was no real "lose" situation whether it remained un-dyed or if it gets dyed.

Sorry of this post is a bit boring... my sick brain isn't quite so "on top" of the usual sarcasm and witty quips. I'll be better in the next post, when I'm all healthy and stuff.